| | |
Warning: This infobox is missing the following parameters: unit2, unit1
- "General Grievous, you have defeated me and taken control of my ship, congratulations. However, if you're watching this message that means I'm boarding an escape pod and will soon be safely away from the ship, which is about to self-destruct."
- ―Obi-Wan Kenobi, in a holographic transmission left for General Grievous
General Grievous of the Confederacy of Independent Systems attacked a Republic Navy fleet under the command of his longtime enemy, High Jedi General Obi-Wan Kenobi, in the third year of the Clone Wars. Launching a surprise assault on Kenobi's three-cruiser fleet in space, Grievous's armada gained a swift advantage, with the Confederate Navy battleships and droid starfighters summarily eliminating the Republic Star Destroyers and their outmatched starfighter squadrons. When Grievous arrived with a boarding party of battle droids aboard the Star Destroyer Negotiator, Kenobi mounted a defense of his flagship's main hangar with Marshal Commander CC-2224, nicknamed "Cody," and their clone troopers from the 212th Attack Battalion. Yet Kenobi was unable to defeat Grievous in lightsaber combat and ordered all troop personnel to evacuate from the Negotiator, which he conceded to Grievous's control.
Before jettisoning from the Negotiator aboard escape pods with Commander Cody and their men, Kenobi activated his crippled flagship's self-destruct sequence, forcing Grievous to abandon the ship aboard a shuttle before he could plunder the military intelligence stored in its computer databanks. The destruction of Kenobi's fleet prevented him from sending Cody to aid Jedi Padawan Ahsoka Tano, who had been captured by Captain Hondo Ohnaka and his pirates while overseeing a training mission with a class of Jedi Initiates.
Prelude
- "Their coordinates put them dangerously close to Florrum. I do not want them getting any ideas. You will need to leave quickly, Cody."
"Sir, enemy fleet's coming out of hyperspace!"
"Battle stations! Launch all fighters! Cody, looks like you're staying here for now." - ―Obi-Wan Kenobi and a clone naval officer

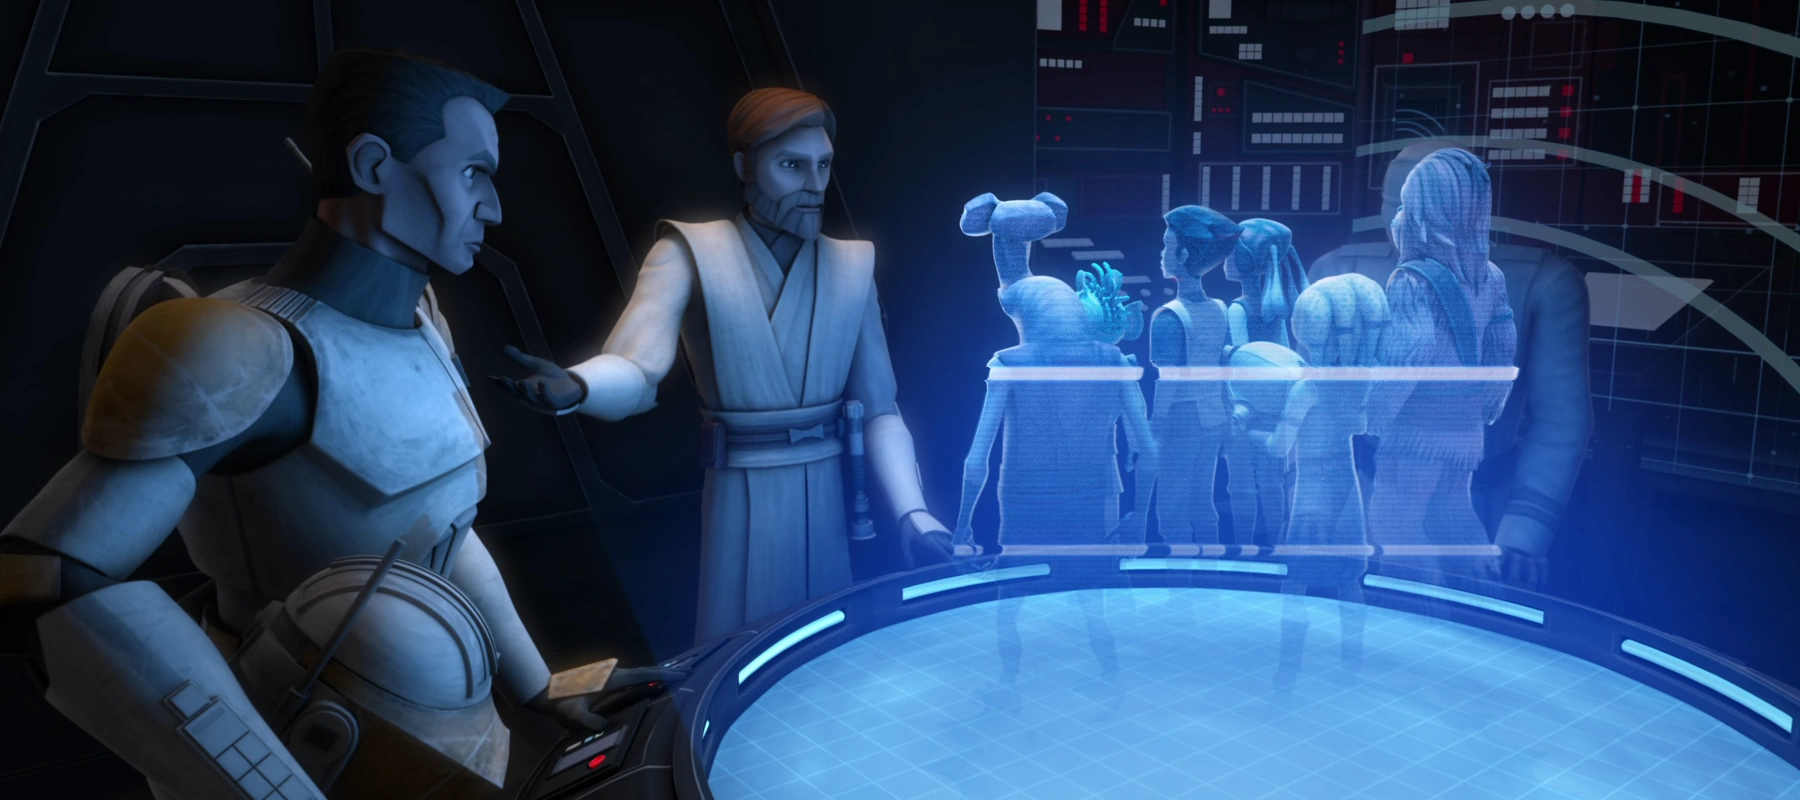
Kenobi prepares to dispatch Cody to rescue the Jedi Initiates aboard the Crucible.
In 20 BBY, the third year of the Clone Wars,[4] High Jedi General Obi-Wan Kenobi was out on patrol with a Republic Navy fleet of three Venator-class Star Destroyers when[3] his flagship, the Negotiator,[5] was hailed by the Jedi training cruiser Crucible. Kenobi learned from the Jedi Initiate Katooni—who spoke for her fellow Jedi-in-training, Petro, Byph, Gungi, Ganodi, and Zatt—that their ship had been raided by Captain Hondo Ohnaka and his gang of pirates, who had attempted to steal their valuable supply of lightsaber crystals from Ilum. Having failed to pilfer the crystals, Ohnaka had instead captured the younglings' chaperone, Padawan Ahsoka Tano, to sell her for profit. The damaged Crucible had subsequently been stranded near the planet Florrum, the site of Ohnaka's base.[3]
With his task force being the only one in a position to respond,[6] Kenobi decided to send his clone marshal commander, CC-2224, to rescue the younglings and then mount a mission to save Tano. Before Commander CC-2224, nicknamed "Cody," could depart from the Negotiator, General Grievous of the Confederacy of Independent Systems launched a surprise attack[3] aimed at killing Kenobi, a longtime foe of his.[5] Kenobi's position in space consequently became the site of a fierce engagement with Grievous's opposing fleet from the Confederate Navy.[3]
The attack
- "This is General Kenobi. Abandon ship. Abandon ship."
"Sir, shouldn't we stay and fight? We can't lose the ship now."
"Cody, this ship is already lost. We must face it. You and I are going to give Grievous a little parting gift." - ―Obi-Wan Kenobi and Cody, deciding to activate the Negotiator's self-destruct sequence

Grievous leads a boarding party to the Negotiator just as another cruiser explodes.
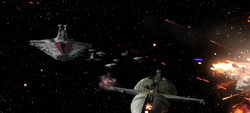
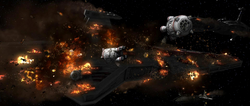
Grievous exited hyperspace with a fleet comprising two Providence-class carrier/destroyers, a Recusant-class light destroyer, and three Munificent-class star frigates. While all six Warships bore down on Kenobi's Star Destroyers and hammered out turbolaser fire, the frigates launched squadrons of Vulture droid starfighters to do battle with the Republic naval forces. When a bridge officer reported the Separatists' arrival, Kenobi immediately ordered his clone naval officer crew and his clone troopers from the 212th Attack Battalion to their battle stations, deploying the entirety of his task force's starfighter complement against the Separatists. BTL-B Y-wing starfighters and clone Z-95 starfighters engaged the Vulture droids in starfighter combat, with dogfights breaking out around the larger warships. One of the clone trooper pilots,[3] "Killer,"[5] shot down a pursuant Vulture droid by cutting the engines of his Z-95 starfighter to maneuver behind the droid. Other clone pilots did not have as much success, with their starfighters being blasted apart by enemy units.[3]
While the Republic and Confederate destroyers fought ship-to-ship, the Republic task force also sent its escort cruisers—a pair each of Arquitens-class light cruisers and Consular-class cruisers—into the fray. Due to their smaller size, the light and escort cruisers were able to press forward to confront the Confederate battleships at a closer range. Although cruisers from both armadas sustained damage, Grievous's surprise attack quickly overwhelmed Kenobi and his flotilla, with ship after ship falling to the Separatists. The cyborg general pressed his all-out assault, setting out with a boarding party to confront the Jedi Master aboard the Negotiator. Upon learning of the inbound battle group from a naval officer, Kenobi ordered all of his embarked 212th troopers to the main hangar, where they would mount a defense to repel the battle droids. Grievous's Sheathipede-class transport shuttle was escorted to the Negotiator by droid tri-fighters, Hyena-class bombers, more Vulture droids, and HMP droid gunships, the latter of which transported the boarding squads of B1 battle droids and B2 super battle droids. The Vulture droids cleared a path by shooting down Killer's Z-95 starfighter and then the BTL-B Y-wing starfighter[3] of clone pilot "Engle,"[5] which crashed in the Negotiator's ventral hangar just as Kenobi arrived there with Cody and their men. Kenobi helped bring Engle to safety inside the magnetic shield, while astromech droids contained the blaze from the wreckage of his Y-wing starfighter.[3]
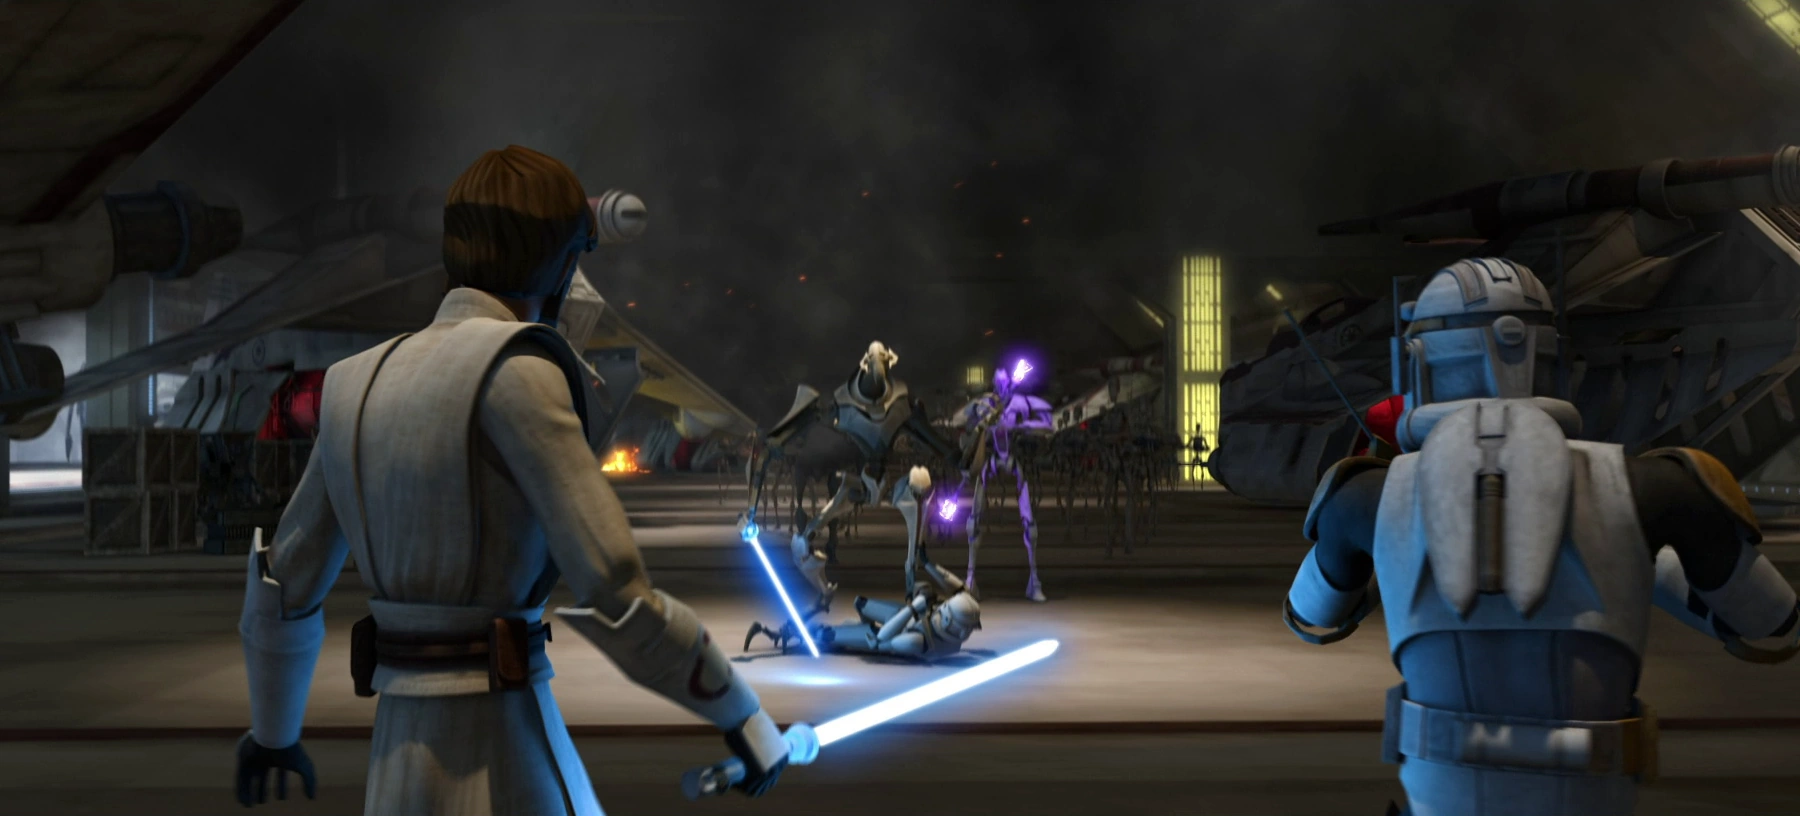
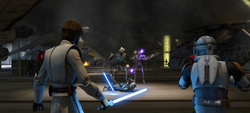
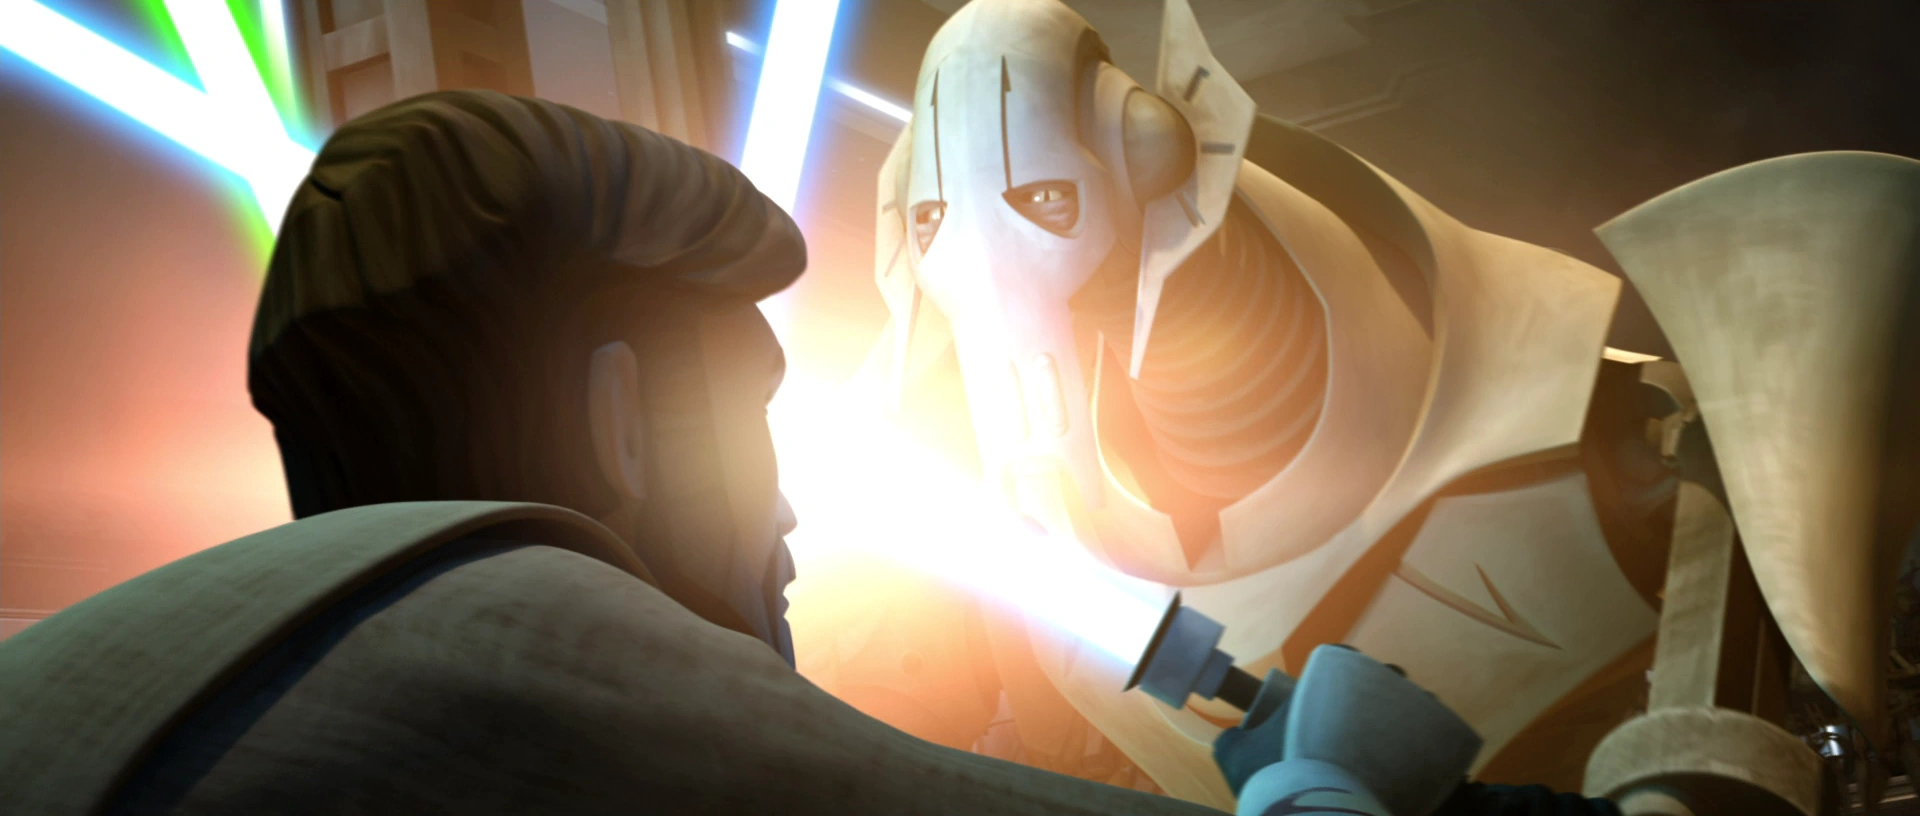
The 212th Attack Battalion was given little time to prepare its defenses, for four Vulture droids then landed in walking mode alongside the B1 and B2 battle droids, which followed Grievous and his two IG-100 MagnaGuard bodyguards into the Negotiator's hangar. A furious firefight erupted, with the 212th's only cover from the enemy droids being the LAAT/i gunships and various starfighters docked in the hangar. Members of the clone flight crew took up blasters alongside the 212th troops, who tried to push forward but were summarily overrun. As Kenobi and Cody entered the firefight, Grievous approached them from the other end of the hangar, butchering every single trooper in his path with his lightsabers and cybernetic limbs, while his IG-100 MagnaGuards additionally joined the fight. He and Kenobi met in the middle and began a lightsaber duel, fiercely engaging in a saberlock while the clones and droids continued to battle around them. After Grievous kicked him backward, Kenobi hit the side of an LAAT/i gunship, where Cody pointed out one of the craft's fuel barrels to him. Kenobi used the Force to hurl the barrel at Grievous, and Cody placed a blaster shot on the flying projectile, detonating it and temporarily hindering Grievous so that they could escape from the hangar.[3]
Grievous chokes a clone trooper before confronting Kenobi in lightsaber combat.
With the battle droids pursuing them into the interior hallways, Kenobi, recognizing that his flagship had fallen to the Separatists, ordered all personnel aboard the Negotiator to abandon ship. Before joining the rest of the survivors at the escape pod launch bay, Kenobi and Cody initiated their cruiser's self-destruct sequence as a "parting gift" for Grievous. By that time, the Negotiator and another Venator-class Star Destroyer were all that remained of Kenobi's fleet. Their crews continued to return fire at the Separatist armada, destroying one of the Munificent-class frigates, but their main DBY-827 turbolaser batteries were soon disabled by Vulture droid assaults. Aboard the Negotiator, a squad of B1 battle droids reached the bridge and eliminated the clone naval officers, securing the warship just as Grievous arrived with his IG-100 MagnaGuards. Grievous ordered the battle droids to scour the computer systems for military intelligence, but he hurriedly made for the hangar upon learning of the active self-destruct mode from a holographic message that Kenobi had left for him.[3]
Four escape pods jettisoned with Kenobi, Cody, and their remaining troops aboard at the same time that Grievous escaped from the Negotiator aboard his Sheathipede-class shuttle, mere seconds before the ship self-destructed. The obliteration of the Negotiator consumed the entirety of the boarding party that Grievous had brought aboard.[3]
Aftermath
- "I'm afraid the younglings are now on their own."
- ―Obi-Wan Kenobi, following the destruction of the Negotiator

Kenobi, Cody, and the other survivors jettison from the Negotiator in escape pods.
With the annihilation of Kenobi's task force, Grievous's assault resulted in a Confederate victory, though the Negotiator fell before the Separatists could gain access to the information stored in its databanks. The destruction of their fleet cut Kenobi and Cody off from the Jedi younglings, who were meanwhile forced to land the Crucible on Florrum on account of an engine problem. The Jedi Initiates launched a mission to rescue Ahsoka Tano, posing as performers in a circus troupe known as Preigo's Traveling World of Wonder so as to infiltrate Hondo Ohnaka's pirate base.[3]
With Kenobi's fleet decimated, Grievous moved in unopposed with his armada and seized control of the[7] Outer Rim Territories'[8] Florrum system,[7] which the Republic had held up until that point.[8] Confederate Head of State Count Dooku, having been previously captured and held for ransom by the Ohnaka Gang, ordered Grievous to launch an assault on Florrum in retribution for Ohnaka's actions. Although Grievous demolished the pirate base, Ohnaka and several of his pirates survived the attack with the aid of Tano and the Jedi Initiates, who banded together with them against Grievous, their common enemy. After escaping from Florrum, Ohnaka transported Tano and the six Initiates to Kenobi, who had transferred to his new flagship, another Venator-class Star Destroyer, with Cody and their surviving clone trooper crew.[7]
The loss of the Negotiator—along with other debacles like the following Carida Incident, in which all personnel at the Republic strategy conference were nearly killed due to a Separatist terror plot[9]—prompted critics of the Jedi Order, such as Admiral Wilhuff Tarkin of the Republic Navy, to further question the Jedi's capability as serving as commanders of the Grand Army of the Republic. Tarkin himself sent his misgivings directly to Supreme Chancellor Palpatine, lobbying for alternatives to Republic Military leadership being entrusted to the Jedi.[10]
Behind the scenes
- "It's always nice to see the battle between Obi-Wan and Grievous and how they end up. With this one, I think Grievous definitely leaves a mark that Obi-Wan's going to be feeling in the morning."
- ―Matthew Wood

The battle featured yet another encounter between old rivals Grievous and Kenobi.
The attack on Obi-Wan Kenobi's fleet was created for "Bound for Rescue," an episode in the fifth season of the Star Wars: The Clone Wars television series. Prior to the release of "Bound for Rescue" on November 17, 2012,[3] scenes from the battle were previewed in a trailer for the fifth season in June 2012.[11] As noted by Matthew Wood, the series' voice actor for General Grievous, the battle featured another encounter between longtime foes Grievous and Kenobi,[12] whose rivalry had been previously established throughout the series.[13][14][15] It also depicted the destruction of the Negotiator,[5] which had been created for the series as Kenobi's flagship.[16] A location for the battle has yet to be established, as "Bound for Rescue" did not specify one. Holocron continuity database manager Leland Chee has stated that it was far off "enough" from the Florrum system to the point that Kenobi intended to send Commander Cody to rescue the Jedi Initiates.[6]
At one point in "Bound for Rescue," a tactical hologram on the Negotiator's bridge shows that there are three Munificent-class star frigates in the Confederate fleet. This is inconsistent with the rest of the battle sequence, in which only two frigates are depicted.[3] This article assumes that the latter is correct.
Appearances
 Star Wars: The Clone Wars — "Bound for Rescue" (First appearance)
- Star Wars: The Clone Wars — "A Necessary Bond" (Indirect mention only)
Sources
- Watch "Star Wars: The Clone Wars Season 5 Trailer" on StarWars.com (backup link (watch/tcw_season5_trailer.html) not verified!) (First pictured)
- "Bound for Rescue" - The Clone Wars Episode Guide on StarWars.com (backup link (explore/the-clone-wars/ep508/#!/about) not verified!) (First mentioned)
- "A Necessary Bond" - The Clone Wars Episode Guide on StarWars.com (backup link (explore/the-clone-wars/ep509/#!/about) not verified!)
- Star Wars: The Clone Wars: Episode Guide
- Star Wars: The Clone Wars The Complete Season Five
- The Official Star Wars Fact File Part 10 (HMP1, HMP Droid Gunship)
- The Official Star Wars Fact File Part 18 (YWI2, Service History)
Notes and references
- ↑
 Star Wars: The Clone Wars — "A Test of Strength"
- ↑ Star Wars Character Encyclopedia
- ↑ 3.00 3.01 3.02 3.03 3.04 3.05 3.06 3.07 3.08 3.09 3.10 3.11 3.12 3.13 3.14 3.15 3.16 3.17 3.18 3.19 3.20 3.21 3.22 3.23 3.24 3.25 3.26 3.27 3.28 3.29 3.30 3.31 3.32 3.33 3.34 3.35 3.36 3.37 3.38 3.39 3.40 3.41 3.42 3.43 3.44 3.45 3.46 3.47 3.48 3.49 3.50 3.51 3.52 3.53 3.54 3.55 3.56 3.57 3.58 3.59 Star Wars: The Clone Wars — "Bound for Rescue"
- ↑ 4.0 4.1 The Official Star Wars Fact File Part 10 (HMP1, HMP Droid Gunship)
- ↑ 5.0 5.1 5.2 5.3 5.4 5.5 "Bound for Rescue" - The Clone Wars Episode Guide on StarWars.com (backup link (explore/the-clone-wars/ep508/#!/about) not verified!)
- ↑ 6.0 6.1 Leland Chee on Facebook
- ↑ 7.0 7.1 7.2 Star Wars: The Clone Wars — "A Necessary Bond"
- ↑ 8.0 8.1 Star Wars: The Clone Wars — "Revival"
- ↑ Star Wars: The Clone Wars — "Point of No Return"
- ↑ Star Wars: The Clone Wars on Facebook
- ↑ Watch "Star Wars: The Clone Wars Season 5 Trailer" on StarWars.com (backup link (watch/tcw_season5_trailer.html) not verified!)
- ↑ Watch "Machinations and Motivations: Being General Grievous" - The Clone Wars Episode Featurette #5.08 on StarWars.com (backup link (watch/bound-for-rescue-featurette.html) not verified!)
- ↑ Star Wars: The Clone Wars — "Destroy Malevolence"
- ↑ Star Wars: The Clone Wars — "Grievous Intrigue"
- ↑ Star Wars: The Clone Wars — "ARC Troopers"
- ↑ The Clone Wars Episode Guide: Rising Malevolence on StarWars.com (content now obsolete; backup link)