m (intro copy-edit) |
m (→Sources) |
||
| (39 intermediate revisions by 13 users not shown) | |||
| Line 1: | Line 1: | ||
| − | {{Eras|imp}} |
+ | {{Eras|imp|featured}} |
| − | {{FAnom}} |
||
{{Battle |
{{Battle |
||
|width= |
|width= |
||
| Line 9: | Line 8: | ||
|imageBG= |
|imageBG= |
||
|image=[[File:BattleofKhorm.jpg|300px]] |
|image=[[File:BattleofKhorm.jpg|300px]] |
||
| − | |conflict=[[Clone Wars]] |
+ | |conflict=[[Clone Wars]]<ref name="ISotR 1">''[[Star Wars: The Clone Wars 7: In Service of the Republic, Part 1]]''</ref> |
| − | |date=c. [[22 BBY]] |
+ | |date=c. [[22 BBY]]<ref name="ISotR 1" /> |
| − | |place=[[Khorm]] |
+ | |place=[[Khorm]]<ref name="ISotR 1" /> |
| − | |result=[[Galactic Republic]] victory |
+ | |result=[[Galactic Republic]] victory<ref name="ISotR 3">''[[Star Wars: The Clone Wars 9: In Service of the Republic, Part 3]]''</ref> |
|BG2= |
|BG2= |
||
| − | |side1=Galactic Republic |
+ | |side1=Galactic Republic<ref name="ISotR 1" /> |
| − | |side2=[[Confederacy of Independent Systems]] |
+ | |side2=[[Confederacy of Independent Systems]]<ref name="ISotR 1" /> |
|side3= |
|side3= |
||
|side4= |
|side4= |
||
| − | |commanders1=*[[Jedi General|General]] [[Plo Koon]] |
+ | |commanders1=*[[Jedi General|General]] [[Plo Koon]]<ref name="ISotR 1" /> |
| − | *General [[Kit Fisto]] |
+ | *General [[Kit Fisto]]<ref name="ISotR 1" /> |
| − | *General [[Tauht]]† |
+ | *General [[Tauht]]†<ref name="ISotR 1" /> |
| − | *[[Admiral]] [[Wieler]] |
+ | *[[Admiral]] [[Wieler]]<ref name="ISotR 1" /> |
| − | *[[Major]] [[Kendal Ozzel]] |
+ | *[[Major]] [[Kendal Ozzel]]<ref name="ISotR 1" /> |
| − | *[[Clone trooper commander|Commander]] [[CC-3636]] |
+ | *[[Clone trooper commander|Commander]] [[CC-3636]]<ref name="ISotR 1" /> |
| − | *[[Clone trooper captain|Captain]] [[Sharp]]† |
+ | *[[Clone trooper captain|Captain]] [[Sharp]]†<ref name="ISotR 1" /> |
| − | |commanders2=*[[Commander]] [[Asajj Ventress]] {{C|late battle}} |
+ | |commanders2=*[[Commander]] [[Asajj Ventress]] {{C|late battle}}<ref name="ISotR 1" /> |
| − | *[[Warlord]] [[Unger Gout]]† |
+ | *[[Warlord]] [[Unger Gout]]†<ref name="ISotR 1" /> |
| − | *[[Sergeant]] [[126]] |
+ | *[[Sergeant]] [[126]]<ref name="ISotR 1" /> |
| − | *[[Villpu Nagg]]† |
+ | *[[Villpu Nagg]]†<ref name="ISotR 2">''[[Star Wars: The Clone Wars 8: In Service of the Republic, Part 2]]''</ref> |
|commanders3= |
|commanders3= |
||
|commanders4= |
|commanders4= |
||
| − | |forces1=*3 [[Jedi Master]]s |
+ | |forces1=*3 [[Jedi Master]]s<ref name="ISotR 1" /> |
| − | *[[Adaroo]] |
+ | *[[Adaroo]]<ref name="ISotR 1" /> |
| − | *[[Clone trooper]]s |
+ | *[[Clone trooper]]s<ref name="ISotR 1" /> |
| − | **[[44th Special Operations Division]] |
+ | **[[44th Special Operations Division]]<ref name="ISotR 1" /> |
| − | ***[[Devil Dogs]] |
+ | ***[[Devil Dogs]]<ref name="ISotR 1" /> |
| − | *[[All Terrain Recon Transport]]s |
+ | *[[All Terrain Recon Transport]]s<ref name="ISotR 1" /> |
| − | *[[All Terrain Tactical Enforcer]]s |
+ | *[[All Terrain Tactical Enforcer]]s<ref name="ISotR 1" /> |
| − | *1 captured [[Armored Assault Tank]] |
+ | *1 captured [[Armored Assault Tank]]<ref name="ISotR 2" /> |
| − | *[[BTL-B Y-wing starfighter]]s |
+ | *[[BTL-B Y-wing starfighter]]s<ref name="ISotR 3" /> |
| − | *[[Venator-class Star Destroyer|''Venator''-class Star Destroyers]] |
+ | *[[Venator-class Star Destroyer|''Venator''-class Star Destroyers]]<ref name="ISotR 1" /> |
| − | **''[[Resilient (Venator-class)|Resilient]]'' |
+ | **''[[Resilient (Venator-class)|Resilient]]''<ref name="ISotR 1" /> |
| − | *[[ |
+ | *[[Acclamator-class assault ship|''Acclamator''-class assault ships]]<ref name="ISotR 3" /> |
| − | *[[ |
+ | *[[V-19 Torrent starfighter]]s<ref name="ISotR 1" /> |
| − | + | *[[Low Altitude Assault Transport/infantry|LAAT/i gunships]]<ref name="ISotR 2" /> |
|
| − | *[[ |
+ | |forces2=*1 [[Dark Acolyte]]<ref name="ISotR 1" /> |
| − | *[[ |
+ | *[[B1 battle droid]]s<ref name="ISotR 1" /> |
| − | *[[ |
+ | *[[B2 super battle droid]]s<ref name="ISotR 1" /> |
| − | *[[ |
+ | *[[BX-series droid commando]]s<ref name="ISotR 1" /> |
| − | * |
+ | *[[DSD1 dwarf spider droid]]s<ref name="ISotR 1" /> |
| − | *[[ |
+ | *3 [[agrocite cannon]]s<ref name="ISotR 3" /> |
| − | *[[ |
+ | *[[J-1 semi-autonomous proton cannon]]s<ref name="ISotR 1" /> |
| + | *[[NR-N99 Persuader-class droid enforcer|NR-N99 ''Persuader''-class droid enforcers]]<ref name="ISotR 2" /> |
||
| − | *Armored Assault [[Tank]]s{{Ref|<ref name="ISotR 1" />}} |
||
| − | *[[ |
+ | *Armored Assault [[Tank]]s<ref name="ISotR 1" /> |
| − | * |
+ | *[[Speeder bike]]s<ref name="ISotR 1" /> |
| + | *1 [[weather-control station]]<ref name="ISotR 2" /> |
||
|forces3= |
|forces3= |
||
|forces4= |
|forces4= |
||
| − | |casual1=*[[General]] Tauht |
+ | |casual1=*[[General]] Tauht<ref name="ISotR 1" /> |
| − | *Heavy [[Cloning|clone]] [[trooper]] casualties |
+ | *Heavy [[Cloning|clone]] [[trooper]] casualties<ref name="ISotR 1" /><ref name="ISotR 3" /><ref name="ISotR 2" /> |
| − | *Moderate [[starship]] casualties, |
+ | *Moderate [[starship]] casualties,<ref name="ISotR 3" /> including at least 2 V-19 Torrent [[starfighter]]s<ref name="ISotR 1" /> and 1 ''Acclamator''-class assault ship<ref name="ISotR 3" /> |
| − | *All Terrain Tactical Enforcers |
+ | *All Terrain Tactical Enforcers<ref name="ISotR 1" /><ref name="ISotR 2" /> |
| − | *The stolen Armored Assault Tank |
+ | *The stolen Armored Assault Tank<ref name="ISotR 2" /> |
| − | |casual2=*B2 super [[battle droid]]s |
+ | |casual2=*B2 super [[battle droid]]s<ref name="ISotR 1" /> |
| − | *Proton [[cannon]]s |
+ | *Proton [[cannon]]s<ref name="ISotR 1" /> |
| − | *[[Agrocite]] cannons |
+ | *[[Agrocite]] cannons<ref name="ISotR 3" /> |
| − | *A large number of BX-series [[droid]] |
+ | *A large number of BX-series [[droid]] [[commando]]s<ref name="ISotR 1" /><ref name="ISotR 2" /> |
| − | *Armored Assault Tanks |
+ | *Armored Assault Tanks<ref name="ISotR 2" /> |
| − | *Weather-control station destroyed |
+ | *Weather-control station destroyed<ref name="ISotR 2" /> |
|casual3= |
|casual3= |
||
|casual4= |
|casual4= |
||
| − | |civilian=Several native [[Khormai]], from the storm that devastated their village |
+ | |civilian=Several native [[Khormai]], from the storm that devastated their village<ref name="ISotR 1" />}} |
| − | {{Quote|With the addition of the Khormai agrocite to our arsenal, I am confident we have taken a bold step toward bringing peace to the galaxy. Your brave service to the Republic made this great victory possible.|Supreme Chancellor Palpatine, to Kendal Ozzel, after the battle|Star Wars The Clone Wars 9: In Service of the Republic, Part 3}} |
+ | {{Quote|With the addition of the Khormai agrocite to our arsenal, I am confident we have taken a bold step toward bringing peace to the galaxy. Your brave service to the Republic made this great victory possible.|Supreme Chancellor Palpatine, to Kendal Ozzel, after the battle|Star Wars: The Clone Wars 9: In Service of the Republic, Part 3}} |
The '''Battle of Khorm''' took place around [[22 BBY]] during the [[Clone Wars]] between the [[Galactic Republic]] and the [[Confederacy of Independent Systems]]. Hoping to obtain access to the deposits of the valuable [[agrocite]] [[mineral]] on the [[Water|ice]] [[planet]] of [[Khorm]] for the Republic, the [[Galactic Senate]] dispatched a force under the command of three [[Jedi General]]s—[[Plo Koon]], [[Kit Fisto]], and [[Tauht]]—to Khorm. However, by the time the Republic arrived there, the Confederacy had formed an alliance with the native [[Khormai]] [[Warlord]] [[Unger Gout]], occupied the planet, and [[Slavery|enslaved]] the local population to [[Mining|mine]] agrocite for them. The Confederacy additionally constructed a [[weather-control station]] that created a storm in Khorm's [[atmosphere]], preventing the Republic from using air support but still enabling the [[fleet]] to land ground [[troop]]s. |
The '''Battle of Khorm''' took place around [[22 BBY]] during the [[Clone Wars]] between the [[Galactic Republic]] and the [[Confederacy of Independent Systems]]. Hoping to obtain access to the deposits of the valuable [[agrocite]] [[mineral]] on the [[Water|ice]] [[planet]] of [[Khorm]] for the Republic, the [[Galactic Senate]] dispatched a force under the command of three [[Jedi General]]s—[[Plo Koon]], [[Kit Fisto]], and [[Tauht]]—to Khorm. However, by the time the Republic arrived there, the Confederacy had formed an alliance with the native [[Khormai]] [[Warlord]] [[Unger Gout]], occupied the planet, and [[Slavery|enslaved]] the local population to [[Mining|mine]] agrocite for them. The Confederacy additionally constructed a [[weather-control station]] that created a storm in Khorm's [[atmosphere]], preventing the Republic from using air support but still enabling the [[fleet]] to land ground [[troop]]s. |
||
| − | Soon, the Republic captured an [[agrocite processing facility]] and established an outpost there, forcing Gout to request reinforcements from the Confederate [[Head of State|leader]], [[Count]] [[Dooku]]. [[Asajj Ventress]], Dooku's [[ |
+ | Soon, the Republic captured an [[agrocite processing facility]] and established an outpost there, forcing Gout to request reinforcements from the Confederate [[Head of State|leader]], [[Count]] [[Dooku]]. [[Asajj Ventress]], Dooku's [[Dark Acolyte]], was dispatched to assist Gout and arrived at Khorm. However, the [[Jedi]] realized that the storm was being created by the weather-control station, prompting Fisto, Koon, and a detachment of [[clone trooper]]s to set off to destroy it. After the Jedi had left, Ventress and Gout initiated a counterattack at the processing facility and recaptured it. Ventress personally [[Death|slew]] [[General]] Tauht—who had been left in charge of the base—and the Confederacy captured [[Major]] [[Kendal Ozzel]], [[Clone trooper commander|Clone Commander]] [[CC-3636]], and several [[Cloning|clone]] [[trooper]]s. Ventress tracked and ambushed the remaining two Jedi and their team but was unable to kill them, as she was recalled back to the processing facility to recapture Ozzel and the clones, who had managed to escape from Separatist custody. |
Ventress pursued the escapees to a Republic staging point and almost decimated all remaining Republic forces stationed there. However, after Koon and Fisto finally managed to destroy the weather-control station, Republic reinforcements arrived, and Ventress was forced to retreat to an agrocite mine, where the enslaved Khormai were being held. The Dark Acolyte then had the mine rigged with explosives with the intention of killing the Khormai if the Republic conquered the mine. Discovering this, the Jedi decided to free the hostages before initiating a full-scale attack and tried to signal Ozzel—who was tasked with leading the assault on the mine—to delay his advance. The Jedi were not able to contact the Major, as the Separatists were [[Jammer|jamming]] all signals, and Ozzel began his attack while the hostages were still in Ventress's custody. During the ensuing fight, Gout revealed the powerful [[agrocite cannon]]s that he had constructed. Fisto and [[Clone trooper captain|Clone Captain]] [[Sharp]] were able to destroy them, however, and Koon prevented Ventress from demolishing the mine. The battle was won by the Republic, and the Khormai were liberated, but Ventress managed to escape. |
Ventress pursued the escapees to a Republic staging point and almost decimated all remaining Republic forces stationed there. However, after Koon and Fisto finally managed to destroy the weather-control station, Republic reinforcements arrived, and Ventress was forced to retreat to an agrocite mine, where the enslaved Khormai were being held. The Dark Acolyte then had the mine rigged with explosives with the intention of killing the Khormai if the Republic conquered the mine. Discovering this, the Jedi decided to free the hostages before initiating a full-scale attack and tried to signal Ozzel—who was tasked with leading the assault on the mine—to delay his advance. The Jedi were not able to contact the Major, as the Separatists were [[Jammer|jamming]] all signals, and Ozzel began his attack while the hostages were still in Ventress's custody. During the ensuing fight, Gout revealed the powerful [[agrocite cannon]]s that he had constructed. Fisto and [[Clone trooper captain|Clone Captain]] [[Sharp]] were able to destroy them, however, and Koon prevented Ventress from demolishing the mine. The battle was won by the Republic, and the Khormai were liberated, but Ventress managed to escape. |
||
==Prelude== |
==Prelude== |
||
| − | {{Quote|An ambitious Warlord cast his lot with Dooku in exchange for control of all we have. Now he enslaves his own people to mine for the Separatists.|Adaroo|Star Wars The Clone Wars 7: In Service of the Republic, Part 1}} |
+ | {{Quote|An ambitious Warlord cast his lot with Dooku in exchange for control of all we have. Now he enslaves his own people to mine for the Separatists.|Adaroo|Star Wars: The Clone Wars 7: In Service of the Republic, Part 1}} |
| − | During the [[Clone Wars]] between the [[Galactic Republic]] and the [[Confederacy of Independent Systems]], both sides struggled for resources to supply their [[Army|armies]]. One such resource was [[agrocite]], a valuable [[mineral]] that could be used to exceptionally increase power to [[starfighter]]s. Agrocite, however, was found only on three [[planet]]s in the entire [[The galaxy|galaxy]], one of them being the [[Water|ice]] world of [[Khorm]]. |
+ | During the [[Clone Wars]] between the [[Galactic Republic]] and the [[Confederacy of Independent Systems]], both sides struggled for resources to supply their [[Army|armies]]. One such resource was [[agrocite]], a valuable [[mineral]] that could be used to exceptionally increase power to [[starfighter]]s. Agrocite, however, was found only on three [[planet]]s in the entire [[The galaxy|galaxy]], one of them being the [[Water|ice]] world of [[Khorm]]. Around [[22 BBY]], the [[Galactic Senate]] dispatched a Republic force under the command of [[Jedi General]]s [[Plo Koon]], [[Kit Fisto]], and [[Tauht]] to secure the agrocite deposits.<ref name="ISotR 1" /> |
| − | By the time the [[Jedi]] arrived at the planet, the |
+ | By the time the [[Jedi]] arrived at the planet, the Confederacy—allied with the native [[Khormai]] [[Warlord]] [[Unger Gout]]—had already occupied Khorm, [[Slavery|enslaved]] the Khormai, and forced them to [[Mining|mine]] agrocite for the Separatists. On the [[Kafiri Mountain]], the Confederacy built a [[weather-control station]], which created a storm in Khorm's [[atmosphere]] and prevented the enemy from utilizing air support.<ref name="ISotR 1" /> Additionally, Gout secretly began construction of [[Agrocite cannon|agrocite-powered cannons]] inside the mine, intent on using them against the Republic.<ref name="ISotR 3" /> |
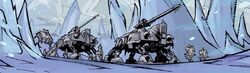
[[File:Khorm.jpg|thumb|250px|left|The Republic forces on Khorm]] |
[[File:Khorm.jpg|thumb|250px|left|The Republic forces on Khorm]] |
||
| Line 89: | Line 89: | ||
==The battle== |
==The battle== |
||
===Capturing the facility=== |
===Capturing the facility=== |
||
| − | {{Quote|<nowiki></nowiki>''Bury them in ice!''<nowiki></nowiki>|Unger Gout gives an order to destroy the Republic forces|Star Wars The Clone Wars 7: In Service of the Republic, Part 1}} |
+ | {{Quote|<nowiki></nowiki>''Bury them in ice!''<nowiki></nowiki>|Unger Gout gives an order to destroy the Republic forces|Star Wars: The Clone Wars 7: In Service of the Republic, Part 1}} |
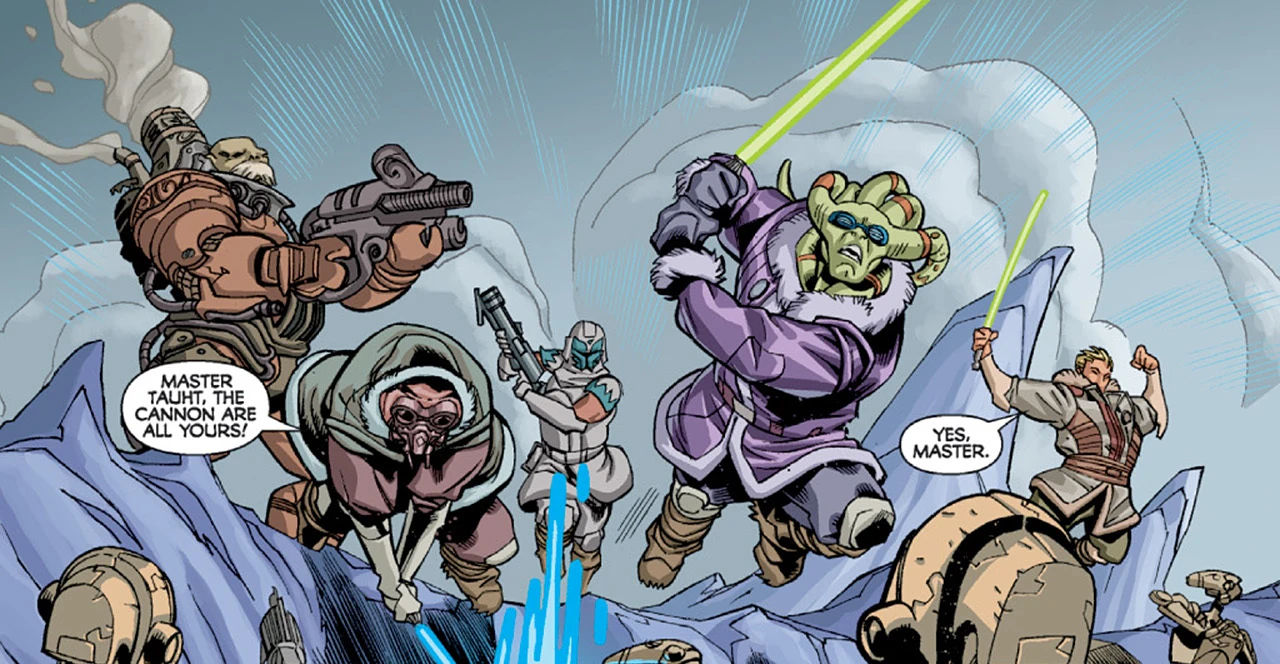
[[File:Khorm assault.jpg|thumb|250px|right|The Jedi and Adaroo fight in the trenches.]] |
[[File:Khorm assault.jpg|thumb|250px|right|The Jedi and Adaroo fight in the trenches.]] |
||
| − | The Republic troops soon reached the agrocite processing plant—where Gout was located—and were attacked by Separatist [[proton cannon]]s. As the Republic's [[All Terrain Tactical Enforcer|AT-TE walkers]] fell under [[laser]] fire, |
+ | The Republic troops soon reached the agrocite processing plant—where Gout was located—and were attacked by Separatist [[J-1 semi-autonomous proton cannon]]s. As the Republic's [[All Terrain Tactical Enforcer|AT-TE walkers]] fell under [[laser]] fire, Ozzel ordered the [[clone trooper]]s to disembark. The move, however, only exposed the [[Cloning|clones]] to the enemy fire. Realizing that the [[trooper]]s could not survive the barrage, the Jedi drew fire upon themselves and used their [[lightsaber]]s to deflect [[blaster]] shots aimed at the clones. Koon, Fisto, and Adaroo then charged Gout's [[BX-series droid commando]]s and [[B2 super battle droid]]s in the trenches that surrounded the plant, while Tauht proceeded to destroy the [[cannon]]s.<ref name="ISotR 1" /> |
| − | Meanwhile, Ozzel's AT-TE [[walker]]s reached the attack position, and the Major ordered them to open fire on the Jedi's positions—thus endangering their lives but greatly reducing the Separatist defenses. Seeing this, Gout fled the facility on a [[rail jet]]. The Republic soon captured the facility and established a base there, while Gout retreated to the main Separatist base in an agrocite mine to await reinforcements from the Confederate [[Head of State|leader]], [[Count]] [[Dooku]]. At the newly established Republic base, the Jedi started contemplating an attack on the mine, where the Khormai slaves were being held. Ozzel proposed a direct assault, but the Jedi declined, as such a tactic would result in too many clone casualties. Meanwhile, Separatist [[Commander]] and [[ |
+ | Meanwhile, Ozzel's AT-TE [[walker]]s reached the attack position, and the Major ordered them to open fire on the Jedi's positions—thus endangering their lives but greatly reducing the Separatist defenses. Seeing this, Gout fled the facility on a [[rail jet]]. The Republic soon captured the facility and established a base there, while Gout retreated to the main Separatist base in an agrocite mine to await reinforcements from the Confederate [[Head of State|leader]], [[Count]] [[Dooku]]. At the newly established Republic base, the Jedi started contemplating an attack on the mine, where the Khormai slaves were being held. Ozzel proposed a direct assault, but the Jedi declined, as such a tactic would result in too many clone casualties. Meanwhile, Separatist [[Commander]] and [[Dark Acolyte]] [[Asajj Ventress]] arrived in her [[starship]], the ''[[Trident (starship)|Trident]]'', to assist Gout. Wieler tried to prevent her from reaching the planet and dispatched two [[V-19 Torrent starfighter]]s to intercept Ventress's vessel.<ref name="ISotR 1" /> |
The Republic fighters pursued Ventress to the edge of the storm and witnessed it opening for her. When they tried to pursue the ''Trident'' further, however, the storm closed again, and both Republic fighters were destroyed. Wieler immediately contacted the Jedi and informed them of what had just transpired, and the Jedi realized that the Confederacy possessed a weather-control station, recalling previous intelligence reports of Separatist attempts to acquire such technology. If the station was to be destroyed, the storm above Khorm would dissipate, allowing the Republic to utilize air support during the assault on the mine and lessen the amount of casualties. Realizing that the station was located somewhere in the mountains near the Separatist mine, Koon, Fisto, [[Clone trooper captain|Clone Captain]] [[Sharp]], and Adaroo took Ozzel's [[Devil Dogs]] clone unit and departed on [[CK-6 swoop]]s to destroy the station with explosives, leaving Tauht in charge of the Republic base. In order to approach the weather-control station undetected, Koon decided against taking a direct route to their objective and instead asked Adaroo to show them another way.<ref name="ISotR 1" /> |
The Republic fighters pursued Ventress to the edge of the storm and witnessed it opening for her. When they tried to pursue the ''Trident'' further, however, the storm closed again, and both Republic fighters were destroyed. Wieler immediately contacted the Jedi and informed them of what had just transpired, and the Jedi realized that the Confederacy possessed a weather-control station, recalling previous intelligence reports of Separatist attempts to acquire such technology. If the station was to be destroyed, the storm above Khorm would dissipate, allowing the Republic to utilize air support during the assault on the mine and lessen the amount of casualties. Realizing that the station was located somewhere in the mountains near the Separatist mine, Koon, Fisto, [[Clone trooper captain|Clone Captain]] [[Sharp]], and Adaroo took Ozzel's [[Devil Dogs]] clone unit and departed on [[CK-6 swoop]]s to destroy the station with explosives, leaving Tauht in charge of the Republic base. In order to approach the weather-control station undetected, Koon decided against taking a direct route to their objective and instead asked Adaroo to show them another way.<ref name="ISotR 1" /> |
||
===Counterattack=== |
===Counterattack=== |
||
| − | {{Quote|Signal the enemy. We're ''surrendering''.''"<br />"''Droids seldom take prisoners, sir.''"<br />"''Not even officers?|Kendal Ozzel and CC-3636, after Ozzel's failed attack|Star Wars The Clone Wars 7: In Service of the Republic, Part 1}} |
+ | {{Quote|Signal the enemy. We're ''surrendering''.''"<br />"''Droids seldom take prisoners, sir.''"<br />"''Not even officers?|Kendal Ozzel and CC-3636, after Ozzel's failed attack|Star Wars: The Clone Wars 7: In Service of the Republic, Part 1}} |
[[File:Ozzel charge.JPG|thumb|200px|left|Major Kendal Ozzel orders the Republic forces to attack.]] |
[[File:Ozzel charge.JPG|thumb|200px|left|Major Kendal Ozzel orders the Republic forces to attack.]] |
||
| − | Shortly after Koon and Fisto had departed, Ventress and Gout initiated a counterattack on the processing facility. Before proceeding with the assault, Ventress had a unit of [[DSD1 dwarf spider droid]]s hidden beneath a layer of snow near the facility. Separatist [[Armored Assault Tank]]s then besieged the plant, and Tauht rushed inside the structure to contact Koon and Fisto. On his way there, Tauht ordered a frightened Ozzel to reinforce the lines and hold the facility. Ventress, however, was able to infiltrate the Republic base and, by detonating some explosives, made Tauht fall to the ground, where she confronted him. After a brief [[lightsaber duel]], Ventress [[Death|killed]] Tauht by [[Telekinesis|manipulating]] one of her [[Paired lightsabers|lightsabers]] behind his back with [[the Force]] and [[Shiak|stabbing]] him with it. The Dark Acolyte made her way back to the Separatist positions.<ref name="ISotR 1" /> |
+ | Shortly after Koon and Fisto had departed, Ventress and Gout initiated a counterattack on the processing facility. Before proceeding with the assault, Ventress had a unit of [[DSD1 dwarf spider droid]]s hidden beneath a layer of snow near the facility. Separatist [[Armored Assault Tank]]s then besieged the plant, and Tauht rushed inside the structure to contact Koon and Fisto. On his way there, Tauht ordered a frightened Ozzel to reinforce the lines and hold the facility. Ventress, however, was able to infiltrate the Republic base and, by detonating some explosives, made Tauht fall to the ground, where she confronted him. After a brief [[lightsaber duel]], Ventress [[Death|killed]] Tauht by [[Telekinesis|manipulating]] one of her [[Paired lightsabers|lightsabers]] behind his back with [[the Force]] and [[Shiak|stabbing]] him with it. The Dark Acolyte then made her way back to the Separatist positions.<ref name="ISotR 1" /> |
| − | Informed of Tauht's death via his [[comlink]], Ozzel assumed command of the remaining Republic forces, but instead of staying put and holding the facility as Tauht had ordered him to do before he had been killed, the Major ordered all troops to charge the enemy. Ozzel himself—alongside [[Clone trooper commander|Clone Commander]] [[CC-3636]], nicknamed "Wolffe"—boarded one of the AT-TEs and participated in the attack. At first, the Republic seemingly gained the upper hand, and the Confederacy appeared to retreat. However, Ventress ordered [[Sergeant]] [[126]] to reveal the hidden spider [[droid]]s, and the sudden appearance of the Confederate reinforcements caught |
+ | Informed of Tauht's death via his [[comlink]], Ozzel assumed command of the remaining Republic forces, but instead of staying put and holding the facility as Tauht had ordered him to do before he had been killed, the Major ordered all troops to charge the enemy. Ozzel himself—alongside [[Clone trooper commander|Clone Commander]] [[CC-3636]], nicknamed "Wolffe"—boarded one of the AT-TEs and participated in the attack. At first, the Republic seemingly gained the upper hand, and the Confederacy appeared to retreat. However, Ventress ordered [[Sergeant]] [[126]] to reveal the hidden spider [[droid]]s, and the sudden appearance of the Confederate reinforcements caught Ozzel by surprise. The spider droids decimated the majority of the Republic force,<ref name="ISotR 1" /> including heavy [[armor]].<ref name="ISotR 2" /> |
| − | As the few remaining troops became surrounded by the droids, |
+ | As the few remaining Republic troops became surrounded by the droids, Ozzel panicked and ordered the Republic forces to surrender.<ref name="ISotR 1" /> With the engagement won, the Confederacy regained control of the processing plant,<ref name="ISotR 2" /> while Ozzel, Wolffe, and four other clone troopers were taken [[prisoner]] by Ventress and interrogated by her regarding Koon's and Fisto's location. Citing the [[Convention of Civilized Systems]], Ozzel initially refused to cooperate, but after Ventress killed two clone troopers and promised to do the same to him, the Major revealed the Jedi's plan. Receiving the information she needed, the Dark Acolyte desired to kill Ozzel, Wolffe, and the remaining troopers<ref name="ISotR 1" />—[[Spitter]] and [[Comet (clone trooper)|Comet]]<ref name="ISotR 2" />—but Gout instead had them [[Prison|imprisoned]].<ref name="ISotR 1" /> Ventress then took a detachment of droid [[commando]]s and set off to kill the Jedi.<ref name="ISotR 2" /> |
===Ambush=== |
===Ambush=== |
||
| − | {{Quote|You've bitten off more than you can chew, assassin. Against two Jedi Masters and without the element of surprise, your best option is surrender.''"<br />"''Who says I've lost the element of surprise?|Plo Koon and Asajj Ventress|Star Wars The Clone Wars 8: In Service of the Republic, Part 2}} |
+ | {{Quote|You've bitten off more than you can chew, assassin. Against two Jedi Masters and without the element of surprise, your best option is surrender.''"<br />"''Who says I've lost the element of surprise?|Plo Koon and Asajj Ventress|Star Wars: The Clone Wars 8: In Service of the Republic, Part 2}} |
[[File:Ventress vs. Plo Koon.jpg|thumb|right|250px|Asajj Ventress attacks Plo Koon.]] |
[[File:Ventress vs. Plo Koon.jpg|thumb|right|250px|Asajj Ventress attacks Plo Koon.]] |
||
| − | The Jedi soon reached the mountain area and saw a Khormai village devastated by the storm. After making a stop there and burying the bodies of the dead Khormai in graves cut in the ice with the Jedi's lightsabers, the Republic strike team continued with its mission.<ref name="ISotR 1" /> Climbing higher in the mountains, the group was forced to abandon the [[swoop]]s and travel the rest of the journey on foot. Meanwhile, Gout contacted the commander of the weather-control station, the [[Aqualish]] [[Villpu Nagg]], and ordered him to create a storm large enough to destroy the Jedi, despite its additional potentiality of killing Ventress, who was pursuing them.<ref name="ISotR 2" /> |
+ | The Jedi soon reached the mountain area and saw a Khormai village devastated by the storm. After making a stop there and burying the bodies of the dead Khormai in graves cut in the ice with the Jedi's lightsabers, the Republic strike team continued with its mission.<ref name="ISotR 1" /> Climbing higher in the mountains, the group was forced to abandon the [[swoop]]s and travel the rest of the journey on [[Limb|foot]]. Meanwhile, Gout contacted the commander of the weather-control station, the [[Aqualish]] [[Villpu Nagg]], and ordered him to create a storm large enough to destroy the Jedi, despite its additional potentiality of killing Ventress, who was pursuing them.<ref name="ISotR 2" /> |
| − | Nagg executed Gout's orders, but Ventress herself was able to pass the Republic troops' advance. She reached a mountain located at a half-rotation's hike from the station and prepared a trap for the Jedi by hiding most of her droids beneath the snow. She then took position at an upper level of the mountain with the remaining droids and an Armored Assault |
+ | Nagg executed Gout's orders, but Ventress herself was able to pass the Republic troops' advance. She reached a mountain located at a half-rotation's hike from the station and prepared a trap for the Jedi by hiding most of her droids beneath the snow. She then took position at an upper level of the mountain with the remaining droids and an Armored Assault Tank. When the Republic troops reached the area, the Dark Acolyte ambushed them, jumping from above and attacking Koon with her lightsabers. At the same time, the droid commandos emerged from the snow and opened fire on the clone troopers. A [[Lightfight|firefight]] ensued, and Fisto ordered Sharp and his men to hold off the droids while he rushed to assist Koon. The two [[Jedi Master]]s engaged in a duel against Ventress. During the fight, Ventress was offered a chance to surrender, but she declined. Instead, the Dark Acolyte used the Force to bring down an avalanche, burying both the Republic forces and Ventress's droids underneath a crust of snow and ice. In order to avoid being crushed to death by the avalanche, the two Jedi created a Force pocket that offered them and the rest of the Republic strike team protection from the imposing wall of snow.<ref name="ISotR 2" /> |
| − | Accompanied by her droid commandos, Ventress initiated a search for any survivors of the avalanche and killed those |
+ | Accompanied by her droid commandos, Ventress initiated a search for any survivors of the avalanche and killed those whom she found. In the meantime, Ozzel, Wolffe, Spitter, and Comet attempted to escape from the agrocite processing facility in which they had been imprisoned. Eventually, the three troopers were able to [[Slicer|hot-wire]] a control panel that operated the doors to their cell and freed themselves from their captivity. Ozzel and the clones then stole an AAT and used it to make their way out of the facility, destroying all droid forces that stood in their way. Attacked by the escaped prisoners, the droids contacted Ventress and called her to assist them. Ventress responded to the call and set off to the processing facility in her own AAT, leaving her droids to kill any surviving Republic troops they could find. As soon as the Dark Acolyte left the scene, however, the Jedi and the clones emerged from the snow and attacked the droids, destroying them.<ref name="ISotR 2" /> |
| − | The encounter with Ventress cost the Republic the lives of four troopers: [[Sten]], [[Deadeye (clone trooper)|Deadeye]], [[Blunt]], and [[Jark (clone trooper)|Jark]]. Also, the explosives with which they had planned to destroy the weather-control station were gone and Koon had broken his left arm. Nevertheless, the Jedi decided to continue their mission. Adaroo used a whistle to call several [[ice worm]]s, [[Aelid]]s, which the Khormai commonly used as transportation by riding in them. The Jedi, the remaining clones, and Adaroo took their positions inside the worms and set off for the enemy station. Meanwhile, Ozzel and the three clones finally managed to escape from the processing facility—moments before Ventress arrived there—and proceeded to the Republic's staging area.<ref name="ISotR 2" /> |
+ | The encounter with Ventress cost the Republic the lives of four troopers: [[Sten]], [[Deadeye (clone trooper)|Deadeye]], [[Blunt]], and [[Jark (clone trooper)|Jark]]. Also, the explosives with which they had planned to destroy the weather-control station were gone, and Koon had broken his left arm. Nevertheless, the Jedi decided to continue their mission. Adaroo used a whistle to call several [[ice worm]]s, [[Aelid]]s, which the Khormai commonly used as transportation by riding in them. The Jedi, the remaining clones, and Adaroo took their positions inside the worms and set off for the enemy station. Meanwhile, Ozzel and the three clones finally managed to escape from the processing facility—moments before Ventress arrived there—and proceeded to the Republic's staging area.<ref name="ISotR 2" /> |
===Turning the tide=== |
===Turning the tide=== |
||
| − | {{Quote|We cannot stop the storm, but perhaps there is a way to use the enemy's weapon against itself and destroy ''this'' location.''"<br />"''But sir. Aren't ''we'' standing on this location?''"<br />"''Very perceptive, Captain.|Plo Koon and Clone Captain Sharp|Star Wars The Clone Wars 8: In Service of the Republic, Part 2}} |
+ | {{Quote|We cannot stop the storm, but perhaps there is a way to use the enemy's weapon against itself and destroy ''this'' location.''"<br />"''But sir. Aren't ''we'' standing on this location?''"<br />"''Very perceptive, Captain.|Plo Koon and Clone Captain Sharp|Star Wars: The Clone Wars 8: In Service of the Republic, Part 2}} |
Ventress deduced Ozzel's intentions and took a force of AATs, spider droids, and [[NR-N99 Persuader-class droid enforcer|NR-N99 ''Persuader''-class droid enforcers]] to kill all at the staging area and thus sever the Republic's foothold on Khorm. At the same time, the strike team led by Koon and Fisto had almost reached the weather-control station in the Aelids. Because they had lost the explosives, the Jedi were forced to devise another method to demolish the enemy structure. Koon decided to destroy the station by redirecting the atmospheric storm at it. This plan, however, posed a danger to the Republic team, as the group could also be caught in the storm. As Koon, Fisto, and the Devil Dogs moved toward the station to execute their strategy, Ozzel and the rest of the escapees reached the staging point in the AAT and rendezvoused with the Republic troops stationed there.<ref name="ISotR 2" /> |
Ventress deduced Ozzel's intentions and took a force of AATs, spider droids, and [[NR-N99 Persuader-class droid enforcer|NR-N99 ''Persuader''-class droid enforcers]] to kill all at the staging area and thus sever the Republic's foothold on Khorm. At the same time, the strike team led by Koon and Fisto had almost reached the weather-control station in the Aelids. Because they had lost the explosives, the Jedi were forced to devise another method to demolish the enemy structure. Koon decided to destroy the station by redirecting the atmospheric storm at it. This plan, however, posed a danger to the Republic team, as the group could also be caught in the storm. As Koon, Fisto, and the Devil Dogs moved toward the station to execute their strategy, Ozzel and the rest of the escapees reached the staging point in the AAT and rendezvoused with the Republic troops stationed there.<ref name="ISotR 2" /> |
||
| Line 124: | Line 124: | ||
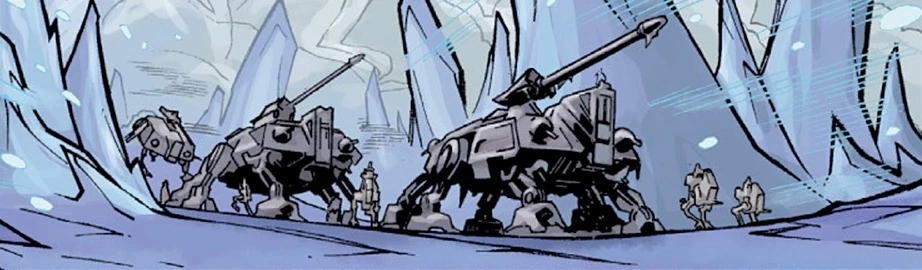
[[File:Battle of Khorm 2.jpg|thumb|250px|left|Admiral Wieler's reinforcements come to rescue Ozzel.]] |
[[File:Battle of Khorm 2.jpg|thumb|250px|left|Admiral Wieler's reinforcements come to rescue Ozzel.]] |
||
| − | While the battle at the staging area raged on, Koon's and Fisto's team reached a network of antennas that surrounded the Kafiri mountain and could be used to redirect the storm. However, the group was spotted by the station's defenders and came under fire. Despite this, trooper [[Fixer (clone trooper)|Fixer]] was able to slice into a junction box and realign the storm's focal node while Koon and Fisto deflected the blaster fire aimed at him with their lightsabers.<ref name="ISotR 2" /> |
+ | While the battle at the staging area raged on, Koon's and Fisto's team reached a network of antennas that surrounded the Kafiri mountain and could be used to redirect the storm. However, the group was spotted by the station's defenders and came under fire. Despite this, trooper [[Fixer (clone trooper)|Fixer]] was able to slice into a junction box and realign the storm's focal node, while Koon and Fisto deflected the blaster fire aimed at him with their lightsabers.<ref name="ISotR 2" /> |
| − | The raging atmospheric phenomena turned on the weather-control station and destroyed it, killing Villpu Nagg. With the station obliterated, the storm itself dissipated as well. Informed of this development, |
+ | The raging atmospheric phenomena turned on the weather-control station and destroyed it, killing Villpu Nagg. With the station obliterated, the storm itself dissipated as well. Informed of this development, Wieler ordered his forces to launch reinforcements. By this time, the Republic forces had almost lost the battle at the staging point, and Ozzel was willing to surrender again. At that point, Wieler's reinforcements finally arrived. ''Venator''-class [[Star Destroyer]]s, V-19 Torrent starfighters, and [[Low Altitude Assault Transport/infantry|LAAT/i gunships]] decimated much of the droid force and forced Ventress to order a retreat.<ref name="ISotR 2" /> |
===Final moves=== |
===Final moves=== |
||
| − | {{ |
+ | {{Dialogue|Koon|Inform Major Ozzel to delay his advance until we free the hostages.|Sharp|It's no good, General. The Seppies are jamming our long-range transmissions.|Fisto|Then we'd better hurry. If I know Major Ozzel—he's already mobilizing his assault.|attr=Plo Koon, Captain Sharp, and Kit Fisto|src=Star Wars: The Clone Wars 9: In Service of the Republic, Part 3}} |
| − | After the arrival of the Republic reinforcements, |
+ | After the arrival of the Republic reinforcements, Ozzel was tasked with retaking the agrocite processing facility. The Jedi scouted out the agrocite mine, which Ozzel was to assault afterward. However, Gout and the Confederate troops who were stationed at the processing plant had also retreated to the mine, albeit with heavy losses. Gout moved the enslaved Khormai deep inside the mine for use as hostages. Observing the thin droid force guarding the mine, Fisto and Sharp expressed a notion to attack immediately, but Koon declined, stating that he sensed that the Confederacy was not showing everything it had. Koon's senses were backed by Adaroo, who mentioned that there had been rumors of heavy weapon construction inside the mine. Soon, Ventress arrived at the mine and confronted the enraged Gout, who blamed her for his losses. Ventress dismissed his concerns and ordered a BX droid commando to rig the mines with [[Thermal detonator|thermal charges]] and key them to her remote detonator. Witnessing the Confederacy's transfer of explosives inside the mine, the Jedi realized that Ventress was going to destroy the mine and kill the slaves if the facility fell into Republic hands. Claiming that the liberation of the Khormai was their top priority, Koon decided to liberate them before attacking and ordered Sharp to contact Ozzel and tell him to delay his assault.<ref name="ISotR 3" /> |
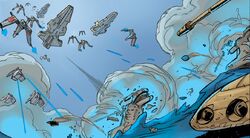
[[File:Mine assault.jpg|thumb|250px|right|Ozzel's forces assault the mine.]] |
[[File:Mine assault.jpg|thumb|250px|right|Ozzel's forces assault the mine.]] |
||
| − | The Separatists, however, were [[Jammer|jamming]] the Republic's long-range transmissions, and the Jedi were therefore unable to contact Ozzel. The Major himself soon gave the order to initiate the attack on the mine. Although the Jedi attempted to liberate the hostages and capture Ventress before Ozzel's forces arrived, they did not succeed, and a full-scale battle began. Republic LAAT/i [[gunship]]s, V-19 starfighters, '' |
+ | The Separatists, however, were [[Jammer|jamming]] the Republic's long-range transmissions, and the Jedi were therefore unable to contact Ozzel. The Major himself soon gave the order to initiate the attack on the mine. Although the Jedi attempted to liberate the hostages and capture Ventress before Ozzel's forces arrived, they did not succeed, and a full-scale battle began. Republic LAAT/i [[gunship]]s, V-19 starfighters, [[Acclamator-class assault ship|''Acclamator''-class assault ships]], and [[BTL-B Y-wing starfighter]]s all assaulted the mine, and Ozzel prepared for a ground assault. However, Gout revealed his agrocite cannons, which attacked the Republic forces. The [[artillery]] shot down half of the attacking Republic force, including one of the Acclamators. Shocked by the sudden turn of events, Ozzel fell unconscious, and Wolffe assumed command of the attacking fleet, ordering it to pull back out of the cannons' range.<ref name="ISotR 3" /> |
| − | Meanwhile, Fisto and Koon developed a plan to assist their forces. Fisto and Sharp set off to sabotage the cannons, while Koon, Adaroo, and two Devil Dogs troopers went inside the mine to capture Ventress and liberate the slaves. Formulating an idea on how to reach the cannon firing platform from an upper level of the mine, Fisto contacted Wolffe and ordered him to advance ground troops. In the meantime, Koon's [[squad]] was attacked by Ventress inside the mine. Ordering Adaroo and the clones to continue the mission, Koon [[Lightsaber combat|engaged]] the Dark Acolyte in a duel. The rest of Koon's task force soon reached a cave housing the prisoners—who were being guarded by a number of BX droids and [[B2 super battle droid]]s—and began to develop a strategy to free them. When Wolffe's troops had arrived, the agrocite cannons moved their barrels down to aim at them. This allowed Fisto and Sharp to infiltrate the cannon firing platform via one of the gun barrels and dispatch the droids |
+ | Meanwhile, Fisto and Koon developed a plan to assist their forces. Fisto and Sharp set off to sabotage the cannons, while Koon, Adaroo, and two Devil Dogs troopers went inside the mine to capture Ventress and liberate the slaves. Formulating an idea on how to reach the cannon firing platform from an upper level of the mine, Fisto contacted Wolffe and ordered him to advance ground troops. In the meantime, Koon's [[squad]] was attacked by Ventress inside the mine. Ordering Adaroo and the clones to continue the mission, Koon [[Lightsaber combat|engaged]] the Dark Acolyte in a duel. The rest of Koon's task force soon reached a cave housing the prisoners—who were being guarded by a number of BX droids and [[B2 super battle droid]]s—and began to develop a strategy to free them. When Wolffe's troops had arrived, the agrocite cannons moved their barrels down to aim at them. This allowed Fisto and Sharp to infiltrate the cannon firing platform via one of the gun barrels and dispatch the droids who were operating the guns.<ref name="ISotR 3" /> |
| − | An intruder alert was sounded throughout the mine, and all droids, including those |
+ | An intruder alert was sounded throughout the mine, and all droids, including those who guarded the prisoners, were ordered to move to the firing platform and confront the infiltrators. This presented Adaroo and the two clones with the opportunity to make their move and free the Khormai. Realizing that they were going to be overwhelmed by droids in moments, Fisto and Sharp were forced to improvise in order to destroy the cannons. The pair decided to use one of the large containers filled with the agrocite to complete their mandate. Fisto moved the container to the cannons with the Force, and Sharp—willing to end the mission like a Devil Dog—told Fisto to get clear. Sharp then [[Suicide|sacrificed his life]] by running to the container and shooting it with his [[DC-15S blaster]].<ref name="ISotR 3" /> |
| − | The resulting explosion destroyed the cannon firing platform and took out all of the agrocite cannons, killed Gout, and threw Fisto to the ground. There, he rejoined Wolffe's troops, and they set off to aid Koon. Meanwhile, the duel between Ventress and Koon had moved to a walkway inside the mine. Despite his broken arm, Koon put up a fierce resistance and even managed to knock one of Ventress's lightsabers out of her hands. The Dark Jedi reached for her remote in order to destroy the mine, but Koon Force-pushed it away from her. The remote fell on the ground beneath the walkway. Ventress jumped down to reclaim it, but the remote was destroyed by a blaster shot fired by Wolffe, who, along with Fisto and several clones, had arrived to assist Koon. Fisto offered Ventress yet another opportunity to surrender, but she declined |
+ | The resulting explosion destroyed the cannon firing platform and took out all of the agrocite cannons, killed Gout, and threw Fisto to the ground. There, he rejoined Wolffe's troops, and they set off to aid Koon. Meanwhile, the duel between Ventress and Koon had moved to a walkway inside the mine. Despite his broken arm, Koon put up a fierce resistance and even managed to knock one of Ventress's lightsabers out of her hands. The Dark Jedi reached for her remote in order to destroy the mine, but Koon Force-pushed it away from her. The remote fell on the ground beneath the walkway. Ventress jumped down to reclaim it, but the remote was destroyed by a blaster shot fired by Wolffe, who, along with Fisto and several clones, had arrived to assist Koon. Fisto offered Ventress yet another opportunity to surrender, but she declined again and ran away, injuring Wolffe in the head with her lightsaber as she escaped.<ref name="ISotR 3" /> |
==Aftermath== |
==Aftermath== |
||
| − | {{Quote|You saved our lives and our livelihood, Master Jedi. Even though I know you came for the agrocite, it was your service to ''my people'', not your Republic, that impressed me.|Adaroo thanks Plo Koon|Star Wars The Clone Wars 9: In Service of the Republic, Part 3}} |
+ | {{Quote|You saved our lives and our livelihood, Master Jedi. Even though I know you came for the agrocite, it was your service to ''my people'', not your Republic, that impressed me.|Adaroo thanks Plo Koon|Star Wars: The Clone Wars 9: In Service of the Republic, Part 3}} |
| − | Fisto wanted to pursue Ventress, but Koon decided that it was more important to support the surviving Republic troops and allowed her to flee. With the Separatists defeated, all of the Khormai slaves were freed, and the Republic was given access to the agrocite. Adaroo was very grateful to the Jedi for the liberation of his people and thanked them. The Jedi, however, admitted that without the clones' brave service, they would have been unable to secure the victory. Later, the Republic again established a command post at the agrocite processing center. The Republic's [[Supreme Chancellor]], [[Palpatine]], contacted Ozzel—who had taken credit for the Republic victory—and promoted him<ref name="ISotR 3" /> to captain.<ref> |
+ | Fisto wanted to pursue Ventress, but Koon decided that it was more important to support the surviving Republic troops and allowed her to flee. With the Separatists defeated, all of the Khormai slaves were freed, and the Republic was given access to the agrocite. Adaroo was very grateful to the Jedi for the liberation of his people and thanked them. The Jedi, however, admitted that without the clones' brave service, they would have been unable to secure the victory. Later, the Republic again established a command post at the agrocite processing center. The Republic's [[Supreme Chancellor]], [[Palpatine]], contacted Ozzel—who had taken credit for the Republic victory—and promoted him<ref name="ISotR 3" /> to [[captain]].<ref>Although in ''[[Star Wars: The Clone Wars 9: In Service of the Republic, Part 3]]'' Palpatine promotes Ozzel to the rank of admiral, [[Dark Horse Comics|Dark Horse]] editor [[Randy Stradley]] [http://www.darkhorse.com/Help/Boards/viewtopic.php?t=16206 has stated] that [[Leland Chee]] instructed that Ozzel be given the rank of captain to accommodate with his rank of captain in the [[novel]] ''[[Allegiance (novel)|Allegiance]]'', which takes place later in the ''[[Star Wars]]'' [[Timeline of galactic history|timeline]]. The error was fixed when ''In Service of the Republic'' was [[Star Wars: The Clone Wars: In Service of the Republic (TPB)|collected]] in a trade paperback.</ref> |
==Notable participants== |
==Notable participants== |
||
===Galactic Republic=== |
===Galactic Republic=== |
||
====General Plo Koon==== |
====General Plo Koon==== |
||
| ⚫ | |||
{{Main|Plo Koon}} |
{{Main|Plo Koon}} |
||
| ⚫ | A [[Kel Dor]] [[Sexes|male]] Jedi Master and a member of the [[Jedi High Council|Jedi Council]],<ref name="DB: Koon">{{DB|character|plokoon|Plo Koon}}</ref> [[General]] Plo Koon led the Republic forces on Khorm alongside fellow Jedi Kit Fisto. Koon valued the lives of the enslaved Khormai and believed that the Republic's main priority on Khorm was to liberate them. Koon was also reluctant to sacrifice the clones in a direct assault on the mine and therefore decided to destroy the weather-control station to lessen the amount of casualties.<ref name="ISotR 1" /> When Asajj Ventress ambushed him and brought down an avalanche, Koon broke his left arm. Despite the injury, he still maintained a willingness to continue the mission<ref name="ISotR 2" /> and eventually faced off against Ventress again. Fighting only with his right arm, Koon was able to withstand Ventress's attacks and ultimately prevented the Dark Jedi from destroying the mine by Force-pushing her detonator away.<ref name="ISotR 3" /> |
||
| ⚫ | |||
| + | |||
| ⚫ | A [[Kel Dor]] [[Sexes|male]] Jedi Master and a member of the [[Jedi High Council|Jedi Council]],<ref name="DB: Koon">{{DB|character|plokoon|Plo Koon}}</ref> General |
||
| − | {{Clear}} |
||
====General Kit Fisto==== |
====General Kit Fisto==== |
||
| ⚫ | |||
{{Main|Kit Fisto}} |
{{Main|Kit Fisto}} |
||
| ⚫ | Kit Fisto was a [[Nautolan]] member of the Jedi Council and a Jedi General<ref name="DB: Fisto">{{DB|character|kitfisto|Kit Fisto}}</ref> who commanded the Republic troops alongside Plo Koon. During the final engagement on Khorm, Fisto devised a plan to infiltrate the cannon firing platform via a gun barrel, a tactic that eventually resulted in the destruction of the agrocite cannons.<ref name="ISotR 3" /> Fisto respected his Kel Dor colleague's wisdom and experience. Along with CC-3636, he tried to discern Koon's age several times, something that Koon kept secret.<ref name="ISotR 1" /> Fisto's curiosity was partially satisfied when Koon revealed at the end of the battle that he was 382 Kel Dor [[List of measurement units|years]], although Fisto was still oblivious as to how long a Kel Dor year was.<ref name="ISotR 3" /> |
||
| ⚫ | |||
| + | |||
| ⚫ | |||
| − | {{Clear}} |
||
====General Tauht==== |
====General Tauht==== |
||
| ⚫ | |||
{{Main|Tauht}} |
{{Main|Tauht}} |
||
| ⚫ | A Jedi Master dispatched to Khorm alongside Fisto and Koon, General Tauht participated in the Republic's initial assault on the agrocite processing center, during which he destroyed Unger Gout's proton cannons with his lightsaber. Koon trusted Tauht and considered him capable enough to be left in charge of the Republic base while he and Fisto went to destroy the weather-control station. When the Confederacy launched a counterattack at the processing center, Tauht hurried to warn Koon but was prevented from doing so by Ventress. Tauht engaged the Dark Acolyte in a lightsaber duel and managed to knock one of her lightsabers out of her hand. Ventress, however, used the Force to manipulate her fallen weapon and stabbed Tauht through the back with it, killing the Jedi Master.<ref name="ISotR 1" /> |
||
| ⚫ | |||
| + | |||
| ⚫ | A Jedi Master dispatched to Khorm alongside Fisto and Koon, General |
||
| − | {{Clear}} |
||
====Major Kendal Ozzel==== |
====Major Kendal Ozzel==== |
||
| ⚫ | |||
{{Main|Kendal Ozzel}} |
{{Main|Kendal Ozzel}} |
||
| ⚫ | Major Kendal Ozzel was in charge of the Republic ground troops during the battle. Although he was promoted by Palpatine for his service following the Republic's victory,<ref name="ISotR 3" /> Ozzel, in fact, had done nothing but panic and act against the Jedi's orders. More than once, Ozzel's decisions went awry for the Republic.<ref name="ISotR 1" /><ref name="ISotR 3" /> Fearing for his life, he even betrayed Koon and Fisto by revealing their location to Ventress.<ref name="ISotR 1" /> During the battle at the staging point, Ozzel was ready to surrender to the Dark Acolyte, but when Wieler's reinforcements arrived and forced Ventress to retreat, he was quick to claim the victory for himself and stated that everything had gone according to his plan.<ref name="ISotR 2" /> Such behavior often put him at odds with the loyal and obedient CC-3636, although the latter still followed Ozzel's orders and protected him from enemy fire.<ref name="ISotR 1" /><ref name="ISotR 3" /><ref name="ISotR 2" /> |
||
| ⚫ | |||
| + | |||
| ⚫ | Major |
||
| − | {{Clear}} |
||
====Captain Sharp==== |
====Captain Sharp==== |
||
| ⚫ | |||
{{Main|Sharp}} |
{{Main|Sharp}} |
||
| ⚫ | Captain Sharp was the leader of the Devil Dogs, a special detachment of the [[44th Special Operations Division]] that served under Ozzel. During an [[Battle of Mimban|engagement]] on the planet [[Circarpous V|Mimban]], Sharp took a blaster bolt in the throat, and, as a result, his voice became distorted. Serving under Ozzel, who was rather harsh and uncaring toward the clone troopers, Sharp became a tough and battle-hardened [[soldier]]. He did not understand why the Jedi made a stop to bury the Khormai's bodies; for him, it made no difference where they would lay because they were already dead. However, he was taught by the Jedi of the necessity not only to protect the Khormai but to respect their lives as civilians caught up in the conflict.<ref name="ISotR 1" /> In the end, the Captain sacrificed himself by shooting at the canister with the agrocite at point-blank range, triggering an explosion that destroyed the cannons and killed Gout.<ref name="ISotR 3" /> |
||
| ⚫ | |||
| + | |||
| ⚫ | Captain |
||
| − | {{Clear}} |
||
===Confederacy of Independent Systems=== |
===Confederacy of Independent Systems=== |
||
====Commander Asajj Ventress==== |
====Commander Asajj Ventress==== |
||
| ⚫ | |||
{{Main|Asajj Ventress}} |
{{Main|Asajj Ventress}} |
||
| ⚫ | An [[assassin]] and Dark Acolyte serving under Count Dooku, Asajj Ventress was sent by her Master to aid Gout in his fight with the Republic. Ventress was successful at first and was able to recapture the agrocite processing facility and take Ozzel prisoner.<ref name="ISotR 1" /> However, her later endeavors all ended in failure. She was unable to kill Koon and Fisto when she faced them for the first time and was additionally unable to defeat all of the Republic forces at the staging point.<ref name="ISotR 2" /> As a last-ditch attempt, Ventress planned to blow up the agrocite mine and kill the Khormai but was prevented from doing so by Koon and CC-3636. The Dark Acolyte was offered a chance to surrender by Fisto, but she did not accept it and instead fled from her defeat.<ref name="ISotR 3" /> |
||
| ⚫ | |||
| + | |||
| ⚫ | An [[assassin]] and Dark Acolyte serving under Count Dooku, |
||
| − | {{Clear}} |
||
====Warlord Unger Gout==== |
====Warlord Unger Gout==== |
||
| ⚫ | |||
{{Main|Unger Gout}} |
{{Main|Unger Gout}} |
||
| ⚫ | A Khormai warlord who betrayed his own people and allied himself with Count Dooku,<ref name="ISotR 1" /> Unger Gout was willing to defeat the Republic at all costs, no matter if it meant sacrificing Ventress's life.<ref name="ISotR 2" /> He often argued with the Dark Jedi and believed her to be responsible for all of his failures. During the Republic's assault on the mine, Gout attempted to defeat the enemy by deploying his agrocite cannons. Although initially successful, the tactic failed when Fisto and Sharp infiltrated the cannon firing platform. When Sharp detonated the agrocite, the resulting explosion destroyed the cannons and killed Gout.<ref name="ISotR 3" /> |
||
| ⚫ | |||
| + | |||
| ⚫ | A Khormai warlord who betrayed his own people and allied himself with Count Dooku,<ref name="ISotR 1" /> |
||
| − | {{Clear}} |
||
==Behind the scenes== |
==Behind the scenes== |
||
| + | {{Quote|We wanted to examine the nature of service and how individuals have different definitions on what that is. Is service the strict sense of duty to accomplish a mission, or is it much larger in meaning, like preserving the ideals of the Republic?|Henry Gilroy|Star Wars Insider 111}} |
||
| − | The Battle of Khorm was the focus of the [[2009]] ''[[Star Wars The Clone Wars: In Service of the Republic|In Service of the Republic]]'' story arc of the ''[[Star Wars: The Clone Wars (comics)|Star Wars: The Clone Wars]]'' [[Comic book|comic]] series. All three issues of the arc were written by [[Henry Gilroy]] and [[Steven Melching]] and were illustrated by [[Scott Hepburn]]. |
||
| + | The Battle of Khorm was the focus of the [[2009]] ''[[Star Wars: The Clone Wars: In Service of the Republic|In Service of the Republic]]'' story arc of the ''[[Star Wars: The Clone Wars (comics)|Star Wars: The Clone Wars]]'' [[Comic book|comic]] series. All three issues of the arc were written by [[Henry Gilroy]] and [[Steven Melching]] and were illustrated by [[Scott Hepburn]]. Through the Battle of Khorm, Gilroy and Melching wanted to explore the various perceptions that different individuals have on service. ''In Service of the Republic'' was initially conceived by Gilroy—who served as a head writer for [[Star Wars: The Clone Wars (TV series)|''The Clone Wars'' television series]]—as a potential premise for the show. However, he found that the story was much easier to realize in comic form, where it was not constrained by a television production budget.<ref name="Blaster">{{InsiderCite|111|Blaster (Star Wars Insider)|Blaster}}</ref> |
||
==Appearances== |
==Appearances== |
||
| − | *''[[Star Wars The Clone Wars 7: In Service of the Republic, Part 1]]'' {{1st}} |
+ | *''[[Star Wars: The Clone Wars 7: In Service of the Republic, Part 1]]'' {{1st}} |
| − | *''[[Star Wars The Clone Wars 8: In Service of the Republic, Part 2]]'' |
+ | *''[[Star Wars: The Clone Wars 8: In Service of the Republic, Part 2]]'' |
| − | *''[[Star Wars The Clone Wars 9: In Service of the Republic, Part 3]]'' {{1stID}} |
+ | *''[[Star Wars: The Clone Wars 9: In Service of the Republic, Part 3]]'' {{1stID}} |
| + | |||
| + | ==Sources== |
||
| + | *{{InsiderCite|111|Blaster (Star Wars Insider)|Blaster}} |
||
| + | *{{CN|url=promos/201007_secretcode/tools/downloads/video2/index.html|text="Clones" Video}} |
||
| + | *{{HasbroCite|set=Star Wars: The Clone Wars (toy line)|text=''Star Wars: The Clone Wars''|pack=Clone Commander Wolffe|link=TCW48-CloneWolffe.asp}} |
||
| + | *{{HasbroCite|set=Star Wars: The Clone Wars (toy line)|text=''Star Wars: The Clone Wars''|pack=Plo Koon (Cold Weather Gear)|link=TCW53-Plo.asp}} |
||
| + | *{{HasbroCite|set=Star Wars: The Clone Wars (toy line)|text=''Star Wars: The Clone Wars''|pack=Kit Fisto (Cold Weather Gear)|link=TCW60-Kit.asp}} |
||
| + | *''[[Star Wars: The Ultimate Visual Guide: Updated and Expanded]]'' |
||
| + | *{{Blog|official=true|2013/02/01/chronicling-the-clone-wars-7/|Chronicling ''The Clone Wars'' #7}} |
||
| + | *{{FFCite|y=2013|4|SWO2, ''CK-6 'Freeco' Swoop Bike''}} |
||
| + | *''[[Star Wars: The Clone Wars: Episode Guide]]'' |
||
| + | *{{FFCite|y=2014|4|SWO2, ''CK-6 'Freeco' Swoop Bike''}} |
||
| + | *{{SWE|characters|clonecommanderwolffe|Clone Commander Wolffe}} {{Imo}} |
||
==Notes and references== |
==Notes and references== |
||
{{Reflist}} |
{{Reflist}} |
||
| + | {{Interlang |
||
| − | [[Category:Battles of the Clone Wars|Khorm]] |
||
| + | |de=Schlacht um Khorm |
||
| + | |es=Batalla de Khorm |
||
| + | |deFA=1 |
||
| + | }} |
||
| − | [[ |
+ | [[Category:Battles of the Clone Wars|Khorm, Battle of]] |
Revision as of 04:16, 2 March 2014
| | |
Warning: This infobox has missing parameters: unit2, unit1 and unrecognized parameters: BG2, imageBG
- "With the addition of the Khormai agrocite to our arsenal, I am confident we have taken a bold step toward bringing peace to the galaxy. Your brave service to the Republic made this great victory possible."
- ―Supreme Chancellor Palpatine, to Kendal Ozzel, after the battle
The Battle of Khorm took place around 22 BBY during the Clone Wars between the Galactic Republic and the Confederacy of Independent Systems. Hoping to obtain access to the deposits of the valuable agrocite mineral on the ice planet of Khorm for the Republic, the Galactic Senate dispatched a force under the command of three Jedi Generals—Plo Koon, Kit Fisto, and Tauht—to Khorm. However, by the time the Republic arrived there, the Confederacy had formed an alliance with the native Khormai Warlord Unger Gout, occupied the planet, and enslaved the local population to mine agrocite for them. The Confederacy additionally constructed a weather-control station that created a storm in Khorm's atmosphere, preventing the Republic from using air support but still enabling the fleet to land ground troops.
Soon, the Republic captured an agrocite processing facility and established an outpost there, forcing Gout to request reinforcements from the Confederate leader, Count Dooku. Asajj Ventress, Dooku's Dark Acolyte, was dispatched to assist Gout and arrived at Khorm. However, the Jedi realized that the storm was being created by the weather-control station, prompting Fisto, Koon, and a detachment of clone troopers to set off to destroy it. After the Jedi had left, Ventress and Gout initiated a counterattack at the processing facility and recaptured it. Ventress personally slew General Tauht—who had been left in charge of the base—and the Confederacy captured Major Kendal Ozzel, Clone Commander CC-3636, and several clone troopers. Ventress tracked and ambushed the remaining two Jedi and their team but was unable to kill them, as she was recalled back to the processing facility to recapture Ozzel and the clones, who had managed to escape from Separatist custody.
Ventress pursued the escapees to a Republic staging point and almost decimated all remaining Republic forces stationed there. However, after Koon and Fisto finally managed to destroy the weather-control station, Republic reinforcements arrived, and Ventress was forced to retreat to an agrocite mine, where the enslaved Khormai were being held. The Dark Acolyte then had the mine rigged with explosives with the intention of killing the Khormai if the Republic conquered the mine. Discovering this, the Jedi decided to free the hostages before initiating a full-scale attack and tried to signal Ozzel—who was tasked with leading the assault on the mine—to delay his advance. The Jedi were not able to contact the Major, as the Separatists were jamming all signals, and Ozzel began his attack while the hostages were still in Ventress's custody. During the ensuing fight, Gout revealed the powerful agrocite cannons that he had constructed. Fisto and Clone Captain Sharp were able to destroy them, however, and Koon prevented Ventress from demolishing the mine. The battle was won by the Republic, and the Khormai were liberated, but Ventress managed to escape.
Prelude
- "An ambitious Warlord cast his lot with Dooku in exchange for control of all we have. Now he enslaves his own people to mine for the Separatists."
- ―Adaroo
During the Clone Wars between the Galactic Republic and the Confederacy of Independent Systems, both sides struggled for resources to supply their armies. One such resource was agrocite, a valuable mineral that could be used to exceptionally increase power to starfighters. Agrocite, however, was found only on three planets in the entire galaxy, one of them being the ice world of Khorm. Around 22 BBY, the Galactic Senate dispatched a Republic force under the command of Jedi Generals Plo Koon, Kit Fisto, and Tauht to secure the agrocite deposits.[1]
By the time the Jedi arrived at the planet, the Confederacy—allied with the native Khormai Warlord Unger Gout—had already occupied Khorm, enslaved the Khormai, and forced them to mine agrocite for the Separatists. On the Kafiri Mountain, the Confederacy built a weather-control station, which created a storm in Khorm's atmosphere and prevented the enemy from utilizing air support.[1] Additionally, Gout secretly began construction of agrocite-powered cannons inside the mine, intent on using them against the Republic.[2]
The Republic forces on Khorm
Despite the storm, the Republic was able to land its ground troops, leaving a fleet of Venator-class Star Destroyers commanded by Admiral Wieler in orbit of Khorm.[1] After landing, the Republic left some troops at a staging area,[3] while the rest of the force, commanded by Major Kendal Ozzel, moved toward a Separatist-controlled agrocite processing facility. Before attacking the facility, Koon arranged a meeting with several Khormai in order to better understand the current situation. One of the Khormai, Adaroo, told the Jedi about Gout's dealings with the Separatists. Informed of the enslaved natives, the Jedi decided that their main priority was to liberate them and assured Adaroo of it. Joining the Republic forces in their attack, Adaroo promised to show his new allies a weakness in Gout's defensive positions.[1]
The battle
Capturing the facility
- "Bury them in ice!"
- ―Unger Gout gives an order to destroy the Republic forces

The Jedi and Adaroo fight in the trenches.
The Republic troops soon reached the agrocite processing plant—where Gout was located—and were attacked by Separatist J-1 semi-autonomous proton cannons. As the Republic's AT-TE walkers fell under laser fire, Ozzel ordered the clone troopers to disembark. The move, however, only exposed the clones to the enemy fire. Realizing that the troopers could not survive the barrage, the Jedi drew fire upon themselves and used their lightsabers to deflect blaster shots aimed at the clones. Koon, Fisto, and Adaroo then charged Gout's BX-series droid commandos and B2 super battle droids in the trenches that surrounded the plant, while Tauht proceeded to destroy the cannons.[1]
Meanwhile, Ozzel's AT-TE walkers reached the attack position, and the Major ordered them to open fire on the Jedi's positions—thus endangering their lives but greatly reducing the Separatist defenses. Seeing this, Gout fled the facility on a rail jet. The Republic soon captured the facility and established a base there, while Gout retreated to the main Separatist base in an agrocite mine to await reinforcements from the Confederate leader, Count Dooku. At the newly established Republic base, the Jedi started contemplating an attack on the mine, where the Khormai slaves were being held. Ozzel proposed a direct assault, but the Jedi declined, as such a tactic would result in too many clone casualties. Meanwhile, Separatist Commander and Dark Acolyte Asajj Ventress arrived in her starship, the Trident, to assist Gout. Wieler tried to prevent her from reaching the planet and dispatched two V-19 Torrent starfighters to intercept Ventress's vessel.[1]
The Republic fighters pursued Ventress to the edge of the storm and witnessed it opening for her. When they tried to pursue the Trident further, however, the storm closed again, and both Republic fighters were destroyed. Wieler immediately contacted the Jedi and informed them of what had just transpired, and the Jedi realized that the Confederacy possessed a weather-control station, recalling previous intelligence reports of Separatist attempts to acquire such technology. If the station was to be destroyed, the storm above Khorm would dissipate, allowing the Republic to utilize air support during the assault on the mine and lessen the amount of casualties. Realizing that the station was located somewhere in the mountains near the Separatist mine, Koon, Fisto, Clone Captain Sharp, and Adaroo took Ozzel's Devil Dogs clone unit and departed on CK-6 swoops to destroy the station with explosives, leaving Tauht in charge of the Republic base. In order to approach the weather-control station undetected, Koon decided against taking a direct route to their objective and instead asked Adaroo to show them another way.[1]
Counterattack
- "Signal the enemy. We're surrendering."
"Droids seldom take prisoners, sir."
"Not even officers?" - ―Kendal Ozzel and CC-3636, after Ozzel's failed attack
Major Kendal Ozzel orders the Republic forces to attack.
Shortly after Koon and Fisto had departed, Ventress and Gout initiated a counterattack on the processing facility. Before proceeding with the assault, Ventress had a unit of DSD1 dwarf spider droids hidden beneath a layer of snow near the facility. Separatist Armored Assault Tanks then besieged the plant, and Tauht rushed inside the structure to contact Koon and Fisto. On his way there, Tauht ordered a frightened Ozzel to reinforce the lines and hold the facility. Ventress, however, was able to infiltrate the Republic base and, by detonating some explosives, made Tauht fall to the ground, where she confronted him. After a brief lightsaber duel, Ventress killed Tauht by manipulating one of her lightsabers behind his back with the Force and stabbing him with it. The Dark Acolyte then made her way back to the Separatist positions.[1]
Informed of Tauht's death via his comlink, Ozzel assumed command of the remaining Republic forces, but instead of staying put and holding the facility as Tauht had ordered him to do before he had been killed, the Major ordered all troops to charge the enemy. Ozzel himself—alongside Clone Commander CC-3636, nicknamed "Wolffe"—boarded one of the AT-TEs and participated in the attack. At first, the Republic seemingly gained the upper hand, and the Confederacy appeared to retreat. However, Ventress ordered Sergeant 126 to reveal the hidden spider droids, and the sudden appearance of the Confederate reinforcements caught Ozzel by surprise. The spider droids decimated the majority of the Republic force,[1] including heavy armor.[3]
As the few remaining Republic troops became surrounded by the droids, Ozzel panicked and ordered the Republic forces to surrender.[1] With the engagement won, the Confederacy regained control of the processing plant,[3] while Ozzel, Wolffe, and four other clone troopers were taken prisoner by Ventress and interrogated by her regarding Koon's and Fisto's location. Citing the Convention of Civilized Systems, Ozzel initially refused to cooperate, but after Ventress killed two clone troopers and promised to do the same to him, the Major revealed the Jedi's plan. Receiving the information she needed, the Dark Acolyte desired to kill Ozzel, Wolffe, and the remaining troopers[1]—Spitter and Comet[3]—but Gout instead had them imprisoned.[1] Ventress then took a detachment of droid commandos and set off to kill the Jedi.[3]
Ambush
- "You've bitten off more than you can chew, assassin. Against two Jedi Masters and without the element of surprise, your best option is surrender."
"Who says I've lost the element of surprise?" - ―Plo Koon and Asajj Ventress


Asajj Ventress attacks Plo Koon.
The Jedi soon reached the mountain area and saw a Khormai village devastated by the storm. After making a stop there and burying the bodies of the dead Khormai in graves cut in the ice with the Jedi's lightsabers, the Republic strike team continued with its mission.[1] Climbing higher in the mountains, the group was forced to abandon the swoops and travel the rest of the journey on foot. Meanwhile, Gout contacted the commander of the weather-control station, the Aqualish Villpu Nagg, and ordered him to create a storm large enough to destroy the Jedi, despite its additional potentiality of killing Ventress, who was pursuing them.[3]
Nagg executed Gout's orders, but Ventress herself was able to pass the Republic troops' advance. She reached a mountain located at a half-rotation's hike from the station and prepared a trap for the Jedi by hiding most of her droids beneath the snow. She then took position at an upper level of the mountain with the remaining droids and an Armored Assault Tank. When the Republic troops reached the area, the Dark Acolyte ambushed them, jumping from above and attacking Koon with her lightsabers. At the same time, the droid commandos emerged from the snow and opened fire on the clone troopers. A firefight ensued, and Fisto ordered Sharp and his men to hold off the droids while he rushed to assist Koon. The two Jedi Masters engaged in a duel against Ventress. During the fight, Ventress was offered a chance to surrender, but she declined. Instead, the Dark Acolyte used the Force to bring down an avalanche, burying both the Republic forces and Ventress's droids underneath a crust of snow and ice. In order to avoid being crushed to death by the avalanche, the two Jedi created a Force pocket that offered them and the rest of the Republic strike team protection from the imposing wall of snow.[3]
Accompanied by her droid commandos, Ventress initiated a search for any survivors of the avalanche and killed those whom she found. In the meantime, Ozzel, Wolffe, Spitter, and Comet attempted to escape from the agrocite processing facility in which they had been imprisoned. Eventually, the three troopers were able to hot-wire a control panel that operated the doors to their cell and freed themselves from their captivity. Ozzel and the clones then stole an AAT and used it to make their way out of the facility, destroying all droid forces that stood in their way. Attacked by the escaped prisoners, the droids contacted Ventress and called her to assist them. Ventress responded to the call and set off to the processing facility in her own AAT, leaving her droids to kill any surviving Republic troops they could find. As soon as the Dark Acolyte left the scene, however, the Jedi and the clones emerged from the snow and attacked the droids, destroying them.[3]
The encounter with Ventress cost the Republic the lives of four troopers: Sten, Deadeye, Blunt, and Jark. Also, the explosives with which they had planned to destroy the weather-control station were gone, and Koon had broken his left arm. Nevertheless, the Jedi decided to continue their mission. Adaroo used a whistle to call several ice worms, Aelids, which the Khormai commonly used as transportation by riding in them. The Jedi, the remaining clones, and Adaroo took their positions inside the worms and set off for the enemy station. Meanwhile, Ozzel and the three clones finally managed to escape from the processing facility—moments before Ventress arrived there—and proceeded to the Republic's staging area.[3]
Turning the tide
- "We cannot stop the storm, but perhaps there is a way to use the enemy's weapon against itself and destroy this location."
"But sir. Aren't we standing on this location?"
"Very perceptive, Captain." - ―Plo Koon and Clone Captain Sharp
Ventress deduced Ozzel's intentions and took a force of AATs, spider droids, and NR-N99 Persuader-class droid enforcers to kill all at the staging area and thus sever the Republic's foothold on Khorm. At the same time, the strike team led by Koon and Fisto had almost reached the weather-control station in the Aelids. Because they had lost the explosives, the Jedi were forced to devise another method to demolish the enemy structure. Koon decided to destroy the station by redirecting the atmospheric storm at it. This plan, however, posed a danger to the Republic team, as the group could also be caught in the storm. As Koon, Fisto, and the Devil Dogs moved toward the station to execute their strategy, Ozzel and the rest of the escapees reached the staging point in the AAT and rendezvoused with the Republic troops stationed there.[3]
Although Wolffe offered to contact the Jedi immediately, Ozzel declined this request out of his belief that they were already dead. Ozzel instead ordered the landing ships to be prepared for takeoff in order to return to and resupply with the fleet, after which he intended to launch a counterattack. However, due to Khorm's harsh natural conditions—further intensified by the storm—all Republic vehicles, including the few remaining AT-TEs, had been frozen in ice and had been rendered non-operational. After Ozzel was informed of this, Ventress's forces—with the Dark Jedi herself at the front line—arrived and launched an attack, immediately destroying the commandeered AAT. Ozzel, Wolffe, and the other clone troopers were outgunned and were forced to take cover at the frozen transports and AT-TEs.[3]

Admiral Wieler's reinforcements come to rescue Ozzel.
While the battle at the staging area raged on, Koon's and Fisto's team reached a network of antennas that surrounded the Kafiri mountain and could be used to redirect the storm. However, the group was spotted by the station's defenders and came under fire. Despite this, trooper Fixer was able to slice into a junction box and realign the storm's focal node, while Koon and Fisto deflected the blaster fire aimed at him with their lightsabers.[3]
The raging atmospheric phenomena turned on the weather-control station and destroyed it, killing Villpu Nagg. With the station obliterated, the storm itself dissipated as well. Informed of this development, Wieler ordered his forces to launch reinforcements. By this time, the Republic forces had almost lost the battle at the staging point, and Ozzel was willing to surrender again. At that point, Wieler's reinforcements finally arrived. Venator-class Star Destroyers, V-19 Torrent starfighters, and LAAT/i gunships decimated much of the droid force and forced Ventress to order a retreat.[3]
Final moves
- Koon: "Inform Major Ozzel to delay his advance until we free the hostages."
- Sharp: "It's no good, General. The Seppies are jamming our long-range transmissions."
- Fisto: "Then we'd better hurry. If I know Major Ozzel—he's already mobilizing his assault."
- ―Plo Koon, Captain Sharp, and Kit Fisto[src]
After the arrival of the Republic reinforcements, Ozzel was tasked with retaking the agrocite processing facility. The Jedi scouted out the agrocite mine, which Ozzel was to assault afterward. However, Gout and the Confederate troops who were stationed at the processing plant had also retreated to the mine, albeit with heavy losses. Gout moved the enslaved Khormai deep inside the mine for use as hostages. Observing the thin droid force guarding the mine, Fisto and Sharp expressed a notion to attack immediately, but Koon declined, stating that he sensed that the Confederacy was not showing everything it had. Koon's senses were backed by Adaroo, who mentioned that there had been rumors of heavy weapon construction inside the mine. Soon, Ventress arrived at the mine and confronted the enraged Gout, who blamed her for his losses. Ventress dismissed his concerns and ordered a BX droid commando to rig the mines with thermal charges and key them to her remote detonator. Witnessing the Confederacy's transfer of explosives inside the mine, the Jedi realized that Ventress was going to destroy the mine and kill the slaves if the facility fell into Republic hands. Claiming that the liberation of the Khormai was their top priority, Koon decided to liberate them before attacking and ordered Sharp to contact Ozzel and tell him to delay his assault.[2]

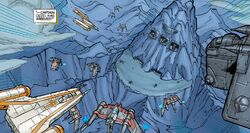
Ozzel's forces assault the mine.
The Separatists, however, were jamming the Republic's long-range transmissions, and the Jedi were therefore unable to contact Ozzel. The Major himself soon gave the order to initiate the attack on the mine. Although the Jedi attempted to liberate the hostages and capture Ventress before Ozzel's forces arrived, they did not succeed, and a full-scale battle began. Republic LAAT/i gunships, V-19 starfighters, Acclamator-class assault ships, and BTL-B Y-wing starfighters all assaulted the mine, and Ozzel prepared for a ground assault. However, Gout revealed his agrocite cannons, which attacked the Republic forces. The artillery shot down half of the attacking Republic force, including one of the Acclamators. Shocked by the sudden turn of events, Ozzel fell unconscious, and Wolffe assumed command of the attacking fleet, ordering it to pull back out of the cannons' range.[2]
Meanwhile, Fisto and Koon developed a plan to assist their forces. Fisto and Sharp set off to sabotage the cannons, while Koon, Adaroo, and two Devil Dogs troopers went inside the mine to capture Ventress and liberate the slaves. Formulating an idea on how to reach the cannon firing platform from an upper level of the mine, Fisto contacted Wolffe and ordered him to advance ground troops. In the meantime, Koon's squad was attacked by Ventress inside the mine. Ordering Adaroo and the clones to continue the mission, Koon engaged the Dark Acolyte in a duel. The rest of Koon's task force soon reached a cave housing the prisoners—who were being guarded by a number of BX droids and B2 super battle droids—and began to develop a strategy to free them. When Wolffe's troops had arrived, the agrocite cannons moved their barrels down to aim at them. This allowed Fisto and Sharp to infiltrate the cannon firing platform via one of the gun barrels and dispatch the droids who were operating the guns.[2]
An intruder alert was sounded throughout the mine, and all droids, including those who guarded the prisoners, were ordered to move to the firing platform and confront the infiltrators. This presented Adaroo and the two clones with the opportunity to make their move and free the Khormai. Realizing that they were going to be overwhelmed by droids in moments, Fisto and Sharp were forced to improvise in order to destroy the cannons. The pair decided to use one of the large containers filled with the agrocite to complete their mandate. Fisto moved the container to the cannons with the Force, and Sharp—willing to end the mission like a Devil Dog—told Fisto to get clear. Sharp then sacrificed his life by running to the container and shooting it with his DC-15S blaster.[2]
The resulting explosion destroyed the cannon firing platform and took out all of the agrocite cannons, killed Gout, and threw Fisto to the ground. There, he rejoined Wolffe's troops, and they set off to aid Koon. Meanwhile, the duel between Ventress and Koon had moved to a walkway inside the mine. Despite his broken arm, Koon put up a fierce resistance and even managed to knock one of Ventress's lightsabers out of her hands. The Dark Jedi reached for her remote in order to destroy the mine, but Koon Force-pushed it away from her. The remote fell on the ground beneath the walkway. Ventress jumped down to reclaim it, but the remote was destroyed by a blaster shot fired by Wolffe, who, along with Fisto and several clones, had arrived to assist Koon. Fisto offered Ventress yet another opportunity to surrender, but she declined again and ran away, injuring Wolffe in the head with her lightsaber as she escaped.[2]
Aftermath
- "You saved our lives and our livelihood, Master Jedi. Even though I know you came for the agrocite, it was your service to my people, not your Republic, that impressed me."
- ―Adaroo thanks Plo Koon
Fisto wanted to pursue Ventress, but Koon decided that it was more important to support the surviving Republic troops and allowed her to flee. With the Separatists defeated, all of the Khormai slaves were freed, and the Republic was given access to the agrocite. Adaroo was very grateful to the Jedi for the liberation of his people and thanked them. The Jedi, however, admitted that without the clones' brave service, they would have been unable to secure the victory. Later, the Republic again established a command post at the agrocite processing center. The Republic's Supreme Chancellor, Palpatine, contacted Ozzel—who had taken credit for the Republic victory—and promoted him[2] to captain.[4]
Notable participants
Galactic Republic
General Plo Koon


Plo Koon
A Kel Dor male Jedi Master and a member of the Jedi Council,[5] General Plo Koon led the Republic forces on Khorm alongside fellow Jedi Kit Fisto. Koon valued the lives of the enslaved Khormai and believed that the Republic's main priority on Khorm was to liberate them. Koon was also reluctant to sacrifice the clones in a direct assault on the mine and therefore decided to destroy the weather-control station to lessen the amount of casualties.[1] When Asajj Ventress ambushed him and brought down an avalanche, Koon broke his left arm. Despite the injury, he still maintained a willingness to continue the mission[3] and eventually faced off against Ventress again. Fighting only with his right arm, Koon was able to withstand Ventress's attacks and ultimately prevented the Dark Jedi from destroying the mine by Force-pushing her detonator away.[2]
General Kit Fisto


Kit Fisto
Kit Fisto was a Nautolan member of the Jedi Council and a Jedi General[6] who commanded the Republic troops alongside Plo Koon. During the final engagement on Khorm, Fisto devised a plan to infiltrate the cannon firing platform via a gun barrel, a tactic that eventually resulted in the destruction of the agrocite cannons.[2] Fisto respected his Kel Dor colleague's wisdom and experience. Along with CC-3636, he tried to discern Koon's age several times, something that Koon kept secret.[1] Fisto's curiosity was partially satisfied when Koon revealed at the end of the battle that he was 382 Kel Dor years, although Fisto was still oblivious as to how long a Kel Dor year was.[2]
General Tauht
Tauht
A Jedi Master dispatched to Khorm alongside Fisto and Koon, General Tauht participated in the Republic's initial assault on the agrocite processing center, during which he destroyed Unger Gout's proton cannons with his lightsaber. Koon trusted Tauht and considered him capable enough to be left in charge of the Republic base while he and Fisto went to destroy the weather-control station. When the Confederacy launched a counterattack at the processing center, Tauht hurried to warn Koon but was prevented from doing so by Ventress. Tauht engaged the Dark Acolyte in a lightsaber duel and managed to knock one of her lightsabers out of her hand. Ventress, however, used the Force to manipulate her fallen weapon and stabbed Tauht through the back with it, killing the Jedi Master.[1]
Major Kendal Ozzel


Kendal Ozzel
Major Kendal Ozzel was in charge of the Republic ground troops during the battle. Although he was promoted by Palpatine for his service following the Republic's victory,[2] Ozzel, in fact, had done nothing but panic and act against the Jedi's orders. More than once, Ozzel's decisions went awry for the Republic.[1][2] Fearing for his life, he even betrayed Koon and Fisto by revealing their location to Ventress.[1] During the battle at the staging point, Ozzel was ready to surrender to the Dark Acolyte, but when Wieler's reinforcements arrived and forced Ventress to retreat, he was quick to claim the victory for himself and stated that everything had gone according to his plan.[3] Such behavior often put him at odds with the loyal and obedient CC-3636, although the latter still followed Ozzel's orders and protected him from enemy fire.[1][2][3]
Captain Sharp


Sharp
Captain Sharp was the leader of the Devil Dogs, a special detachment of the 44th Special Operations Division that served under Ozzel. During an engagement on the planet Mimban, Sharp took a blaster bolt in the throat, and, as a result, his voice became distorted. Serving under Ozzel, who was rather harsh and uncaring toward the clone troopers, Sharp became a tough and battle-hardened soldier. He did not understand why the Jedi made a stop to bury the Khormai's bodies; for him, it made no difference where they would lay because they were already dead. However, he was taught by the Jedi of the necessity not only to protect the Khormai but to respect their lives as civilians caught up in the conflict.[1] In the end, the Captain sacrificed himself by shooting at the canister with the agrocite at point-blank range, triggering an explosion that destroyed the cannons and killed Gout.[2]
Confederacy of Independent Systems
Commander Asajj Ventress


Asajj Ventress
An assassin and Dark Acolyte serving under Count Dooku, Asajj Ventress was sent by her Master to aid Gout in his fight with the Republic. Ventress was successful at first and was able to recapture the agrocite processing facility and take Ozzel prisoner.[1] However, her later endeavors all ended in failure. She was unable to kill Koon and Fisto when she faced them for the first time and was additionally unable to defeat all of the Republic forces at the staging point.[3] As a last-ditch attempt, Ventress planned to blow up the agrocite mine and kill the Khormai but was prevented from doing so by Koon and CC-3636. The Dark Acolyte was offered a chance to surrender by Fisto, but she did not accept it and instead fled from her defeat.[2]
Warlord Unger Gout
Unger Gout
A Khormai warlord who betrayed his own people and allied himself with Count Dooku,[1] Unger Gout was willing to defeat the Republic at all costs, no matter if it meant sacrificing Ventress's life.[3] He often argued with the Dark Jedi and believed her to be responsible for all of his failures. During the Republic's assault on the mine, Gout attempted to defeat the enemy by deploying his agrocite cannons. Although initially successful, the tactic failed when Fisto and Sharp infiltrated the cannon firing platform. When Sharp detonated the agrocite, the resulting explosion destroyed the cannons and killed Gout.[2]
Behind the scenes
- "We wanted to examine the nature of service and how individuals have different definitions on what that is. Is service the strict sense of duty to accomplish a mission, or is it much larger in meaning, like preserving the ideals of the Republic?"
- ―Henry Gilroy
The Battle of Khorm was the focus of the 2009 In Service of the Republic story arc of the Star Wars: The Clone Wars comic series. All three issues of the arc were written by Henry Gilroy and Steven Melching and were illustrated by Scott Hepburn. Through the Battle of Khorm, Gilroy and Melching wanted to explore the various perceptions that different individuals have on service. In Service of the Republic was initially conceived by Gilroy—who served as a head writer for The Clone Wars television series—as a potential premise for the show. However, he found that the story was much easier to realize in comic form, where it was not constrained by a television production budget.[7]
Appearances
- Star Wars: The Clone Wars 7: In Service of the Republic, Part 1 (First appearance)
- Star Wars: The Clone Wars 8: In Service of the Republic, Part 2
- Star Wars: The Clone Wars 9: In Service of the Republic, Part 3 (First identified as Battle of Khorm)
Sources
 "Blaster" — Star Wars Insider 111
- "Clones" Video on CartoonNetwork.com (content removed from CartoonNetwork.com and unavailable)
- Star Wars: The Clone Wars (Pack: Clone Commander Wolffe) (backup link (TCW48-CloneWolffe.asp) not verified!)
- Star Wars: The Clone Wars (Pack: Plo Koon (Cold Weather Gear)) (backup link (TCW53-Plo.asp) not verified!)
- Star Wars: The Clone Wars (Pack: Kit Fisto (Cold Weather Gear)) (backup link (TCW60-Kit.asp) not verified!)
- Star Wars: The Ultimate Visual Guide: Updated and Expanded
- "The Clone Wars #7 {{{3}}}" — {{{4}}} — [[{{{5}}}|{{{5}}}'s]] StarWars.com Blog (The Clone Wars #7 backup link (2013/02/01/chronicling-the-clone-wars-7//Chronicling The Clone Wars #7) not verified!)
- The Official Star Wars Fact File (2013) Part 4 (SWO2, CK-6 'Freeco' Swoop Bike)
- Star Wars: The Clone Wars: Episode Guide
- The Official Star Wars Fact File (2014) Part 4 (SWO2, CK-6 'Freeco' Swoop Bike)
- Clone Commander Wolffe in the Encyclopedia (content now obsolete; backup link) (Indirect mention only)
Notes and references
- ↑ 1.00 1.01 1.02 1.03 1.04 1.05 1.06 1.07 1.08 1.09 1.10 1.11 1.12 1.13 1.14 1.15 1.16 1.17 1.18 1.19 1.20 1.21 1.22 1.23 1.24 1.25 1.26 1.27 1.28 1.29 1.30 1.31 1.32 1.33 1.34 1.35 1.36 1.37 1.38 1.39 1.40 1.41 1.42 1.43 1.44 1.45 1.46 1.47 1.48 1.49 1.50 1.51 1.52 1.53 1.54 1.55 1.56 1.57 1.58 1.59 1.60 1.61 1.62 Star Wars: The Clone Wars 7: In Service of the Republic, Part 1
- ↑ 2.00 2.01 2.02 2.03 2.04 2.05 2.06 2.07 2.08 2.09 2.10 2.11 2.12 2.13 2.14 2.15 2.16 2.17 2.18 2.19 2.20 2.21 2.22 2.23 Star Wars: The Clone Wars 9: In Service of the Republic, Part 3
- ↑ 3.00 3.01 3.02 3.03 3.04 3.05 3.06 3.07 3.08 3.09 3.10 3.11 3.12 3.13 3.14 3.15 3.16 3.17 3.18 3.19 3.20 3.21 3.22 3.23 3.24 3.25 3.26 3.27 3.28 Star Wars: The Clone Wars 8: In Service of the Republic, Part 2
- ↑ Although in Star Wars: The Clone Wars 9: In Service of the Republic, Part 3 Palpatine promotes Ozzel to the rank of admiral, Dark Horse editor Randy Stradley has stated that Leland Chee instructed that Ozzel be given the rank of captain to accommodate with his rank of captain in the novel Allegiance, which takes place later in the Star Wars timeline. The error was fixed when In Service of the Republic was collected in a trade paperback.
- ↑
 Plo Koon in the Databank (content now obsolete; backup link)
- ↑ Kit Fisto in the Databank (content now obsolete; backup link)
- ↑ "Blaster" — Star Wars Insider 111