| | |
Warning: This infobox has missing parameters: designer, navy, type, maneuverability and unrecognized parameters: taskforce, lastsight, modules, firstsight, class, era, imageBG
- "Your Highness, we must take this last transport. It's our only hope!"
- ―C-3PO, to Princess Leia Organa, during the Battle of Hoth
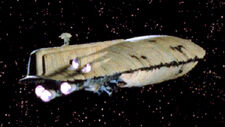
The Bright Hope, also known as Transport C One Seven, was a modified Gallofree Yards GR-75 medium transport that saw service with the Alliance to Restore the Republic during the height of the Galactic Civil War. Acquired as one of several outdated and dilapidated transports by the Rebellion, the Bright Hope nevertheless played an invaluable role in the rapid transit of war matériel. By 3 ABY, the ship was one of thirty GR-75 transports stationed at the Alliance High Command headquarters of Echo Base on the planet Hoth. As the final transport to evacuate the besieged base late during the Battle of Hoth, the Bright Hope carried an overloaded number of wounded and dying passengers in its attempt to run the Imperial blockade of the planet. The ship was disabled and all but destroyed by concentrated fire from Imperial Star Destroyers and the Mist Hunter, the craft of the bounty hunters Zuckuss and 4-LOM. Due to the efforts of Echo Base's chief controller, Toryn Farr, the Bright Hope's 108 surviving passengers were safely recovered.
Description
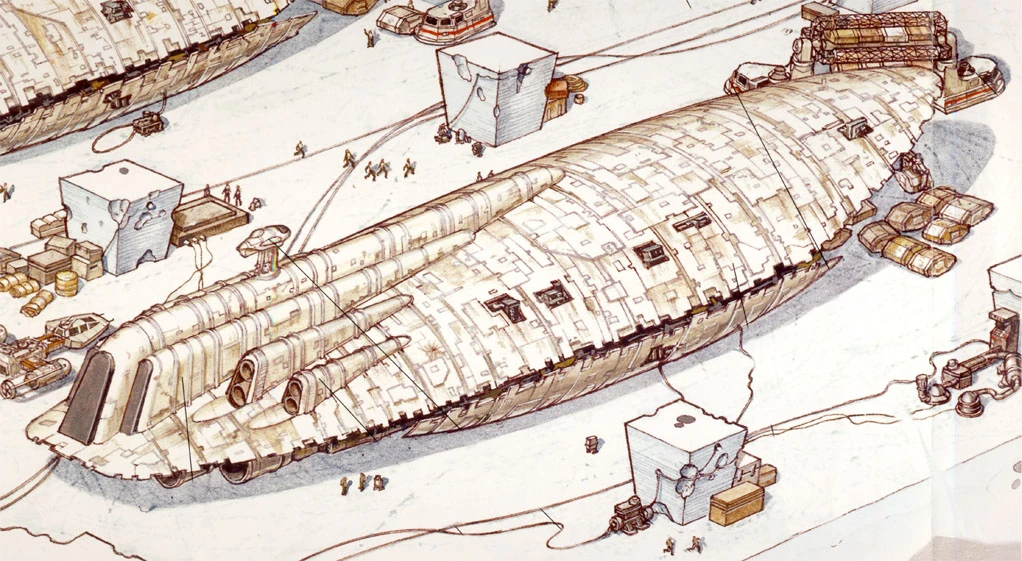
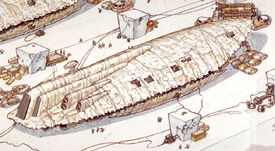
The Bright Hope was typical of the Gallofree Yards[1][3][6] GR-75 medium transport[2] line.[1] At only ninety meters in length, the clamshell-shaped transport could nonetheless haul a considerable amount of cargo for its size, at up to 19,000 metric tons.[1][5] Modular cargo pods were located at the front and underside of the outer hull, each equipped with a repulsorlift device for rapid loading and unloading, and secured in place and protected against atmosphere and vacuum by an invisible magnetic shield,[1] while the vessel's interior was equipped to hold additional cargo and could comfortably house about ninety passengers.[3]
Perched above the top of the outer hull was the stalked, cramped command pod, where a crew of seven—including a command crew of six and one gunner—operated the ship.[3] The transport's single rudimentary deflector shield generator was also located within the pod, protecting a vital yet dangerously exposed section of the vessel.[1] The Bright Hope could alternatively function with a skeleton crew of three.[6] The gunner controlled[3] the ship's minimal armament of four retractable,[1] fire-linked twin laser cannons,[6] though the Bright Hope, like all GR-75 medium transports, was largely unfit for combat. Instead, the Bright Hope typically relied on the escort of Rebel Alliance starfighters for protection while moving between star systems, a long-range sensor suite and advanced countermeasure systems for detecting and escaping enemy ships, as well as extensive durasteel[1] armored plating[3] that showed the wear and tear of years of use.[2]
The Bright Hope, stationed inside Echo Base
The Bright Hope was propelled by three standard primary sublight ion drive engines and six secondary drive engines,[3][5] powered by a main reactor,[1] and was also outfitted with a standard Class 4.0 hyperdrive for hyperspace travel.[3] The Bright Hope's engines, like those of its GR-75 brothers, were greater in number than its civilian-use predecessor, the GR-45 medium transport, to provide greater power.[2] The transport had a maximum acceleration of 900 G,[1] and a maximum speed of twenty megalights in space[3] and up to 650 kilometers per hour in atmosphere. Four retractable landing gear legs extending from the underside of the ship,[1] along with repulsorlift drive units and a retractable boarding ramp, made landing on planetary surfaces a possibility.[3][7]
The transport's interior was mostly hollow, consisting of at least three modular decks, interchangeably equipped to hold either passengers or cargo.[2] By the time of the Battle of Hoth, the Bright Hope was modified with expanded passenger capacity to facilitate evacuation.[4] It was arranged with two freight decks at the bottom of the ship and a single passenger deck near the top. Ladders connected the decks.[7] The passenger deck module consisted of columns of adjacent seats running four across and facing another set of four separated by a common walkway. Each group of eight inward-facing seats were in turn separated by consoles.[2]
The Bright Hope featured a centralized computer system accessible from throughout the ship, including a Ship's Registry database for data on other starships. The Bright Hope's bulkheads were fitted with small storage compartments, some of which by 3 ABY held bantha-wool blankets and white pillows, and the inner passageways were lighted by a standard illumination system and a dim emergency system that offered light from the ceiling above, powered by power cells on each level of the ship. Emergency power supplies were also available. Viewports at intervals offered vistas of the surrounding outside environment. At least three escape pods, each capable of carrying six passengers, were located on the passenger deck.[7] The Bright Hope carried six months of consumables.[6]
History
Acquisition and assignment to Echo Base
The Bright Hope was constructed by Gallofree Yards sometime before the corporation's dissolution in 0 ABY. It was one of many GR-75 medium transports obtained by the Rebel Alliance at a bargain price for cargo transportation duties. Although outdated and dilapidated by the time of the Galactic Civil War, the Gallofree transports were instrumental in helping the Rebellion to efficiently move valuable matériel ranging from medicine to weapons.[5] GR-75 medium transports like the Bright Hope were invaluable in helping Rebel bases quickly evacuate in the face of an impending Imperial assault as early as the Battle of Yavin.[2]
By 3 ABY, the Bright Hope was stationed at the Alliance High Command headquarters' secret Echo Base on the remote ice world of Hoth. It was among a fleet of thirty GR-75 medium transports transferred to Hoth to supplement the needs of the facility. The Bright Hope occupied a position at the north-west corner of Echo Base's interior, within the central transport hangar at the end of a column of similarly immobile GR-75 transports lining the western-most ice wall. When not in use, the transport was routinely kept connected to one of the base's many power generators.[2]
Battle of Hoth
- "Transport, this is Solo. Better take off. I can't get to you. I'll get her out on the Falcon."
- ―Han Solo, after a cave-in prevented Princess Leia Organa from reaching the Bright Hope
Following the discovery of an Imperial Arakyd Viper probe droid and the arrival of Darth Vader's fleet of Imperial-class Star Destroyers, the Death Squadron, in the Hoth system, the Rebel forces of Echo Base began a hasty retreat of their compromised outpost. The base became a hodgepodge of frantic scurrying, with people rushing to load whatever vital equipment onto the base's transports they could muster before they were forced to evacuate. The pilots of Rogue Group were tasked with engaging and delaying the advance of the Imperial walker invasion force in order to buy time for the base's transports to escape.[9]

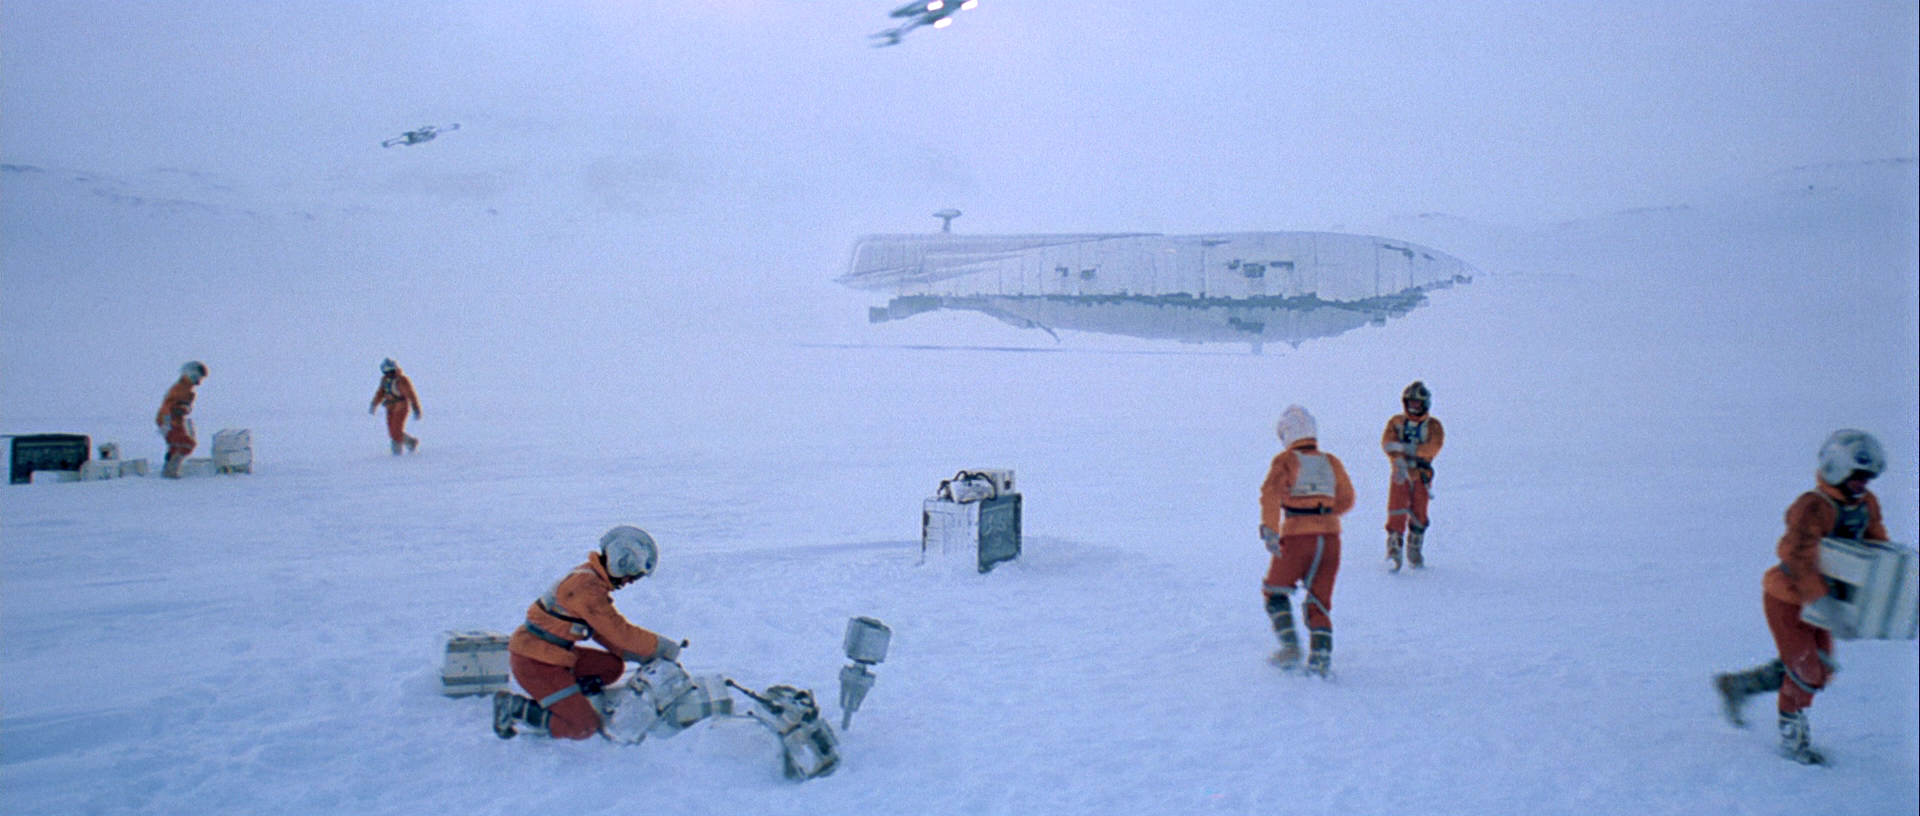
The Bright Hope lifts off from the South Slope staging area.
The transports, unable to defend themselves against the might of Vader's blockading Death Squadron, would be escorted by two starfighters through the Imperial line. Additionally, the evacuation plan called for the base's v-150 anti-orbital ion cannon to provide suppressing covering fire to clear a flight path for the transports to slip by, enter hyperspace, and escape to the Rebels' predetermined rendezvous point beyond the rim of the galaxy.[9] Given its docking position in the hangar farthest from the staging area, the Bright Hope would by default be the final transport to attempt evacuation.[2] Since no one would be left behind to man the ion cannon to provide cover for the Bright Hope, the last remaining Echo Base personnel planned to set the cannon on autofire and simply make a run for it.[10]
As the Battle of Hoth raged, the transports lifted off, one by one, from the evacuation staging area just behind the South Ridge, beyond the south entrance of Echo Base.[2] The Bright Hope was intended to be the evacuation transport assigned to Princess Leia Organa, as she steadfastly remained in the base's command center to direct the final actions of the battle and to ensure that the last remnants remaining in the base reached their own escape ships.[8] As an indicator of their subtle yet increasingly blossoming attachment to each other, Han Solo risked his own safety to escort Organa and the protocol droid C-3PO to the Bright Hope's docking hangar. When they were cut off en route by an ice avalanche in one of the base's corridors from the explosions of the battle outside, Solo instead was forced to oversee her escape aboard his own ship, the Millennium Falcon, instructing the Bright Hope to lift off in light of their inability to reach the transport.[11]
Running the gauntlet
- "Let's give our Imperial friends a seventeenth ship."
- ―Zuckuss, announcing his intentions to destroy the fleeing Bright Hope
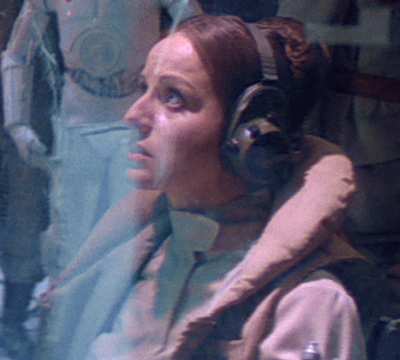
As the last transport remaining, the Bright Hope was, appropriately enough, the last beacon of hope for the hundreds of Rebel personnel still on the planet. Toryn Farr, Echo Base's chief controller and the final person to evacuate the command center, was one of the many who were reliant on the ship as a means to escape. By the time she reached the hangar and saw the transport's flight deck, the scene before her was a motley assortment of many wounded and dying people being assisted by medical droids. With the Imperial advance having already breached the walls of the base, Farr realized the grim predicament facing all those present. She saw no conceivable way of getting all the wounded onto the ship while still allowing the Bright Hope enough time to safely take off.[7]
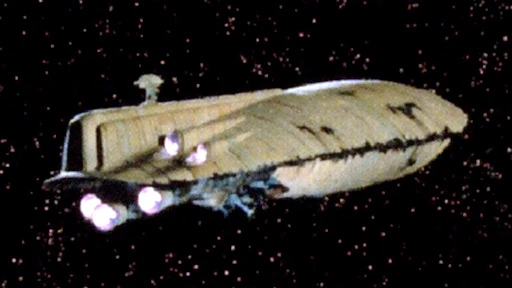
The Bright Hope leaves Hoth.
When a group of snowtroopers began firing on the hangar from the corridor behind her, Farr inadvertently took up a defensive position behind a crate of thermal detonators. Noticing its contents, she tore open the crate and used the explosives to halt the Imperial advance, creating a cave-in that choked off the corridor. Farr thus was able to buy the valuable time needed to get the remaining wounded soldiers aboard the transport, including her own sister, Samoc Farr. Among those who boarded the final evacuation ship was Colonel Ledick Firest, who stayed behind to oversee the final disengagement of Rebel troops from the battlefield.[9] The Bright Hope lifted off from the hangar, leaving behind tons of vital equipment in lieu of the unanticipated number of overloaded passengers, with moments to spare as more snowtroopers descended on the hangar from the snow fields outside.[7] As a transport designed to safely carry ninety individuals, the Bright Hope blasted away from Hoth carrying hundreds.[2]
The Bright Hope held the distinction of being escorted by six T-65 X-wing starfighters as it made its desperate run through the blockading line of Star Destroyers, including fighters piloted by Wedge Antilles, Derek Klivian, Wes Janson,[2] and Lieutenant Tarn Mison,[12] though the base's ion cannon had long been neutralized at this point.[9] Even the ship's uniquely heavy escort could not save it from the armada of Imperial warships waiting for the final transport. The Bright Hope was damaged and nearly destroyed by the Super Star Destroyer Executor[7] and the Imperial II-class Star Destroyer Stalker.[4] Additionally, the Bright Hope was intercepted by the G-1A transport Mist Hunter, the bounty hunting craft of the Gand Zuckuss and the LOM-series protocol droid 4-LOM, who had come to the Hoth system on an Imperial assignment. Having exited hyperspace in time to encounter the tail-end of the space battle, the bounty-hunting duo hoped to destroy the Bright Hope as a token of good will to their Imperial employers. The Mist Hunter wiped out the perched command pod, while the two Star Destroyers ripped into the transport's hull, exposing three decks to the vacuum of space. Drifting helpless and without power, the Bright Hope went down as the seventeenth GR-75 medium transport caught in the blockade's snare.[7]
A last hope
Although a badly damaged wreck of a ship—a large portion of the vessel had completely broken away—the Bright Hope still held pockets able to sustain life. The two freight decks were still completely intact, and the remaining passenger deck was 17.4% intact with over four hours of breathable oxygen left. The still-intact portions of the ship had been sealed off by emergency containment shields where the destroyed section of the ship had exploded away. While the ship's depressurization had been quick, most of the Bright Hope's passengers had been sucked out into vacuum. Still, survivors remained, among them Toryn Farr.[7]

Echo Base Chief Controller Toryn Farr led the Bright Hope's 108 survivors to safety.
Farr discovered a total of 108 passengers alive—eight pilots, thirty-two newly inducted soldiers, support staff from the command center, hangar crew, personnel with specialized hunting and survival skills, and one cook—though fifty-two were badly wounded. Some of the Echo Base survivors included Rebels Rory, Seito, Bindu, Darklighter, Crimmins, Sala Natu, Meghan Rivers, and Berec Tanaal. As the ranking officer among the survivors, Farr assumed command of her comrades. They were able to salvage three operational escape pods, grimly determining that they would only be able to hold eighteen individuals. To complicate matters, the group identified an Imperial-class Star Destroyer having begun mop-up duties of similarly destroyed vessels floating in space nearby. With time running out, Farr selected four of the Bright Hope's survivors—Seito, Crimmins, Sala Natu, and Berec Tanaal—as those most valuable to the Rebellion's cause, who might also be fit enough to survive Hoth's harsh climate, to occupy positions in the escape pods. The remaining fourteen individuals to join them in the escape pods were nominated and voted on by the rest of the transport's survivors. The eighteen chosen were jettisoned back to Hoth in the hope that they would survive long enough for later retrieval[7]—it was better to risk the cold and attacks from Hoth's native wampas than face Imperial interrogation and imprisonment.[13]
With incarceration or death at the hands of the Empire looming heavily on the minds of the remaining passengers, Farr, with the assistance of a dedicated hacker droid attached to the transport's central computer, proceeded to dutifully erase the computer records and droids aboard, lest information regarding those who had served at Echo Base and had escaped aboard the Bright Hope were to fall into Imperial hands. It was then that the Mist Hunter returned and docked with the Bright Hope, with the bounty hunters Zuckuss and 4-LOM hoping to board the transport to capture and collect the bounties on twenty-six of the most valuable surviving Rebels aboard. After a few tense moments of negotiation between Zuckuss and 4-LOM and the Rebels aboard the Bright Hope, Farr, carrying the highest price on her head among the survivors, managed to convince the hunters to instead rescue the remaining ninety passengers, including the medical droids 2-1B[7] and FX-7,[3][14] and deliver them to the sanctuary of the Rebel underground on the nearby planet Darlyn Boda.[7]
The Bright Hope's crippled remains were left to float through space, free for the Imperial fleet to search, though little information was left behind for their benefit.[7] The eighteen members who were jettisoned from the Bright Hope back to Hoth were eventually recovered by an Alliance Special Forces team led by Toryn Farr herself.[3]
Behind the scenes
Notable appearances
The Bright Hope was first featured in the short story Of Possible Futures: The Tale of Zuckuss and 4-LOM, written by author M. Shayne Bell as part of the December 1996 anthology book Tales of the Bounty Hunters. The story provided a name and expanded operational history for the transport Han Solo attempts to bring Princess Leia Organa to during the Battle of Hoth in the 1980 film Star Wars Episode V: The Empire Strikes Back. The Bright Hope's name is effectively derived from C-3PO's spoken film line, suggesting to the Princess that the final transport is their "only hope" for escape.[7][11]
The 1998 PC program Star Wars: Behind the Magic later established the GR-75 medium transport lifting off from the staging area outside Echo Base in the background scene in which Luke Skywalker boards his X-wing to evacuate Hoth in The Empire Strikes Back as the Bright Hope, thus retconning the film as the ship's first canonical appearance.[3]
Inconsistencies
There are several inconsistencies regarding the Bright Hope.
According to the second edition of the West End Games sourcebook Galaxy Guide 3: The Empire Strikes Back, the transport Leia Organa was assigned to board was the Thon's Orchard.[9] Additionally, in the radio adaptation of The Empire Strikes Back, Luke Skywalker informs Organa that he will be escorting her transport—the last flight to leave.[10] The Essential Guide to Characters, however, describes Skywalker as escorting the GR-75 medium transport piloted by Tarrin Datch,[15] which Galaxy Guide 3 identifies as the Thon's Orchard—one of the final transports to leave, though not the last—a ship that successfully made the run through the Imperial blockade of Hoth.[9] To further compound the confusion, the transport piloted by Datch in The Empire Strikes Back radio adaptation is intended to be the final evacuation transport.[3][10]
Another inconsistency arises with the script of The Empire Strikes Back radio adaptation, published in The Empire Strikes Back: The National Public Radio Dramatization, which identifies the last evacuation transport as the ship assigned to General Carlist Rieekan.[16] This is contradicted by Of Possible Futures: The Tale of Zuckuss and 4-LOM, which places Rieekan at the rendezvous point ahead of the Bright Hope's crew.[7]
Star Wars: Behind the Magic and the reference book Star Wars: Complete Locations both identify the Bright Hope as the transport seen lifting off from the staging area outside Echo Base in the background shot when Luke Skywalker departs Hoth in The Empire Strikes Back. This seems contradictory to Of Possible Futures: The Tale of Zuckuss and 4-LOM, which describes the Bright Hope as lifting off directly from the base's hangar.[3][2]
In the novelization of The Empire Strikes Back, Han Solo refers to the ship as "Transport C One Seven," which this article treats as a registry number.[8] The Official Star Wars Fact File 48 erroneously identifies the Bright Hope as the "Bright Star."[17] In Of Possible Futures, there is some uncertainty as to which medical droid accompanies 2-1B aboard the Bright Hope. Author M. Shayne Bell inexplicably alternates between referring to 2-1B's partner as "Effour-Seven" and "Effex-Seven" all within the course of several paragraphs.[7] However, Star Wars: Behind the Magic and the article Who's Who in Echo Base from Star Wars Insider 74 both identify the droid as FX-7,[3][14] the most traditionally accepted counterpart of 2-1B, as seen in The Empire Strikes Back.[11]
Appearances
- Star Wars Episode V: The Empire Strikes Back radio drama (Indirect mention only)
- Star Wars Episode V: The Empire Strikes Back novelization (First mentioned, simultaneous with The Empire Strikes Back Storybook) (as Transport C One Seven)
- Star Wars Episode V: The Empire Strikes Back junior novelization
- Star Wars Episode V: The Empire Strikes Back (First appearance) (Retcon)
- Star Wars Episode V: The Empire Strikes Back PhotoComic (Indirect mention only)
- The Empire Strikes Back Storybook (First mentioned, simultaneous with The Empire Strikes Back novelization) (Indirect mention only)
- Classic Star Wars: The Empire Strikes Back book-and-record (Indirect mention only)
- Star Wars 41: The Empire Strikes Back: Imperial Pursuit (Indirect mention only)
- Of Possible Futures: The Tale of Zuckuss and 4-LOM (First identified as Bright Hope)
- Star Wars: Rogue Squadron III: Rebel Strike (Video clip only)
Sources
Notes and references
- ↑ 1.00 1.01 1.02 1.03 1.04 1.05 1.06 1.07 1.08 1.09 1.10 1.11 1.12 1.13 1.14 1.15 1.16 1.17 1.18 1.19 1.20 1.21 1.22 1.23 1.24 1.25 The New Essential Guide to Vehicles and Vessels
- ↑ 2.00 2.01 2.02 2.03 2.04 2.05 2.06 2.07 2.08 2.09 2.10 2.11 2.12 2.13 Star Wars: Complete Locations
- ↑ 3.00 3.01 3.02 3.03 3.04 3.05 3.06 3.07 3.08 3.09 3.10 3.11 3.12 3.13 3.14 3.15 3.16 3.17 3.18 3.19 3.20 3.21 3.22 Star Wars: Behind the Magic
- ↑ 4.0 4.1 4.2
 Star Wars Customizable Card Game — [[Unknown set: No set defined!]]
- ↑ 5.0 5.1 5.2 5.3 5.4 The Essential Guide to Vehicles and Vessels
- ↑ 6.0 6.1 6.2 6.3 6.4 6.5 6.6 6.7 Star Wars Trilogy Sourcebook - Special Edition
- ↑ 7.00 7.01 7.02 7.03 7.04 7.05 7.06 7.07 7.08 7.09 7.10 7.11 7.12 7.13 7.14 7.15 7.16 7.17 7.18 7.19 Of Possible Futures: The Tale of Zuckuss and 4-LOM
- ↑ 8.0 8.1 8.2 Star Wars Episode V: The Empire Strikes Back novelization
- ↑ 9.0 9.1 9.2 9.3 9.4 9.5 Galaxy Guide 3: The Empire Strikes Back, Second Edition
- ↑ 10.0 10.1 10.2 Star Wars Episode V: The Empire Strikes Back radio drama
- ↑ 11.0 11.1 11.2 Star Wars Episode V: The Empire Strikes Back
- ↑
 Star Wars Customizable Card Game — [[Unknown set: No set defined!]]
- ↑ The Official Star Wars Fact File 33 (HOT14-16, Escape of the Rebels)
- ↑ 14.0 14.1 "Who's Who in Echo Base" — Star Wars Insider 74
- ↑ The Essential Guide to Characters
- ↑ The Empire Strikes Back: The National Public Radio Dramatization
- ↑ The Official Star Wars Fact File 48 (BOU10, Bounty Hunters - 4-LOM)