| | |

- "You may fire when ready."
- ―Grand Moff Tarkin during the Battle of Yavin
The Overbridge, sometimes called the War Room or Death Star Control Room, was the bridge and main command center of the first Death Star. The Overbridge was located above the battlestation's superlaser dish.
Description[]

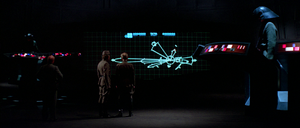
Grand Moff Tarkin reviews the battle plan on the overbridge of the Death Star.
The Overbridge acted as the main command center of the Death Star. It monitored all workstations and datafiles on the battle station. In addition, it was also the primary headquarters for the battle station's command triumvirate, which was made up of Grand Moff Wilhuff Tarkin, Admiral Conan Antonio Motti, and High General Cassio Tagge. Because of its status as the command center for the entire station, all information collected by the Death Star's bridge, sensor arrays, communication centers, and space traffic control were routed through the station's central computers as well as displayed on banks of monitors and holoprojectors situated throughout the Overbridge. Although it could completely run the Death Star during non-emergencies, such an action was usually reserved for emergency situations only, due to the triumvirate viewing it as being more efficient to have the various zone's active bridge to be responsible for their own sections during normal events.
During the Emperor's visits to the Death Star and instances where the Emperor himself would take direct command of the station, the Overbridge's authority was superseded by the onboard Imperial throne room tower. In addition, due to insistence on the Emperor's part, one of the zone bridges and/or the Imperial throne room could take over control from the Overbridge if it was damaged beyond repair short of the destruction of the entire Death Star as a contingency plan.
History[]
The Overbridge was built between 19 BBY and 3 BBY. Grand Moff Tarkin often frequented the Overbridge during the construction of the Death Star.[1]

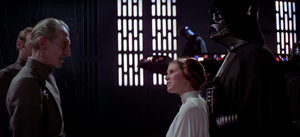
Tarkin, Leia Organa, and Darth Vader on the overbridge shortly before the Destruction of Alderaan
In 0 BBY, from the Overbridge, Grand Moff Wilhuff Tarkin ordered the Destruction of Alderaan in order to show test the strength of the superlaser. Princess Leia Organa was also present during this time, in a failed bid to save both her homeworld and deceive Tarkin with the location of the Rebel Alliance.[2]
Afterwards, during the Battle of Yavin, Tarkin and Motti perished on the Overbridge when proton torpedoes destroyed the Death Star's main reactor, causing the battlestation to explode.[2]
Layout[]
The Overbridge contained the meeting room from which Darth Vader, Tarkin and other senior officers discussed the dissolution of the Imperial Senate and the status of the Rebellion onboard Death Star I 0 BBY.
The bridge area contained the command platform, which likewise contained a tactical holo display pad, and is accessible by stairwell. In front of the command platform, there are three additional stairwells that led to three command stations: The central chair, farthest in the platform, was the seat belonging to the Grand Moff (Tarkin); the leftmost seat was the Imperial Navy Admiral's chair (Motti); and the rightmost chair belonged to the General of the Imperial Army (Bast). There were also three posts directly in front of the top stations: The middlemost one was reserved for the Battle Station Operations Chief (Romodi); the leftmost one was reserved for the Navy Operations Chief; and the rightmost one was reserved for the Army Operations Chief.
There were also two strategic holo display pads (one on each side [left and right] of the room), as well as four duty posts (two on the right side of the left side of the room; and two on the right). The Stormtrooper Chief's post was located on the left side of the room, while the security post was on the right side. Behind the command platform were three viewscreens. In front of the posts for the various Operations Chiefs was a crew pit, complete with duty consoles, as well as the main viewscreen.
There were also two adjacent offices on each of the left and right sides of the room: On the right were the Army and Navy Operations Chiefs offices (the Army being the bottommost office, and the Navy being the topmost office); and on the left were the Grand Moff's office and the Battle Station Operations Chief's office (the bottommost being the Grand Moff, and the topmost the Battle Station Operations Chief). The three operations offices each had a two curved desks, a holopod, and various devices, while the Grand Moff's office possessed a single desk, some chairs, a holopod, and eight consoles. The corners of the room near the main viewscreen each contained two turbolifts. In addition, all of the operations offices contained a turbolift for direct access by the offices. The doors at the back of the bridge area led to two hallways. The right door upon exiting into the right hallway led to a room equipped with a secure holo-booth. The holobooth was used for direct communication with the Emperor for private conversations between him and either Darth Vader or Tarkin.
The conference room was adjacent to the overbridge via the left hallway, on the door to the left upon exiting the bridge. The two hallways led directly to the command staff's offices, where the admiral and general's offices were presumably located. Between the two hallways was the command sanctum, which was heavily fortified and was only accessible by the highest ranking officers during major station operations. It only contained two duty posts and a lone viewscreen at the back of the room, far from the entry points.
Behind the scenes[]


Overbridge layout for the Death Star Technical Companion
The Overbridge was first seen in Star Wars Episode IV: A New Hope (originally simply identified as Star Wars).
Its layout appeared differently in two sources. In the first source, the Technical Companion (see picture), the room possessed seven duty posts to the right (near the Grand Moff's office and the Battle Station Operations office), and two duty posts to the left (near the Navy Operations office and the Army's operation office); the secure holo booth was located near the large viewscreen; the Conference room was placed directly beyond the rightmost door at the back via a circular hallway; there were four turbolifts (one on each corner of the overbridge), and there were offices for Motti and Tagge adjacent to the conference room.
In the second source, the Death Star Owner's Technical Manual, the room, while largely the same, had its duty posts being reduced to four, two on each side of the room. In addition, a large stretch of (presumably adjoining) hallways are placed on both entry doors from the Overbridge, with the left hallway (the hallway closest to the Grand Moff's office and the Battle Station Operations office), having a doorway to the right/left (depending on exit or entry) that possessed the conference room. In addition, the secure holo booth was moved to the rightmost hallway (the hallway closest to the Navy operation's office and the Army operation's office). The source also added in the Command Sanctum, which was located between the two hallways. The four turbolifts in the main overbridge area were also moved, with two turbolifts being located at each corner near the main viewscreen (which was moved to the front of the room rather than the back), and added four more turbolifts within the secure holo booth and the three operations offices.
Appearances[]
- The Rise and Fall of Darth Vader
- Star Wars: Battlefront (Appears in cutscene(s))
- Death Star
- Star Wars: Episode IV A New Hope (First appearance)
- Star Wars: Episode IV A New Hope junior novelization
Non-canon appearances[]
- LEGO Star Wars: The Complete Saga
- Star Wars: Tiny Death Star
- LEGO Star Wars II: The Original Trilogy
Sources[]
- Death Star Technical Companion
- Death Star Technical Companion, Second Edition
 Star Wars Customizable Card Game — Premiere Limited (Card: Death Star: War Room) (backup link)
- The Essential Guide to Weapons and Technology
- Star Wars: Incredible Cross-Sections
- Star Wars Trading Card Game — Rogues and Scoundrels
- Inside the Worlds of Star Wars Trilogy
- The Complete Star Wars Encyclopedia
- Death Star Owner's Technical Manual