| | |

Warning: This infobox has missing parameters: designer, navy, type and unrecognized parameters: modules, class, era, taskforce
- Umak Leth: "An ionic cannon capable of surprising and wiping out entire capital ship task forces would require a ship of unreasonable proportions. Something on the magnitude of at least eight kilometers in length."
- Nasdra Magrody: "Twelve."
- Bunt Dantor: "Seventeen."
- ―A Republic panel of experts debates the technical details of the Malevolence[src]
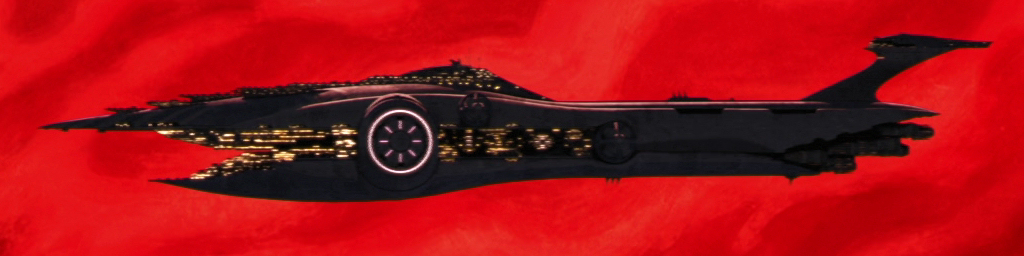
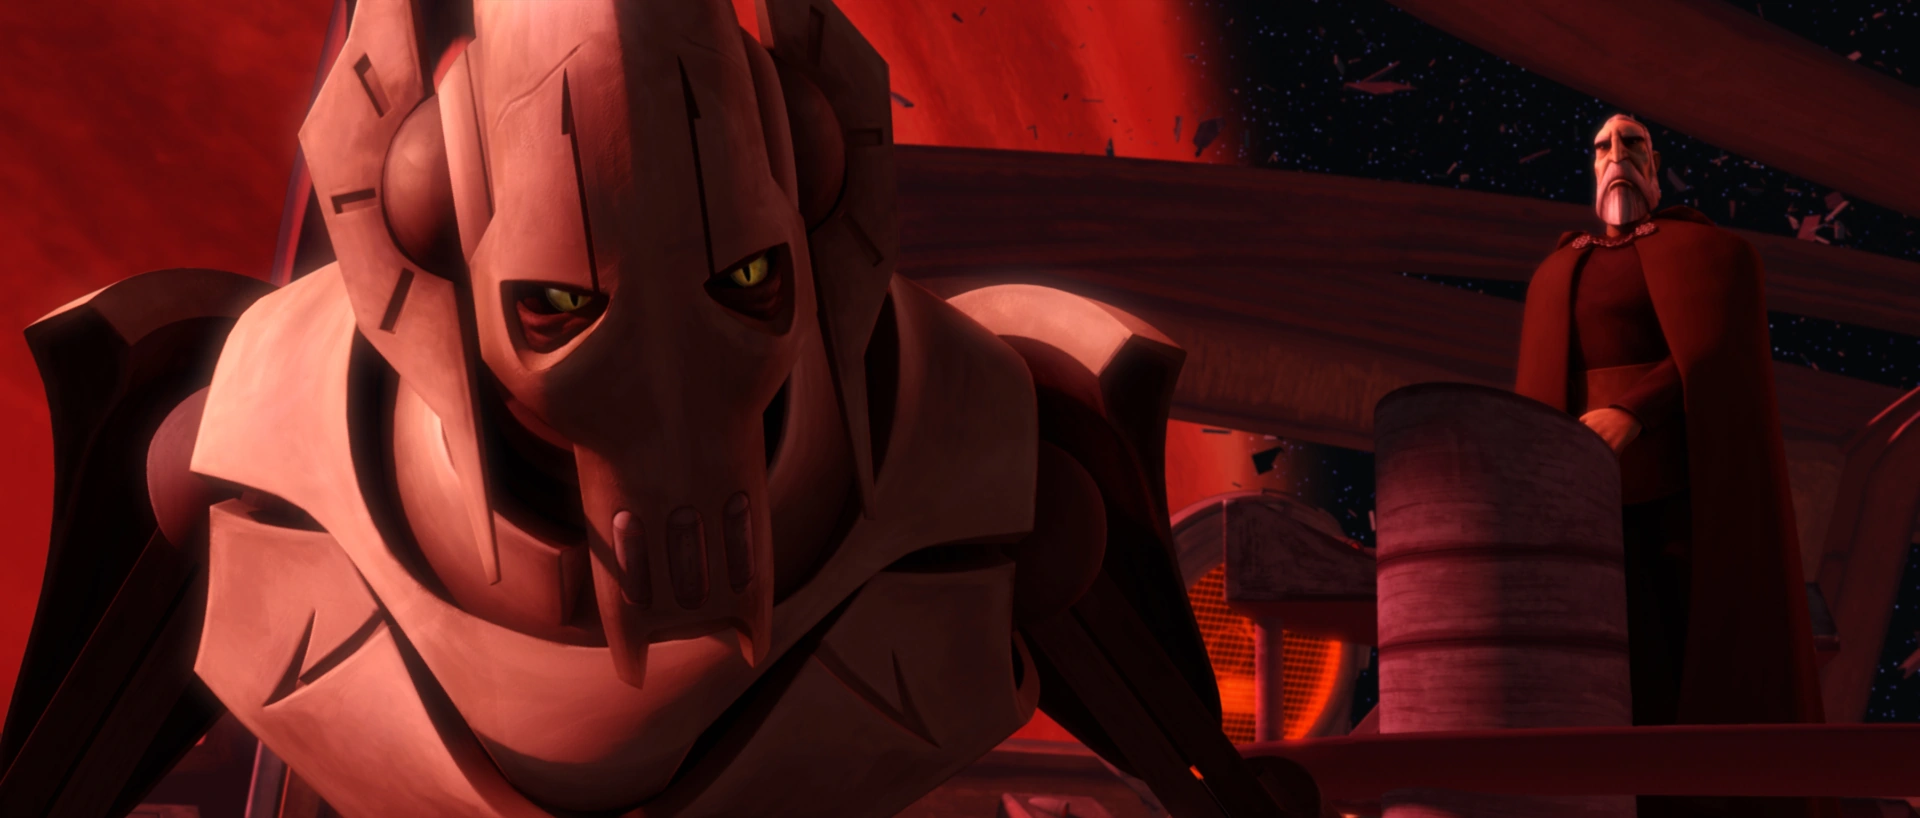
The Malevolence was a Subjugator-class heavy cruiser active during the Clone Wars. It served as the flagship of the Confederate General Grievous. The massive ship was longer than four Venator-class Star Destroyers and sported massive ion cannons, capable of disabling enemy ships, mounted on both sides of its hull. The ship was first spotted by Republic forces around 22 BBY by Jedi General Ares Nune and Clone Commander Kite, who were on an inspection in the Phu system. Grievous took the opportunity to fire the ion cannons on Nune's fleet, destroying it. High Jedi General Plo Koon led a fleet to engage the Malevolence after losing contact with Nune.
After destroying Koon's fleet, the Malevolence was revealed to the Republic after Koon was rescued by Jedi General Anakin Skywalker. Dooku assigned the Malevolence to a major clone trooper medical center near the Ryndellia system. En route to the Kaliida Shoals Medical Center, the Malevolence destroyed a Republic medical convoy passing through the Ryndellia system. Before the warship could attack the medcenter, however, a group of BTL-B Y-wing starfighters led by General Skywalker intercepted the massive ship near the medcenter and disabled its ion cannons and hyperdrive with proton torpedoes.
Senator Padmé Amidala was taken hostage aboard the Malevolence, and Skywalker and High Jedi General Obi-Wan Kenobi left to rescue Amidala. Prior to escaping the warship, Skywalker tampered with the ship's navicomputer. Grievous fled on his starfighter after noting that the battle had been lost. The battle droids stationed on the Malevolence believed that the hyperdrive had been fixed; however, the sabotaged navicomputer caused the Malevolence to crash into the Dead Moon of Antar.
Description
- "Our ship is unstoppable."
- ―General Grievous

The Malevolence, first flagship of General Grievous
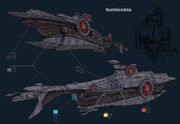
The Malevolence was a Subjugator-class heavy cruiser.[2] It was 4,845 meters long[5] and possessed two twin ion cannons.[3] Once fired, the wave from the cannons would expand over great distances and disable any spacecraft upon impact. After the ion cannon had disabled an enemy warship, approximately 500 turbolasers mounted on the ship's enormous hull could fire upon the disabled vessel.[6][10] The vessel's power plant operated by recapturing waste heat and propulsion by-products. The design required a gigantic hull and was required to vent its stored energy on a regular basis, which was adopted to the ion cannons.[11] A panel of experts debated the warship's size on the HoloNet News, as many predicted how large the ship was.[9]
The massive ship was designed with an internal rail jet system, which served as a hovertrain that transported ammunition, supplies, and sometimes troops throughout the ship. Its cars looked similar to the Multi-Troop Transport.[12] Its computer systems were built with parts from KynachTech Industries.[13] Equipped with sixteen massive sublight engines,[3] the Malevolence also had a powerful hyperdrive, and at one point, its commander, the Confederate General Grievous, was told that the Malevolence was fast enough to outrun Republic forces.[3] The ship carried two tractor-beam batteries that could pull any freighter or small vessel aboard one of the Malevolence's docking bays.[7] Complementing the ship, Vulture-class droid fighters were on board to eradicate enemy fighters.[10] At least one Droch-class boarding ship, nicknamed a "pod hunter," was aboard the Malevolence, and was often deployed with rocket battle droids to seek and destroy jettisoned enemy escape pods.[3] The Malevolence also held General Grievous' personal starfighter.[7]
History
Rise of the Malevolence
- "Until found this menace is, vigilant we all must be."
- ―Yoda commenting on the Malevolence


The Malevolence's command tower.
The Malevolence was designed by Ruggle Schmong[14] and built by Quarren Separatists on Pammant. It was the first of its class.[15] The Separatists acquired the design after SoroSuub Corporation rejected it. The vessel was constructed in a huge drydock that Republic operatives could not penetrate. When the Malevolence was launched, the operatives were captured.[11] Count Dooku named the Malevolence meaning "wishing evil to others."[12] It served as General Grievous' flagship prior to his use of the Invisible Hand[1] and destroyed dozens of Republic task forces,[3] including the Galactic Republic Fourth Fleet.[16] It was known that the Malevolence possessed at least one sister ship, the Devastation.[17]
The massive Malevolence was first spotted by Jedi General Ares Nune and Clone Commander Kite as they took three Venator-class Star Destroyers to the Phu system for an inspection. Commanding the Malevolence, Grievous took the opportunity to fire upon the Republic forces. The first wave from the cannons obliterated the shields of the Star Destroyer Laudable. Nune and Kite tried to evacuate their flagship, though the ship was doomed as the intense fire from the Malevolence progressed.[9] After the Jedi Order received word of the new superweapon, Jedi Master Plo Koon volunteered to take several Venator-class cruisers to find and destroy the "mystery weapon," as the Malevolence had been dubbed.[18] Aboard the Venator-class cruiser Triumphant,[19] Koon tracked the Malevolence to the Abregado system.[3]
Battle of Abregado
- "Finding it is one thing. Finding a way to stop it is another."
- ―Mace Windu
When Koon tracked the massive Malevolence in the Abregado system, he intended to report as much information as possible on the weapon in case of his defeat. After the Confederate Head of State, Count Dooku, arrived aboard the Malevolence to watch General Grievous' progress, he ordered the general to jam the Republic task force's transmissions. Koon and Clone Commander CC-3636 reported information to Jedi General Anakin Skywalker and his Padawan Ahsoka Tano via hologram. However, the nearby Malevolence cut their communications.[3][20]

The Malevolence engaging Koon's fleet
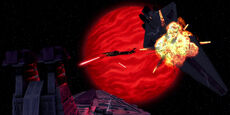
While the Malevolence was out of firing range of the advancing Republic fleet, Grievous nevertheless ordered the battle droids to fire its ion cannon, which passed over the fleet and neutralized the Star Destroyers' shields. As the battle continued, the intense fire from the Malevolence's numerous turbolaser cannons soon engulfed the vulnerable Republic Star Destroyers. After Koon and several clones jettisoned their fleet in escape pods, Dooku ordered the battle droids to deploy the "pod hunters" to track down and eliminate the survivors.[3]
Using the last known report from Koon, Skywalker and Tano emerged from hyperspace in Skywalker's commandeered freighter, the Twilight, to look for Koon. Both Jedi noticed the large debris field the battle had produced. The pod hunters had destroyed all but Koon's pod, but Koon and his clone troopers destroyed those battle droids. Skywalker and Tano rescued Koon and the surviving clones, after which the Twilight detected the approaching Malevolence, and Koon ordered Skywalker to shut down all of the freighter's systems. However, the group left a 2-1B surgical droid active, and the Malevolence detected the Twilight. Koon, Skywalker, and Tano reactivated their ship and fled the area. Grievous ordered the ion cannon to be fired, but failed to stop the Jedi before they entered hyperspace. Thus the Republic learned of the warship and its ion cannons, and despite most of Koon's forces being eradicated, Dooku considered the battle a defeat. The Sith Lord was most displeased with Grievous' failure to prevent the Republic from learning of the warship. His trust in Grievous shaken, Dooku left to discuss plans with his Sith master.[3]
Ryndellia conflict
- "Boy, this is a lot more fun when they're not shooting back."
"I still can't seem to hit anything." - ―Two battle droids during the battle
In the Ryndellia system, the Malevolence intercepted several Republic Pelta-class frigates that were passing through the system. A Venator-class Star Destroyer that was escorting the frigates tried to protect the medical convoys; however, Grievous attacked the Republic medical convoy with the Malevolence's numerous laser cannons. After the Malevolence destroyed the small fleet, one of the frigates evaded the fire and began to escape. Grievous ordered the ship's ion cannons to be fired at the fleeing frigate. The electrical ion surge decimated the frigate's power, and the Malevolence then directed heavy fire at the frigate, destroying it.[10]
Count Dooku, who had been watching Grievous' progress through a hologram transmission, told the cyborg general of the Republic's Kaliida Shoals Medical Center, treating over 60,000 wounded clones near the Naboo system.[6] Dooku assigned the medical center as the Malevolence's new target. Grievous was pleased with this new assignment, as it showed that the Count had not lost all faith in him since the defeat at Abregado.[10]
Destruction of the Malevolence
- Yularen: "Skywalker! The enemy has attacked our convoy of medical transports near Ryndellia."
- Tano: "Medical transports? Only General Grievous would go after clones who can't fight back."
- Skywalker: "The Ryndellia system… Near Naboo? Isn't that where our medical base is? I bet that will be his next target."
- ―Admiral Wullf Yularen, Ahsoka Tano and Anakin Skywalker[src]
The Malevolence under attack by Shadow Squadron, led by Anakin Skywalker
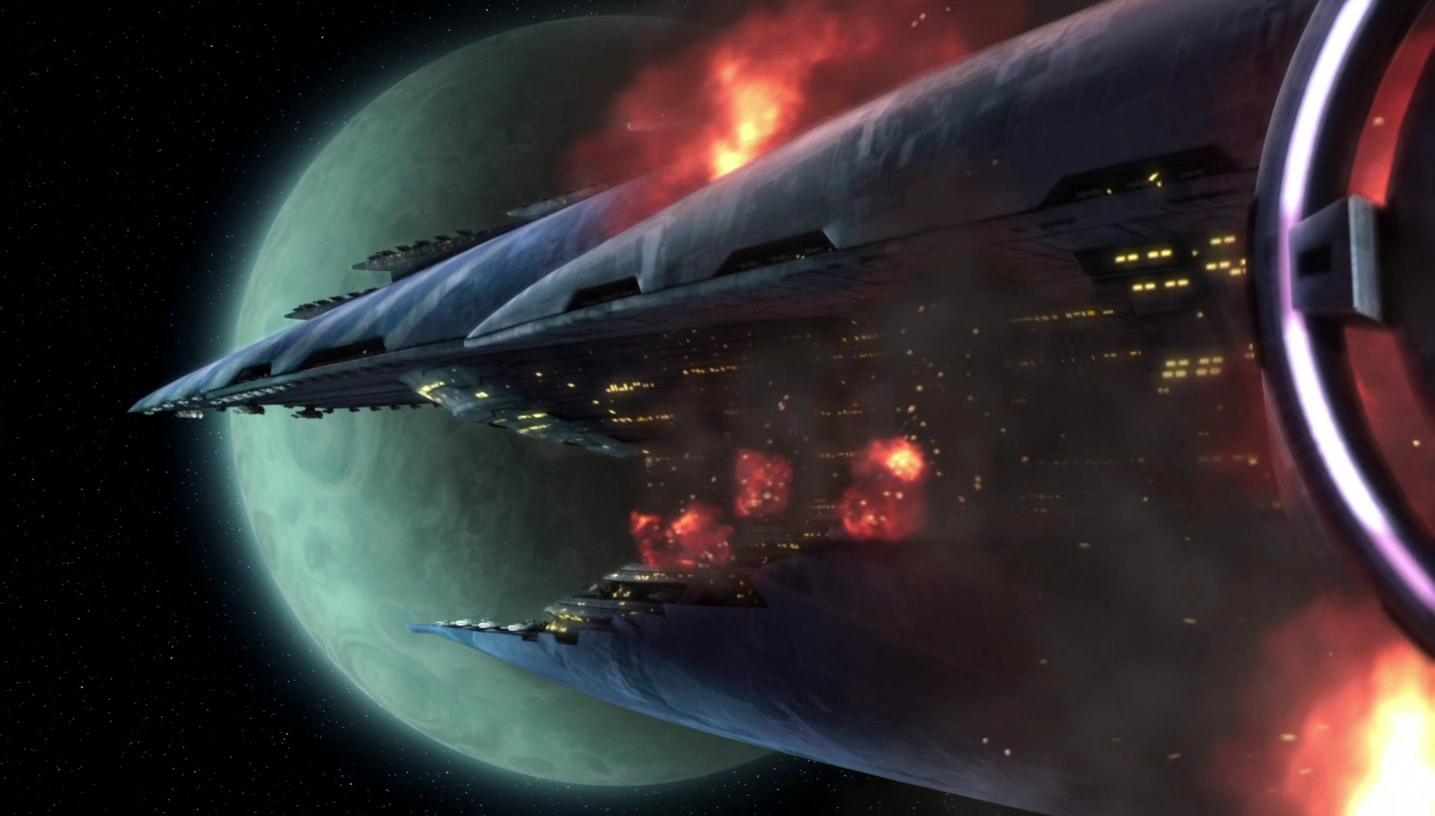
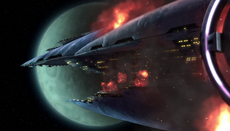
En route to the medical facility, Dooku contacted Grievous through a hologram transmission, after he received intelligence from his master, Darth Sidious, that the Republic had launched a small group of fighters to attack the Malevolence. Grievous noted that the Malevolence's hyperdrive was not fast and the warship's navicomputer was forced to recalculate its coordinates in order to go around the Kaliida Nebula.[10] In an attempt to stop him, Skywalker and Tano retrieved brand-new BTL-B Y-wing starfighters, nimble bombers manufactured by Koensayr Manufacturing.[21] Their squadron soon left and entered the Kaliida Nebula as a shortcut to arrive at the medcenter before the Malevolence, while High Jedi General Obi-Wan Kenobi and his fleet went around the nebula. The massive ship arrived near the medcenter and began to fire on the departing medical frigates. Upon emerging from the nebula, Skywalker led the Republic squadron to engage the Malevolence. Vulture droids were dispatched from the Malevolence and attacked the Republic group. As they engaged Skywalker's bombers, Grievous ordered the battle droids to fire the ion cannon at the approaching group. The ion wave deactivated the Vulture droids and three of Skywalker's bombers. However, the Republic squadron managed to damage the two heavy ion cannons, causing them to overload and explode and damaging the ship's hyperdrive in the process.[10]
After the Republic disabled the Malevolence, Count Dooku contacted Grievous and informed him that his master had sent a senator to the warship's location. Sidious, using his alter ego of Supreme Chancellor Palpatine, sent Padmé Amidala and her protocol droid, C-3PO, who were to negotiate a peace treaty with InterGalactic Banking Clan officials. However, Amidala wasn't fully aware of the situation, and she and her droid were captured by the Malevolence's tractor beam, but evaded capture after destroying their ship inside the warship's hangar. Firefighting battle droids that were stationed aboard rushed to the scene of the destroyed ship and began to extinguish the flames. Skywalker and Kenobi planned a rescue and left on the Twilight to board the Malevolence through an emergency airlock. Grievous and a squad of B2 super battle droids and B1 battle droids soon left the bridge while Amidala contacted Skywalker via a transmission box inside the Malevolence. The senator waited until Grievous and his entourage passed by her before entering the internal rail jet room. Noticing that there were intruders, Grievous ordered the battle droids to protect the internal systems of the massive warship and to fix the hyperdrive.[7]
The Malevolence in flames shortly before its destruction
Inside the internal rail jet room, battle droids began to attack Amidala and C-3PO. Skywalker and Kenobi met up with Amidala inside the room, and Skywalker rescued Amidala on a separate rail cart while Kenobi went to rescue her droid, C-3PO. After Kenobi Force-pushed C-3PO onto storage containers outside the jet railings, Kenobi entered the hyperdrive room. Grievous confronted Kenobi, though the Jedi Master escaped to the rail jet room. Unbeknownst to Grievous, Skywalker and Amidala entered the bridge and destroyed all stationed battle droids there. As Amidala hid the destroyed battle droids inside a storage room, Skywalker tampered with the warship's navicomputer before the two left. Grievous followed Kenobi and engaged the Jedi in a lightsaber duel, but Kenobi escaped again and met up with Skywalker, Amidala, C-3PO and R2 in the Twilight. Seeing that the battle had been lost, Grievous left the Malevolence in his personal starfighter, the Soulless One. Meanwhile, the droid crew aboard the Malevolence, believing the hyperdrive to be fixed, prepared to jump to Sector Four in Confederate space. However, the droids, who were destroyed by Skywalker and Amidala, did not contact the squad of B1 battle droids that were preparing to jump to hyperspace. The battle droids realized that the massive warship wasn't responding to the coordinates they entered and contacted Grievous. The general frantically ordered the droids to reset the navicomputer, but they failed to do so, resulting in the destruction of the ship. Grievous managed to escape, and the Twilight returned to the waiting Republic ships. The Malevolence's threat was over.[7]
After the vessel's destruction, a squad of Republic clone troopers under the command of Captain Lock was assigned to investigate the wreckage. CT-8863 found computer parts which originated from Kynachi. The squad was later assigned to investigate Kynachi.[13]
Rebuilding of the Malevolence
Around 21 BBY, the Malevolence was rebuilt at Pammant Docks. Before it ever left the docks, however, this successor vessel was destroyed by a Jedi Knight.
Commanders and crew
General Grievous and Count Dooku on the Malevolence bridge
- "Do not compound your failure this day by allowing our prized warship to fall."
- ―Count Dooku to Grievous
General Grievous was the leading commander of the Malevolence, and it served as his flagship. Battle droids maintained and controlled the bridge. Grievous commanded the battle droids; however, the relationship between Grievous and battle droids was shaken during his time commanding the Malevolence.[3][7][10]
Count Dooku was on board at the time of the Battle of Abregado and acted as an advisor for Grievous. The Sith Lord also served as another commander, and often contacted Grievous via hologram to check in on the general's progress. He helped Grievous by orchestrating battle plans, as well as exploiting the maneuvers and attacks of the Republic forces.[3]
Behind the scenes
The Malevolence was originally based on concept art for a Separatist communications ship meant to be used in Star Wars: Episode III Revenge of the Sith. Designed in 2004, the warship was originally Grievous' flagship during the Battle of Coruscant, with a design similar to that of the Invisible Hand. The idea of the massive warship was dropped, and the Invisible Hand became Grievous' flagship in Revenge of the Sith.[22]
According to Dave Filoni, supervising director of Star Wars: The Clone Wars, the Malevolence and its story were based in part on the real-life German battleship Bismarck, which the British Royal Navy hunted relentlessly during World War II.[23] The finished version of the Malevolence was designed by Russell Chong and was based upon the GR-75 medium transport. Originally, the iconic train-like transport system in the center of the Malevolence was created so large that the Malevolence, to scale, could be flown inside its own train system.

Early Malevolence concept art
In the The Clone Wars episode "Shadow of Malevolence," Anakin Skywalker commands the Y-wing bombers to attack the starboard ion cannon, but the port cannon is the one destroyed. Anakin may have meant the cannon on the bombers' starboard side. The explosion takes out both cannons, however. It is possible that the cannons either use the same power generator or are really just one, big, two-way cannon that can fire from either side; this may have caused the destruction of one side to produce a chain reaction destroying both guns, as well as causing extensive damage to most of the ship.[10]
Henry Gilroy has suggested that the reason the Malevolence is able to receive holographic communications while in hyperspace is related to the size of the ship's internal gravity field.[24]
The firing-channel design of the Malevolence's ion cannon is almost identical to the firing channel of the Death Star in Star Wars: Episode IV A New Hope.
In 2012, LEGO released a Malevolence warship set.
Appearances
- The Clone Wars: Shipyards of Doom (Indirect mention only)
- The Clone Wars: Prelude (First mentioned, concurrent with A Galaxy Divided) (Indirect mention only)
 Star Wars: The Clone Wars — "Ambush" (In flashback(s))
- HoloNet News — A Galaxy Divided (First mentioned)
- The Clone Wars: Shakedown (First appearance)
- Star Wars: The Clone Wars — "Rising Malevolence"
- The Clone Wars: Procedure (Indirect mention only)
- Star Wars: The Clone Wars — "Shadow of Malevolence"
- The Clone Wars: Agenda (Mentioned only)
- Star Wars: The Clone Wars — "Destroy Malevolence"
- The Clone Wars: Secret Missions 1: Breakout Squad (Wreckage only)
- The Clone Wars: Departure (Mentioned only)
- Star Wars: The Clone Wars: Lightsaber Duels
- Star Wars: Clone Wars Adventures (video game)
- Star Wars: The Clone Wars — "Sphere of Influence" (In flashback(s))
- The Imperial Warlords: Despoilers of an Empire, Part 2 on StarWars.com (article) (backup link)
Non-canon appearances
- LEGO Star Wars III: The Clone Wars
- LEGO Star Wars: The Yoda Chronicles video game
- LEGO Star Wars: The Yoda Chronicles — "Menace of the Sith"
Sources
- Star Wars: The Clone Wars: The Visual Guide (First identified as Malevolence)
- The Clone Wars Episode Guide: Rising Malevolence on StarWars.com (content now obsolete; backup link)
- The Clone Wars Episode Guide: Shadow of Malevolence on StarWars.com (content now obsolete; backup link)
- Video Commentary: Shadow of Malevolence on StarWars.com (content now obsolete; backup link (video/view/000697.html) not verified!)
- The Clone Wars Episode Guide: Destroy Malevolence on StarWars.com (content now obsolete; backup link)
- The Clone Wars Decoded Episode: Rising Malevolence on StarWars.com (content now obsolete; backup link (video/view/000807.html) not verified!)
- The Complete Star Wars Encyclopedia
- The Clone Wars Campaign Guide
- Star Wars: The Official Starships & Vehicles Collection 12
- The Essential Atlas
- Star Wars: The Official Starships & Vehicles Collection 28
- Star Wars: The Clone Wars: The Official Episode Guide: Season 1
- Star Wars: The Official Starships & Vehicles Collection 32
- Star Wars: The Clone Wars The Complete Season One
- Star Wars: The Clone Wars: Incredible Vehicles
- LEGO Star Wars: The Clone Wars (Set: 9515 The Malevolence)
- The Essential Guide to Warfare
- Star Wars: The Ultimate Visual Guide: Updated and Expanded
- Star Wars: The Clone Wars Comic UK 6.41
- Star Wars: The Clone Wars: Episode Guide
- Star Wars: The Clone Wars Magazine 22
- Admiral Coburn in the Encyclopedia (content now obsolete; backup link)
- Malevolence in the Encyclopedia (content now obsolete; backup link)
- Y-wing starfighter in the Encyclopedia (content now obsolete; backup link)
Notes and references
- ↑ 1.00 1.01 1.02 1.03 1.04 1.05 1.06 1.07 1.08 1.09 1.10 Star Wars: The Clone Wars: The Visual Guide
- ↑ 2.0 2.1 2.2 2.3 2.4 The Clone Wars Campaign Guide
- ↑ 3.00 3.01 3.02 3.03 3.04 3.05 3.06 3.07 3.08 3.09 3.10 3.11 3.12 3.13 3.14 3.15 3.16 3.17 3.18 3.19 3.20
 Star Wars: The Clone Wars — "Rising Malevolence"
- ↑ 4.0 4.1 Star Wars: The Clone Wars: Incredible Vehicles
- ↑ 5.0 5.1 Titanium Series - Malevolence
- ↑ 6.0 6.1 6.2 Star Wars: The Clone Wars — "Shadow of Malevolence" (Decoded)
- ↑ 7.0 7.1 7.2 7.3 7.4 7.5 7.6 7.7 Star Wars: The Clone Wars — "Destroy Malevolence"
- ↑ The Essential Reader's Companion
- ↑ 9.0 9.1 9.2 HoloNet News — A Galaxy Divided
- ↑ 10.0 10.1 10.2 10.3 10.4 10.5 10.6 10.7 10.8 10.9 Star Wars: The Clone Wars — "Shadow of Malevolence"
- ↑ 11.0 11.1 The Essential Guide to Warfare
- ↑ 12.0 12.1 The Clone Wars Decoded Episode: Rising Malevolence on StarWars.com (content now obsolete; backup link (video/view/000807.html) not verified!)
- ↑ 13.0 13.1 The Clone Wars: Secret Missions 1: Breakout Squad
- ↑ Star Wars: The Clone Wars — "Rising Malevolence" (Decoded)
- ↑ Star Wars: The Clone Wars: The Official Episode Guide: Season 1
- ↑ The Complete Star Wars Encyclopedia
- ↑ Fun Facts about Star Wars The Clone Wars: Jedi Alliance on StarWars.com (content now obsolete; backup link (/games/videogames/news20081113.html) not verified!)
- ↑ The Clone Wars: Prelude
- ↑ The Clone Wars: Shakedown
- ↑ The Clone Wars Episode Guide: Rising Malevolence on StarWars.com (content now obsolete; backup link)
- ↑ The Clone Wars: Procedure
- ↑ The Art of Revenge of the Sith
- ↑ Video Commentary: Shadow of Malevolence on StarWars.com (content now obsolete; backup link (video/view/000697.html) not verified!)
- ↑ The Clone Wars TV SHOW on Cartoon Network: WOWOWOW (Fri Oct 10, 2008)