| | |
Warning: This infobox has missing parameters: type, terrain, interest, flora, fauna and unrecognized parameters: poi, era
- "You must maneuver straight in down this shaft, level off in the trench, and skim the surface to this point. The target is only two meters across. It will take a precise hit at exactly ninety degrees to reach the reactor systematization. And only a direct hit will start the complete reaction."
- ―Rebel Alliance general Jan Dodonna
The Meridian trench, located on the first Death Star, was a trench encompassing a portion of that battlestation. It housed the station's greatest weakness: a thermal exhaust port situated near the station's north pole, which is why it was also known as the Polar Trench. If weaponry was fired into it, the exhaust port would cause the Death Star to under go a critical chain reaction. The Alliance to Restore the Republic utilized this trench to destroy the Death Star before it blew up their base on Yavin 4.
Layout
- "And it was your idea to build this exhaust port?"
"No, it wasn't my idea. It's on the plans." - ―Teela Kaarz to a shift chief
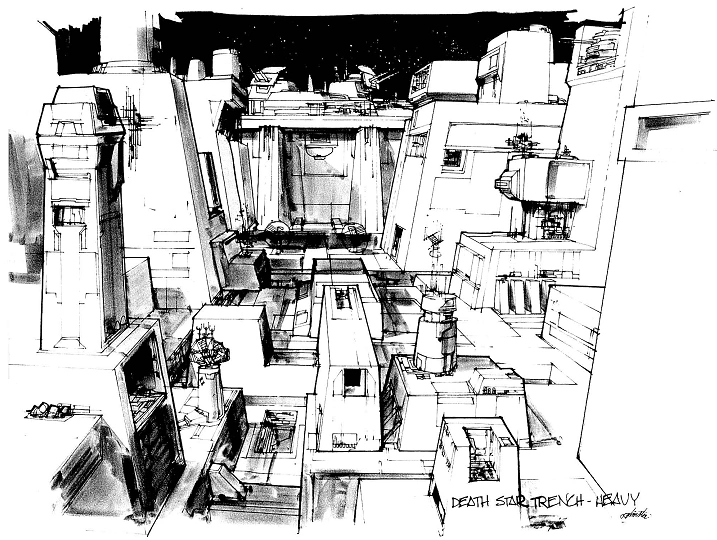
The meridian trench was one of the eighteen narrow canyons that converged on the poles of the Death Star, a moon-shaped deep-space mobile battlestation built by the Galactic Empire.[4] Those large furrows that stretched across the Death Star's surface could be easily spotted, even at a distance, and they gave access to multiple docking bays and hangars. The most visible of the trenches ran around the battlemoon's equator, separating its northern and southern hemispheres, while the others ran parallel to those.[5] The meridian trench itself was located near the "north pole" of the Death Star.[6] Like the other trenches, the Meridian trench acted as directional markers for Starfighter and shuttle pilots. It was protected to some degree by low-energy shield projectors in terms of entry points as well as disposal ports. The trench overall was wide enough to accommodate three single-pilot starfighters in attack formation.[7]
The trench itself's height was the equivalent of at least three sub-surface levels. In addition, it contained energy flush vents as well as communications array within the trench, and heat sinks, communications arrays, power distribution nodes, service access ports, shuttle landing pads, cosmic ray sinks, sensor suite fields, defense-field generators, as well as various shield projection towers on the surfaces near the trench.[7]
Like all the other trenches, it proved treacherous to even the most skilled starfighter pilots, as it was fitted with many XX-9 heavy turbolaser towers (which acted as the primary source for protection), several even being on the floor of the trench in addition to just outside of it, and thus left little room for evasive maneuvers. The defensive systems were also programmed in such a way to avoid the turbolaser batteries from either accidentally blasting each other or otherwise damaging the station's hull and surface structures. While the Death Star had been designed to withstand massive assaults by a full enemy starfleet, a successful attack by small fighters had never been anticipated during conception. Therefore, the meridian trench granted access to the station's major weakness, the thermal exhaust port.[4] Despite this, however, it nonetheless was equipped with a field generator that caused various sensors save for sight to be negatively affected, and generated a distortion field potent enough to cause even enemy starfighters' maneuverability to be negatively effected to the extent of decreasing to point three.[8] In addition, although the designers for the Death Star had anticipated the possibility that the trenches would be accessible to enemy Starfighters, they were confident that Imperial firepower would readily defeat the threat, and would not cause significant damage, and also included ray-shield projectors around the area of the thermal exhaust port specifically to ensure that it could not be set off by laser bombardment.[7]
History
- "You're all clear, kid, now let's blow this thing and go home!"
- ―Han Solo to Luke Skywalker
In 0 BBY, the Alliance to Restore the Republic planned on destroying the Death Star over the gas giant Yavin Prime. The plan depended on the ability of a single T-65 X-wing starfighter to navigate the meridian trench while avoiding the Imperial TIE fighters and the turbolaser towers, and fire two proton torpedoes into the vent reactor core. With the aid of the Force and the timely intervention of Han Solo, the young Tatooinian farmboy Luke Skywalker accomplished the mission. His torpedoes traveled into the reactor core, starting a chain reaction that blew up the battlestation.[4]
Behind the scenes

Johnston's original design for the meridian trench
- "The concept of a ball in space is simple, but its components—the trench, the low altitude surfaces, the towers, the horizon pieces, the exhaust port—collectively required the most design input."
- ―Joe Johnston
The Death Star's meridian trench first appeared in Star Wars: Episode IV A New Hope, the first installment of the Star Wars original trilogy.[3] For the final dogfight of the movie, Industrial Light & Magic used a puzzle of patterned pieces fitted together on larges tables. In the process, a three feet deep model of the meridian trench and a full-scale thermal exhaust port were also completed.[4]
Originally, the meridian trench was intended to get denser and more detailed toward the station's poles. This shows in the conceptual drawings by Joe Johnston appearing in the early reference book The Star Wars Sketchbook.[9] This was to some extent retained in Star Wars: The Arcade Game, as well as the Trench Run sequences in the Rogue Squadron series, in order to make the level more challenging.
Appearances
 LEGO Star Wars: Microfighters — "video game" (Non-canonical source)
- Star Wars: Episode IV A New Hope
- Star Wars Episode IV: A New Hope novelization (First appearance)
- Star Wars Episode IV: A New Hope junior novelization
- Star Wars Episode IV: A New Hope PhotoComic
- Star Wars: The Arcade Game
- Star Wars 1987 video game
- Super Star Wars
- Star Wars: Rogue Squadron
- Star Wars: Rogue Squadron II: Rogue Leader
- Star Wars: Rogue Squadron III: Rebel Strike (Co-op/vs. mode only)
- Star Wars Battlefront: Elite Squadron
- The Force Unleashed Novelization
- Death Star (First identified as meridian trench)
Sources
- Death Star Technical Companion (As "Equatorial Trench")
- Death Star Technical Companion, Second Edition
- The Star Wars Sketchbook
- Star Wars Screen Entertainment
- Star Wars: Behind the Magic
- The Official Star Wars Fact File 76 (DEA 171NDASH.18, Death Star Exterior)
- Biggs Darklighter in the Encyclopedia (content now obsolete; backup link) (as "Death Star trench")
- Death Star Owner's Technical Manual (as latitudinal trench and latitudinal polar trench)
Notes and references
- ↑ The New Essential Chronology
- ↑ The Essential Atlas
- ↑ 3.0 3.1 3.2 3.3 Star Wars: Episode IV A New Hope
- ↑ 4.0 4.1 4.2 4.3 Star Wars: Behind the Magic
- ↑ The Official Star Wars Fact File 76 (DEA 171NDASH.18, Death Star Exterior)
- ↑ Death Star
- ↑ 7.0 7.1 7.2 Death Star Owner's Technical Manual
- ↑ Star Wars Episode IV: A New Hope novelization
- ↑ The Star Wars Sketchbook