Tags: Visual edit apiedit |
Darth Yarco (talk | contribs) (1.2 Formatting) Tag: sourceedit |
||
| Line 164: | Line 164: | ||
* Finn (gunner)<ref name="Episode VII" /> |
* Finn (gunner)<ref name="Episode VII" /> |
||
| − | === |
+ | ===Under Rey=== |
* Rey (captain) |
* Rey (captain) |
||
* Chewbacca (co-pilot)<ref name="Episode VII" /> |
* Chewbacca (co-pilot)<ref name="Episode VII" /> |
||
| − | * |
+ | * Finn (gunner)<ref name="Episode VII" /> |
| − | * |
||
{{Stub}} |
{{Stub}} |
||
Revision as of 09:48, 13 January 2016
| | |
Template:Majorspoiler Warning: This infobox has missing parameters: designer, navy, type and unrecognized parameters: taskforce, class, era, modules, imageBG
- "You know, that ship's saved my life quite a few times. She's the fastest hunk of junk in the galaxy!"
- ―Lando Calrissian
The Millennium Falcon was a Corellian YT-1300 light freighter used by the smugglers Han Solo and Chewbacca during the Galactic Civil War. It was previously owned by Lando Calrissian, who lost it to Solo in a game of sabacc.[13]
Its aged appearance belied numerous advanced modifications to boost the ship's speed, weapons and shield, including a hyperdrive engine among the fastest in the entire galaxy, enabling it to outrun Imperial Star Destroyers. It also included sensor-proof smuggling compartments, which were used during the rescue of Princess Leia Organa to evade Imperial stormtroopers. Afterwards, the Millennium Falcon saw further action when Solo chose to join the Rebels during the Battle of Yavin, where it was able to sneak up on Darth Vader's TIE Advanced.
After Han was captured on Bespin, Lando took command of the Falcon once more to search for him, and later flew the ship at the Battle of Endor, where it entered the Death Star II and destroyed it from within. During this battle, the starship's circular sensor dish was knocked off as Calrissian piloted it through the Death Star's interior.
In addition to its renowned hyperdrive, which made the Falcon boasted as the "fastest ship in the galaxy," the ship was equipped with a backup hyperdrive. Compared to the primary engine, it was much slower and often took several weeks or months to reach the nearest star system. It also had a dejarik table featuring creatures found throughout the galaxy.[5]
At some point over the following thirty years,[14] the sensor dish was replaced with a rectangular model.[15]
History
A Fateful Trip
- "You came in that thing? You're braver than I thought."
- ―Leia Organa upon seeing the Millennium Falcon for the first time
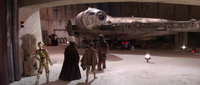
The Millennium Falcon's destiny as a tool for a small-time smuggling operation was changed when it was chartered by Obi-Wan Kenobi and Luke Skywalker in the Mos Eisley Cantina for passage to Alderaan.

The Falcon in Docking Bay 94 on Tatooine, shortly before departing for Alderaan.
When challenged by Obi-Wan about his ship's speed, Solo cited that the Falcon was capable of attaining 0.5 past lightspeed, and that it "made the Kessel Run in less than twelve parsecs."
The journey to Alderaan proved to be much more than a simple passenger flight. The Falcon was forced to blast its way out of Mos Eisley when a garrison of stormtroopers attacked the ship in an attempt to recover its cargo. It also narrowly avoided capture by a couple of Star Destroyers before making the jump to lightspeed.
The Falcon emerged from hyperspace into the remains of Alderaan. After chasing a single TIE fighter stranded in what appeared to be empty space, the Falcon was captured by one of the first Death Star's tractor beams and secured aboard the massive space station. Thanks to quick thinking by those aboard the Falcon, the ship was made to appear as if the crew had escaped soon after taking off from Tatooine. It was searched by stormtroopers and it was reported that there were no passengers on-board. Their search had managed to miss the crew who were hidden in a series of secret smuggling holds who then proceeded to kill a scanning crew before they could be detected by the scanner.
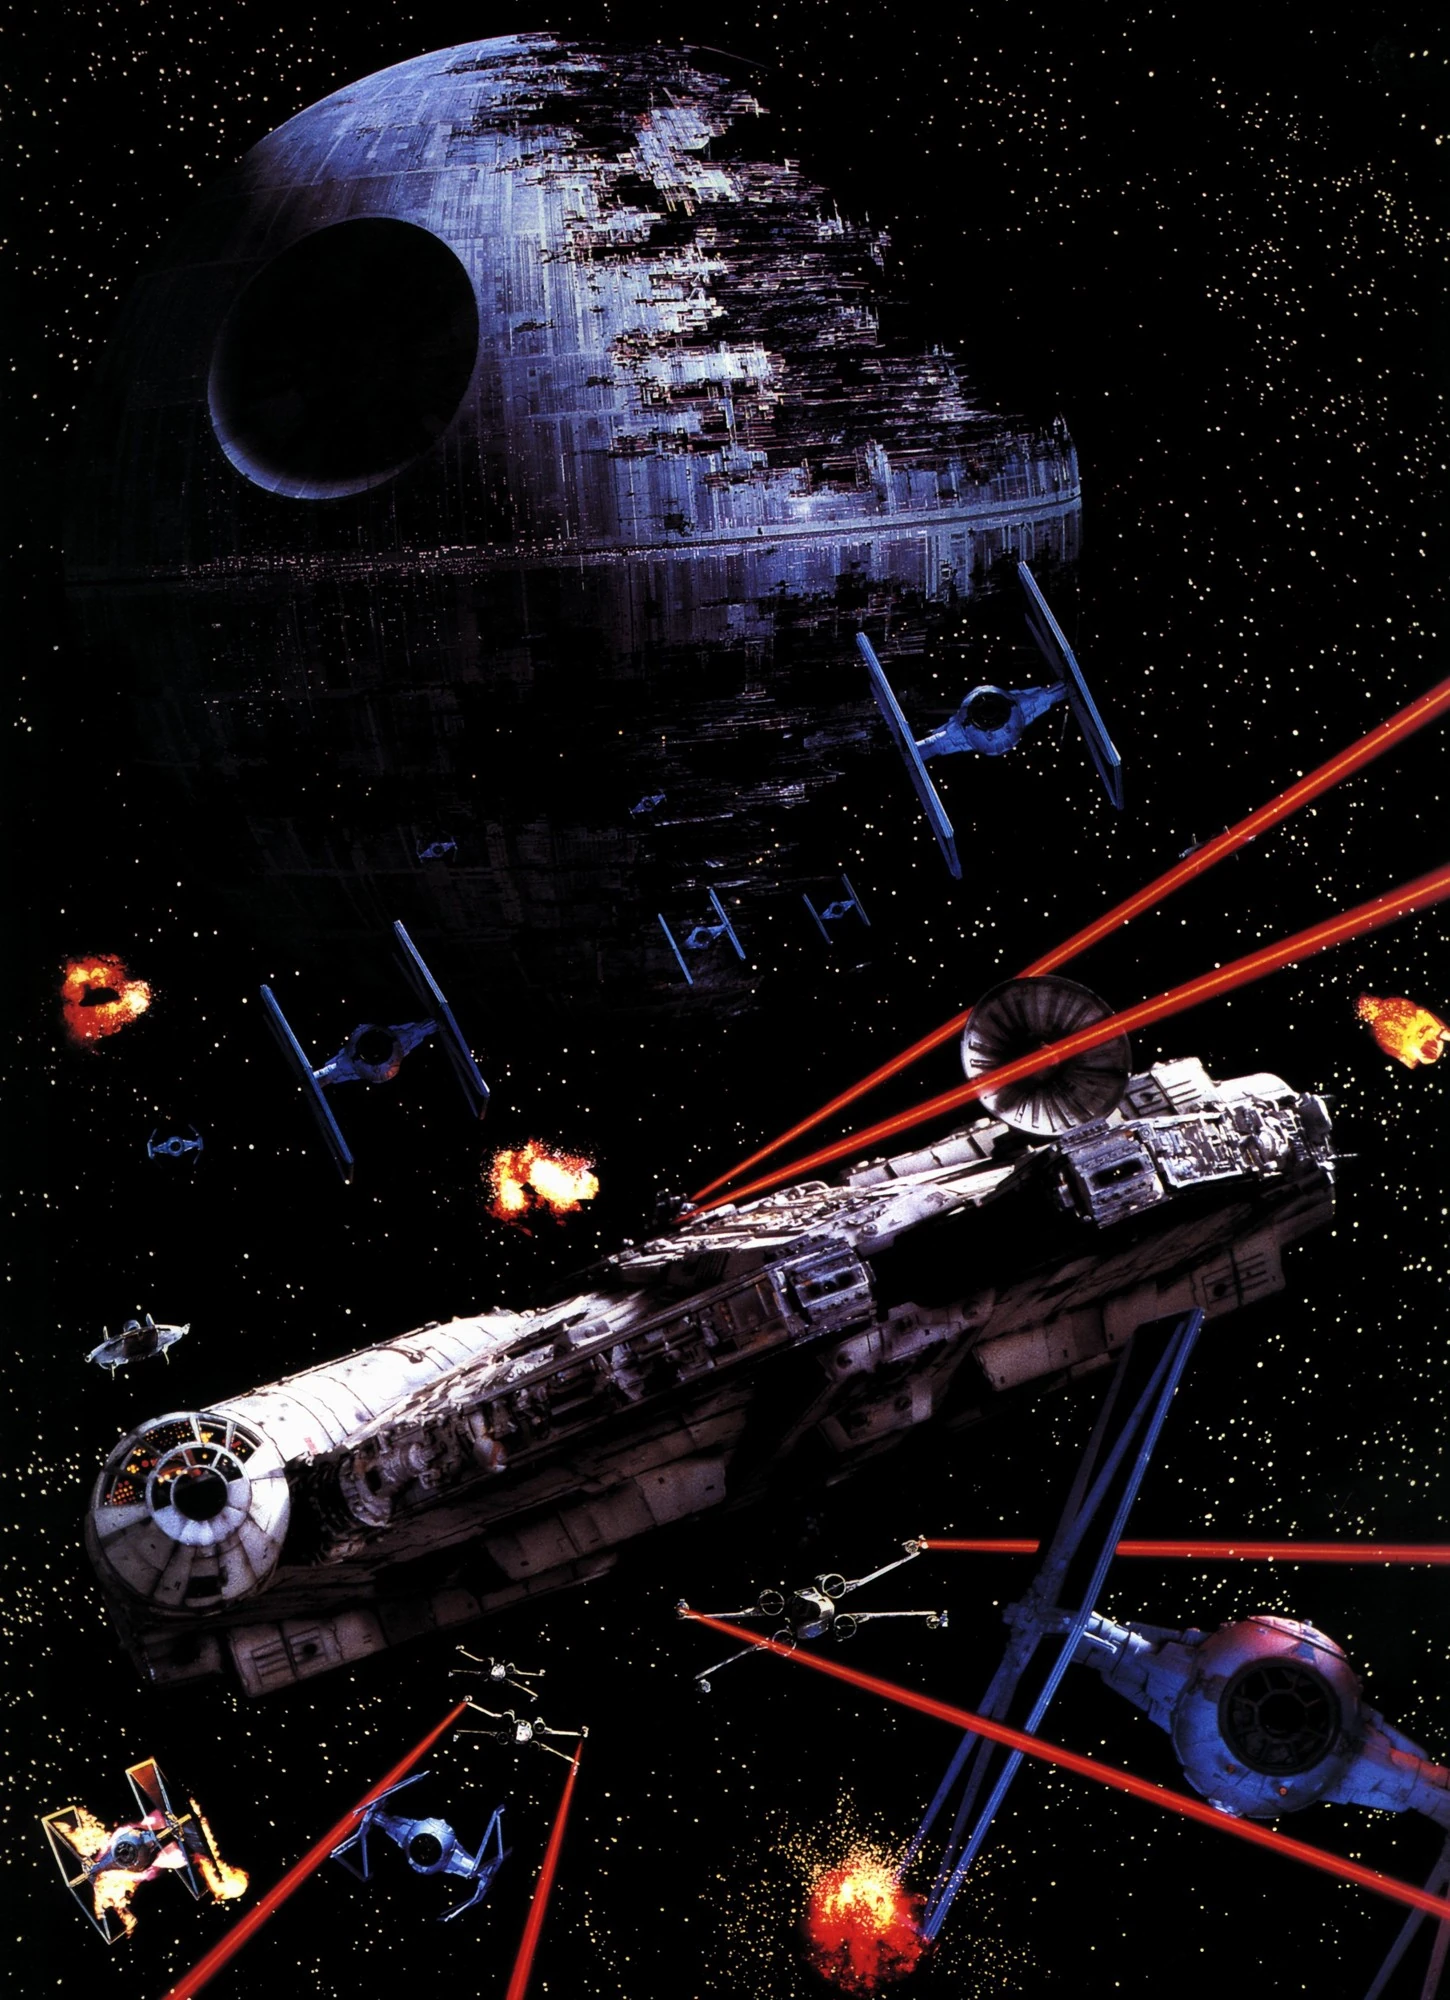
In a matter of hours, the Millennium Falcon had once again escaped the Imperial Navy, this time with the rescued Princess Leia Organa onboard. After a fleeing battle with Imperial fighters and a trip through hyperspace, the ship arrived at the secret Alliance base on Yavin 4. During the ship's stay on the battlestation, the Empire had planted a homing device onboard the Falcon which it used to pursue the Princess to this location. As the Rebels scrambled to organize a preemptive attack on the massive Death Star, Solo loaded his reward on board the Falcon and departed the moon. However, thanks to Chewbacca, its smuggler captain had a change of heart. Solo and his ship returned just in time to cover Luke Skywalker in his last-ditch effort to destroy the station and secure the safety of the Rebel Alliance. The ship's surprise attack destroyed Darth Vader's two wingmen and sent Vader himself spinning off into space, allowing Luke to successfully complete his attack and destroy the Death Star.[5]
Escape from Hoth
- "Punch it!"
- ―Han Solo to Chewbacca

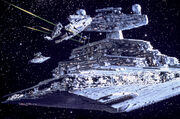
Millennium Falcon pursued by an Imperial-class Star Destroyer.
Three years after the Battle of Yavin, the Falcon was undergoing repairs in the main hangar of the Rebel installation Echo Base as the Empire began its assault on Hoth. As the Alliance scrambled to escape the base, Solo and Chewbacca hurried to make the ship spaceworthy. Princess Leia was cut off from her transport by a tunnel cave-in and was forced to make her escape from Hoth on board the Falcon accompanied by Han, Chewbacca and C-3PO. Solo used the ship's uncanny maneuverability and his piloting skills to elude an Imperial Star Destroyer chasing them, and two more emerging from hyperspace. Han's maneuvers in the Falcon caused the two Star Destroyers approaching and the one pursuing to nearly collide with each other. The Falcon then attempted to make the jump into lightspeed, but was stopped short by an equipment malfunction.

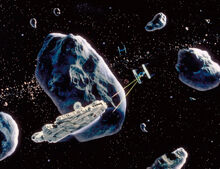
The Falcon is pursued into the Hoth asteroid field.
Forced to take drastic measures to avoid capture, Solo made the decision to pilot the Falcon into a nearby asteroid field in an attempt to lose the Imperial pursuers. However, his repairs were cut short as he had unknowningly landed on a space slug. Escaping just in time, the Falcon was discovered by the Star Destroyer Avenger. They attempted to jump to lightspeed but once again, the hyperdrive was not fully repaired. Han then used the landing claw of the Falcon to attach to a blind spot on the conning tower of the Star Destroyer. Adhering to standard Imperial procedure, the Star Destroyers of Death Squadron ejected all scrap and garbage before entering hyperspace. Han then signaled Chewbacca to release the claw, allowing the Falcon to "float away with the rest of the garbage." Boba Fett, however, saw through this ruse, and waited behind in the Slave I, following the Falcon as it left the system.

The Falcon lands at Platform 327 on Cloud City.
After its close encounter with the Empire, the Falcon journeyed to Bespin's Cloud City, where Han's old acquaintance, Lando Calrissian, held the position of Baron Administrator. The Empire had arrived first, however, due to Boba Fett tailing the Falcon to Bespin. The crew of the Falcon were captured, tortured, and detained. Han was encased in carbonite and given to the bounty hunter Boba Fett. The remaining members of the crew, joined by Lando, escaped to the Falcon. After rescuing Luke, who was dangling from a weather vane on the underside of Cloud City, the ship left the planet and attempted to jump to lightspeed. The crew were unaware that the recently repaired hyperdrive had been disabled by Vader's men, and only a last minute patch by R2-D2 prevented the Falcon from falling into Imperial hands. Thanks to R2's efforts, the hyperdrive was activated and the Falcon managed to make the jump at the last second and escape.[7]
Rescuing Han
During the following months, the Falcon served as home base to Leia, Luke, and Lando as they tracked Fett in an attempt to save Solo. After successfully rescuing Han, the Falcon rendezvoused with the Rebel Fleet, and prepared to assault the newest Death Star.[8]
Battle of Endor
- "Look, I want you to take her. I mean it, take her! You need all the help you can get; she's the fastest ship in the fleet!"
- ―Han Solo to Lando Calrissian

The Falcon leads the starfighter attack during the Battle of Endor.
During the Battle of Endor, Lando and Sullustan copilot Nien Nunb flew the Falcon as Gold Leader. After the planetary shield protecting the second Death Star was destroyed, the Falcon and several Alliance fighters entered the battle station through a conduit port and headed towards the reactor core. Space was limited in the conduit tunnels leading to the core and the relatively large Falcon lost its sensor dish when it smashed into a bulkhead. Lando was able to pilot the craft into the energy core housing the main reactor, fired upon the reactor, and headed for the exhaust port. The Falcon barely succeeded in outrunning the massive explosion that destroyed the powerful battlestation. Soon afterwards, the Imperial fleet retreated and the galaxy celebrated the death of the Emperor.[8]
Reappearance
- "The garbage will do!"
- ―Rey being forced to board the Falcon during the Escape from Jakku.
More than two decades later, the Falcon was stolen from Han following his separation from Leia after their son fell to the the dark side. It was in turn stolen several other times before the sitting unused for several years in Niima Outpost on the junkyard planet Jakku, under the possession of junkboss Unkar Plutt. Rey, Finn, and BB-8 stole the vessel to escape an attack from the First Order on the outpost.[10]
While in space flight, the Falcon was picked up by Han Solo and Chewbacca's sensors, and they promptly locked down the Falcon's systems so they could recapture it using a freighter they were then using for their smuggling operations. Upon boarding their old vessel, Han and Chewie went about inspecting their ship and found Rey and Finn hiding, whom they assumed were the thieves that had stolen the Falcon. When Rey and Finn explained that they were going to take a droid named BB-8 to the Resistance as he had a map that would reveal Luke's location, Han and Chewie agreed to help them. Later, the Falcon crew arrived at the planet Takodana and met Maz Kanata.[10]
Following the attack on Maz Kanata's castle, Starkiller Base prepared to fire on D'Qar, and the Resistance devised a plan to sneak onto the surface and lower the planetary shields so the fighters could attack the superweapon's weak spot. Using the Falcon, Han, Chewbacca, and Finn infiltrated the base, lowered the shields, and reunited with Rey, who was captured during a raid on Takodana by the First Order.[10]
After the confrontation with Kylo Ren following the death of Han Solo, Chewbacca rescued Finn and Rey aboard the Falcon, managing to escape the planet as it exploded. After learning of Luke Skywalker's location, Rey, R2, and Chewbacca flew in the Falcon to Ahch-To, the distant planet where he was exiled.[10]
Significant Crew
Under Lando Calrissian
- Lando Calrissian (captain)[3][7][8]
- Chewbacca (co-pilot, mechanic)[3][8]
- Nien Nunb (co-pilot, Battle of Endor)[3][8]
- Cracken (gunner, Battle of Endor)[3]
- Blount (gunner, Battle of Endor)[3]
Under Han Solo
- Han Solo (captain)[3][5]
- Chewbacca (co-pilot, mechanic)[3][5]
- Luke Skywalker (gunner)[3][5]
- Rey (co-pilot)[10]
- Finn (gunner)[10]
Under Rey
Behind the scenes
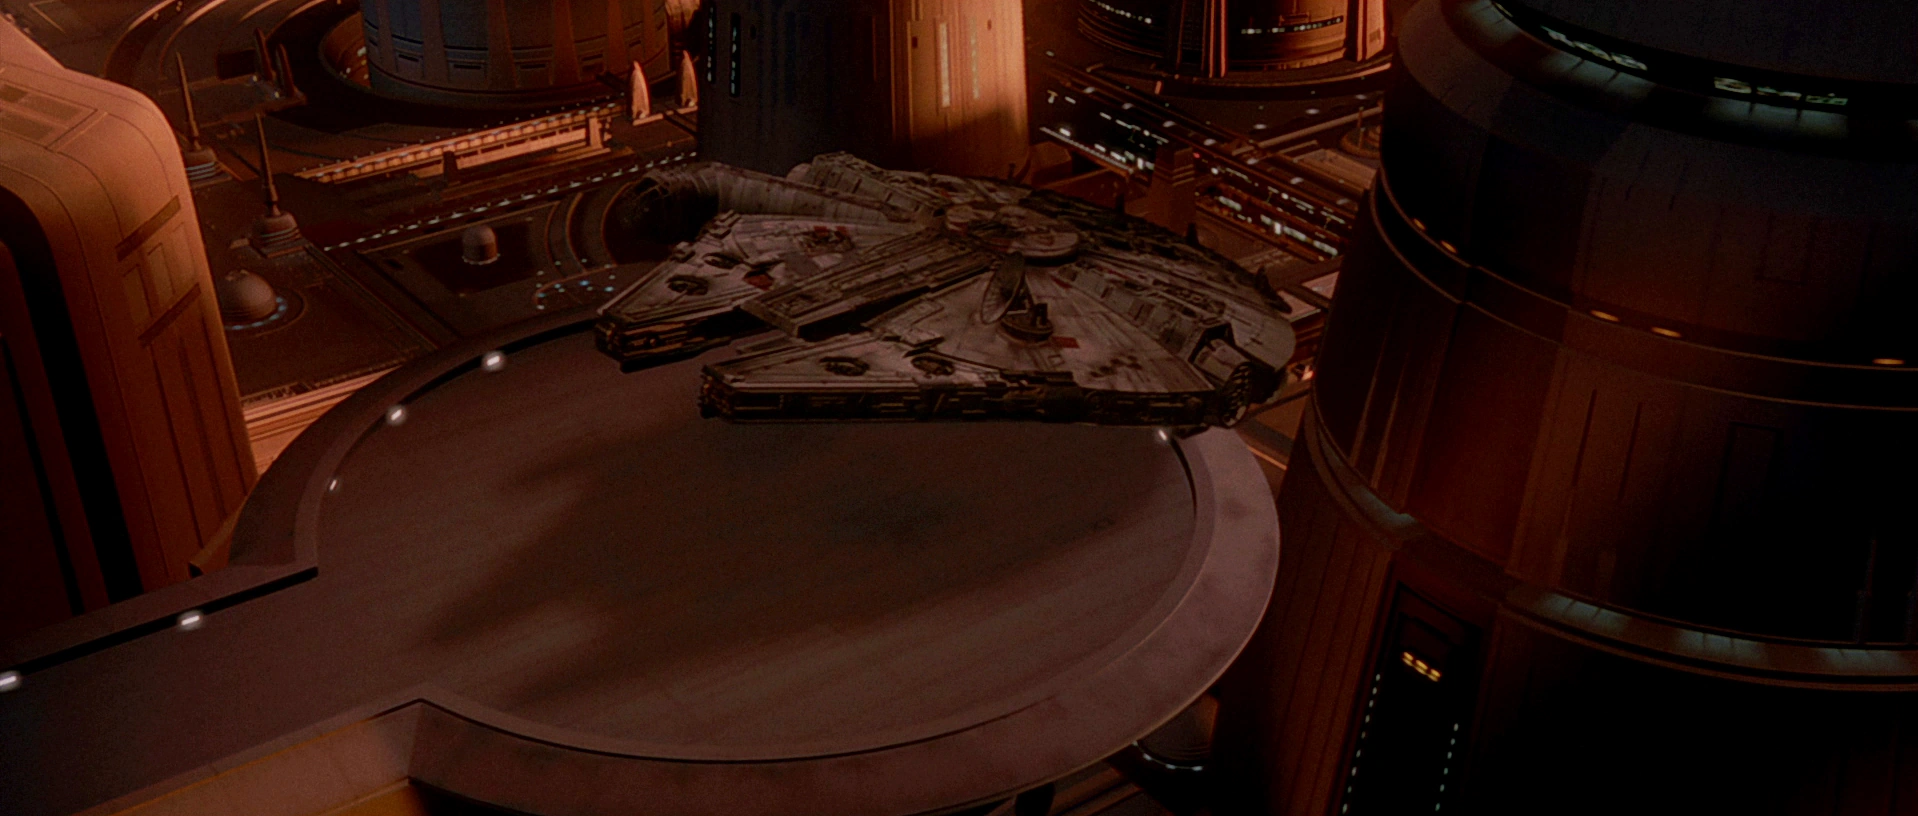
It was speculated that the Falcon would make an appearance in Revenge of the Sith to further tie the prequel trilogy to the original trilogy, and the ship did indeed make a cameo in the movie. At the beginning of one shot closing in on a docking bay on Coruscant, a freighter is seen flying in to dock. George Lucas confirmed that it was the Millennium Falcon itself and not just another ship of the same class.[16]
Appearances
- Star Wars: Galactic Defense
- Star Wars: Episode III Revenge of the Sith
- Lost Stars
- Star Wars: Episode IV A New Hope (First appearance)
- A New Hope Read-Along Storybook and CD
- The Adventures of Luke Skywalker, Jedi Knight
- Star Wars: Battle Pod
- Smuggler's Run: A Han Solo & Chewbacca Adventure
- Smuggler's Run animated comic
- Heir to the Jedi (Mentioned only)
- Star Wars 1: Skywalker Strikes
- Star Wars 2: Skywalker Strikes, Part II
- Star Wars 3: Skywalker Strikes, Part III
- Star Wars: Darth Vader 1: Vader (In flashback(s))
- Star Wars 4: Skywalker Strikes, Part IV
- Star Wars 5: Skywalker Strikes, Part V (Mentioned only)
- Star Wars 10: Showdown on the Smuggler's Moon, Part III
- Star Wars 12: Showdown on the Smuggler's Moon, Part V
- Star Wars: Vader Down, Part I
- Star Wars: Darth Vader 13: Vader Down, Part II
- Star Wars Battlefront
- Battlefront: Twilight Company
- Star Wars: Lando, Part II (Mentioned only)
- Smuggler's Run: A Han Solo & Chewbacca Adventure
- Star Wars: Episode V The Empire Strikes Back
- Epic Yarns: The Empire Strikes Back (Non-canonical appearance)
- Star Wars: Episode VI Return of the Jedi
- Return of the Jedi Read-Along Storybook and CD
- Return of the Jedi: Beware the Power of the Dark Side! (Mentioned only)
- Epic Yarns: Return of the Jedi (Non-canonical appearance)
 "Blade Squadron" — Star Wars Insider 149–150
- Star Wars: Shattered Empire, Part I
- Aftermath
- Jakku Spy
- Star Wars: Episode VII The Force Awakens
- Star Wars: Episode VII The Force Awakens novelization
- Star Wars: Episode VII The Force Awakens junior novelization
- Han & Chewie Return!
Sources
- Bossk in the Encyclopedia (content now obsolete; backup link)
- Captain Needa in the Encyclopedia (content now obsolete; backup link)
- Chewbacca in the Encyclopedia (content now obsolete; backup link)
- Lando Calrissian in the Encyclopedia (content now obsolete; backup link)
- Millennium Falcon in the Encyclopedia (content now obsolete; backup link)
- Republic tugboat in the Encyclopedia (content now obsolete; backup link)
- The Pykes in the Encyclopedia (content now obsolete; backup link)
- "Launch Pad" — Star Wars Insider 151
- Star Wars in 100 Scenes
- Star Wars: Absolutely Everything You Need to Know
- Star Wars: Ships of the Galaxy
- Star Wars: The Force Awakens: Incredible Cross-Sections
- LEGO Star Wars: Episode VII The Force Awakens (Set: 75105 Millennium Falcon)
- Star Wars: Absolutely Everything You Need to Know
- Bossk in the Databank (backup link)
- C-3PO (See-Threepio) in the Databank (backup link)
- Captain Needa in the Databank (backup link)
- Chewbacca in the Databank (backup link)
- Death Star II in the Databank (backup link)
- Imperial Star Destroyer biography gallery on StarWars.com (backup link (Imperial-Star-Destroyer-Biography-gallery) not verified!); images #10, 11, 12, 14 (of 15)
- Lando Calrissian in the Databank (backup link)
- Millennium Falcon in the Databank (backup link)
- Stormtroopers in the Databank (backup link)
- TIE fighter in the Databank (backup link)
- Wookiee in the Databank (backup link)
- X-wing Fighter history gallery in the Databank (backup link); image #8 (of 8)
Notes and references
- ↑ 1.00 1.01 1.02 1.03 1.04 1.05 1.06 1.07 1.08 1.09 1.10 1.11 1.12 1.13 1.14 1.15 1.16 1.17 1.18 1.19 1.20 1.21 Star Wars: The Force Awakens: Incredible Cross-Sections
- ↑
 Millennium Falcon in the Databank (backup link)
- ↑ 3.00 3.01 3.02 3.03 3.04 3.05 3.06 3.07 3.08 3.09 3.10 3.11 Star Wars: Absolutely Everything You Need to Know
- ↑ Star Wars: Absolutely Everything You Need to Know
- ↑ 5.00 5.01 5.02 5.03 5.04 5.05 5.06 5.07 5.08 5.09 5.10 5.11 5.12 5.13 5.14 5.15 Star Wars: Episode IV A New Hope
- ↑ Star Wars 1: Skywalker Strikes
- ↑ 7.0 7.1 7.2 7.3 7.4 7.5 Star Wars: Episode V The Empire Strikes Back
- ↑ 8.0 8.1 8.2 8.3 8.4 8.5 8.6 Star Wars: Episode VI Return of the Jedi
- ↑ Star Wars Battlefront
- ↑ 10.00 10.01 10.02 10.03 10.04 10.05 10.06 10.07 10.08 10.09 10.10 10.11 Star Wars: Episode VII The Force Awakens
- ↑ Aftermath
- ↑ Visible on studio model
- ↑ Star Wars in 100 Scenes
- ↑ Star Wars: Episode VII Set to Roll Cameras May 2014 on StarWars.com (backup link (news/star-wars-episode-vii-set-to-roll-cameras-may-2014.html) not verified!)
- ↑ Episode III Easter Egg Hunt on StarWars.com (content now obsolete; backup link (episode-iii/bts/production/f20050526/) not verified!)
External links
- Millennium Falcon on Wikipedia
- Template:SWSB