No edit summary |
m (Canon/Legends switch-over, Stage 2) Tag: apiedit |
||
| (42 intermediate revisions by 28 users not shown) | |||
| Line 1: | Line 1: | ||
{{Eras|imp}} |
{{Eras|imp}} |
||
| + | {{Droid |
||
| − | {{Droid_infobox |
||
|imageBG= |
|imageBG= |
||
| − | |image=[[File:OOM10- |
+ | |image=[[File:OOM10-Counterattack.png]] |
|name=OOM-10 |
|name=OOM-10 |
||
| − | |hidep= |
||
|homeworld= |
|homeworld= |
||
|birth= |
|birth= |
||
| + | |death=c. [[21 BBY]], [[Lola Sayu/Legends|Lola Sayu]] |
||
| − | |death= |
||
|creator= |
|creator= |
||
| − | |manufacturer=[[Baktoid Combat Automata]] |
+ | |manufacturer=[[Baktoid Combat Automata/Legends|Baktoid Combat Automata]] |
| − | |line=[[ |
+ | |line=[[OOM-series battle droid]] |
| − | |model=[[OOM |
+ | |model=[[OOM command battle droid/Legends|OOM command battle droid]] |
| − | |class=[[Battle droid]] |
+ | |class=[[Battle droid/Legends|Battle droid]] |
| − | | |
+ | |degree= |
| + | |cost= |
||
|length= |
|length= |
||
|width= |
|width= |
||
| − | |height=1.91 meters |
+ | |height=1.91 [[Imperial standard meter|meters]] |
| + | |mass= |
||
| − | |gender=[[Sexes|Masculine programming]] |
+ | |gender=[[Sexes/Legends|Masculine programming]] |
| − | |sensor=[[Black]] |
+ | |sensor=[[Color/Legends|Black]] |
| − | |armament= |
||
| + | |plating= |
||
| + | |armament=[[E-5 blaster rifle/Legends|E-5 blaster rifle]] |
||
|equipment= |
|equipment= |
||
| − | |hidec= |
||
|era=[[Rise of the Empire era]] |
|era=[[Rise of the Empire era]] |
||
| − | |affiliation=*[[Confederacy of Independent Systems]] |
+ | |affiliation=*[[Confederacy of Independent Systems/Legends|Confederacy of Independent Systems]] {{C|formerly}} |
| − | *[[Galactic Republic]] |
+ | *[[Galactic Republic/Legends|Galactic Republic]] |
| − | **[[R2-D2's battle droid squadron]] |
+ | **[[R2-D2's battle droid squadron]]}} |
| ⚫ | |||
| ⚫ | |||
| + | |||
| ⚫ | |||
==Biography== |
==Biography== |
||
{{Quote|Hold it. Where are you going with these prisoners?''"<br />"''We're transferring them aboard the shuttle from Citadel to Point Tarron.''"<br />"''Point Tarron? There's no outpost there.''"<br />"''Uh, it's new...we have orders. We're coming aboard.|OOM-10 tries convincing a B1 battle droid into letting them leave the Citadel.|Counterattack}} |
{{Quote|Hold it. Where are you going with these prisoners?''"<br />"''We're transferring them aboard the shuttle from Citadel to Point Tarron.''"<br />"''Point Tarron? There's no outpost there.''"<br />"''Uh, it's new...we have orders. We're coming aboard.|OOM-10 tries convincing a B1 battle droid into letting them leave the Citadel.|Counterattack}} |
||
| − | Originally, built as a [[Confederacy of Independent Systems|CIS]] battle droid, it was captured and reprogrammed to listen to R2's orders. It, along with two other reprogrammed battle droids helped sneak the Jedi aboard the Citadel in order to rescue [[Jedi Master]] [[Even Piell]]. This droid stayed behind with R2 and the other two droids on [[Lola Sayu]], the planet housing the Citadel. When R2 received orders from [[Anakin Skywalker|Anakin]] to pick them up from a certain area of the Citadel, OOM-10, R2 and the other two droids flew the hip to the meeting area but when [[K2-B4]], the [[T-series tactical droid|tactical droid]] stationed in the Citadel arrived instead of the team, OOM-10 and the droids were forced to act as if R2 was their prisoner and were taking him for interrogation. When they were in the clear, R2 surmised that [[Obi-Wan Kenobi|Kenobi]] and his team would be walking into a trap. He was right as Kenobi and his team were captured. While they were being taken to the interrogation room, OOM-10 managed to convince the [[OOM security battle droid|security droids]] escorting them to hand the prisoners over to them. They then rushed back to the ship outside where they had met with Skywalker's team. However, OOM-10's reprogramming had been revealed to the CIS and a group of battle droids, [[BX-series droid commando|droid commandos]] with energy shields and two [[LM-432 crab droid|crab droids]] rushed outside to confront the team. In the firefight, [[ARC Trooper|ARC trooper]] [[CT-21-0408|Echo]] and one of the reprogrammed battle droids were lost. OOM-10 and the remaining members of the team managed to retreat to the lower caves of the planet below the Citadel where they lay in wait for the Republic that had been called by Kenobi, to rescue them. |
||
| + | Originally built as a [[Confederacy of Independent Systems/Legends|Confederacy of Independent Systems]] battle droid, this [[OOM command battle droid/Legends|OOM command battle droid]] was captured by the [[Galactic Republic/Legends|Galactic Republic]] and reprogrammed to listen to [[Astromech droid/Legends|astromech droid]] [[R2-D2/Legends|R2-D2]]'s orders. |
||
| − | It is believed that OOM-10 is the battle droid which was trapped in the [[gutkurr]] cage featured in the 20th episode of season 1. |
||
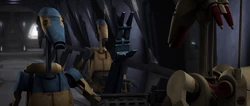
| + | [[File:OOM10halt-Counterattack.png|left|thumb|250px|OOM-10 fools another OOM-series droid into turning over his prisoners]] |
||
| + | This droid along with two other reprogrammed [[B1 battle droid/Legends|battle droids]] helped [[Jedi General/Legends|Jedi General]] [[Obi-Wan Kenobi/Legends|Obi-Wan Kenobi]] and [[Anakin Skywalker/Legends|Anakin Skywalker]] and a squadron of [[Clone trooper/Legends|clone trooper]]s sneak aboard the Citadel in order to rescue [[Jedi Master/Legends|Jedi Master]] [[Even Piell/Legends|Even Piell]]. After landing on the [[Lola Sayu/Legends|planet]] where the Citadel was located, this droid stayed behind with R2 and the other two droids. When R2 received orders from Anakin Skywalker to pick them up from a certain area of the Citadel, OOM-10, R2 and the other two droids flew the ship to the meeting area. When [[K2-B4]], the [[T-series tactical droid/Legends|tactical droid]] stationed in the Citadel arrived instead of the team, OOM-10 and the droids were forced to act as if R2 was their prisoner and were taking him for interrogation. When they were in the clear, R2 surmised that Obi-Wan Kenobi and his team would be walking into a trap. |
||
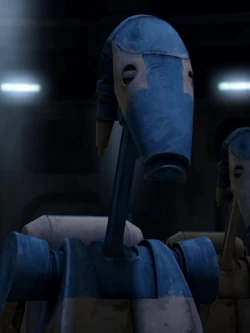
| + | [[File:OOM10-TC.png|thumb|250px|OOM-10 alongside a pilot droid.]] |
||
| + | |||
| + | He was right as Kenobi and his team were indeed captured but while they were being taken to the interrogation room, OOM-10 managed to convince the [[OOM security battle droid|security droids]] escorting them to hand the prisoners over. They then rushed Kenobi's team back to the ship waiting outside, where they met with Skywalker's team. However, OOM-10's reprogramming had been revealed to the Separatists and a group of battle droids, [[BX-series droid commando/Legends|droid commandos]] with energy shields and two [[LM-432 crab droid/Legends|crab droids]] rushed outside to confront the team. In the firefight which ensued, [[Advanced Recon Commando|ARC trooper]] [[CT-21-0408|Echo]] was killed. OOM-10 and the remaining members of the team managed to retreat to the caves below the Citadel where they waited for the Republic forces that had been called by Kenobi to arrive. However, while heading for the extraction point, battle droids arrived and ambushed them. R2 then ordered the droids to hold them back while the team escapes. In the end, although the team managed to escape with only two casualties, the entire battle droid team including OOM-10, was destroyed. |
||
==Appearances== |
==Appearances== |
||
| Line 41: | Line 46: | ||
==Sources== |
==Sources== |
||
| − | *{{ |
+ | *{{SWArchive|url=theclonewars/guide/episode318.html|text=''The Clone Wars'' Episode Guide: The Citadel}} |
| − | *{{ |
+ | *{{SWArchive|url=theclonewars/guide/episode319.html|text=''The Clone Wars'' Episode Guide: Counterattack}} |
| + | *{{SWArchive|url=theclonewars/guide/episode320.html|text=''The Clone Wars'' Episode Guide: Citadel Rescue}} |
||
| + | *''[[Star Wars: The Clone Wars Comic UK 6.41]]'' |
||
| + | {{Interlang |
||
| ⚫ | |||
| ⚫ | |||
| − | [[Category:Masculine programming]] |
||
| + | |es=OOM-10 |
||
| ⚫ | |||
| + | |nl=OOM-10 |
||
| ⚫ | |||
| + | [[Category:Galactic Republic military personnel]] |
||
| ⚫ | |||
| ⚫ | |||
| ⚫ | |||
Revision as of 03:14, 10 December 2015
| | |
Warning: This infobox has missing parameters: type, pronouns and unrecognized parameters: era, degree, imageBG
OOM-10 was a OOM-series battle droid used by the Galactic Republic during the Clone Wars. It was second-in-command of R2-D2's battle droid squadron.
Biography
- "Hold it. Where are you going with these prisoners?"
"We're transferring them aboard the shuttle from Citadel to Point Tarron."
"Point Tarron? There's no outpost there."
"Uh, it's new...we have orders. We're coming aboard." - ―OOM-10 tries convincing a B1 battle droid into letting them leave the Citadel.
Originally built as a Confederacy of Independent Systems battle droid, this OOM command battle droid was captured by the Galactic Republic and reprogrammed to listen to astromech droid R2-D2's orders.

OOM-10 fools another OOM-series droid into turning over his prisoners
This droid along with two other reprogrammed battle droids helped Jedi General Obi-Wan Kenobi and Anakin Skywalker and a squadron of clone troopers sneak aboard the Citadel in order to rescue Jedi Master Even Piell. After landing on the planet where the Citadel was located, this droid stayed behind with R2 and the other two droids. When R2 received orders from Anakin Skywalker to pick them up from a certain area of the Citadel, OOM-10, R2 and the other two droids flew the ship to the meeting area. When K2-B4, the tactical droid stationed in the Citadel arrived instead of the team, OOM-10 and the droids were forced to act as if R2 was their prisoner and were taking him for interrogation. When they were in the clear, R2 surmised that Obi-Wan Kenobi and his team would be walking into a trap.

OOM-10 alongside a pilot droid.
He was right as Kenobi and his team were indeed captured but while they were being taken to the interrogation room, OOM-10 managed to convince the security droids escorting them to hand the prisoners over. They then rushed Kenobi's team back to the ship waiting outside, where they met with Skywalker's team. However, OOM-10's reprogramming had been revealed to the Separatists and a group of battle droids, droid commandos with energy shields and two crab droids rushed outside to confront the team. In the firefight which ensued, ARC trooper Echo was killed. OOM-10 and the remaining members of the team managed to retreat to the caves below the Citadel where they waited for the Republic forces that had been called by Kenobi to arrive. However, while heading for the extraction point, battle droids arrived and ambushed them. R2 then ordered the droids to hold them back while the team escapes. In the end, although the team managed to escape with only two casualties, the entire battle droid team including OOM-10, was destroyed.
Appearances
 Star Wars: The Clone Wars — "The Citadel" (First appearance)
- Star Wars: The Clone Wars — "Counterattack"
- Star Wars: The Clone Wars — "Citadel Rescue"
Sources
- The Clone Wars Episode Guide: The Citadel on StarWars.com (content now obsolete; backup link)
- The Clone Wars Episode Guide: Counterattack on StarWars.com (content now obsolete; backup link)
- The Clone Wars Episode Guide: Citadel Rescue on StarWars.com (content now obsolete; backup link)
- Star Wars: The Clone Wars Comic UK 6.41