(2.2 Updated with new information) |
m (Canon/Legends switch-over, Stage 2) Tag: apiedit |
||
| (10 intermediate revisions by 6 users not shown) | |||
| Line 1: | Line 1: | ||
| − | {{Eras|reb|real}} |
+ | {{Eras|reb|real|title=''{{PAGENAME}}''}} |
| + | {{Comic_story |
||
| − | {{Title|''{{PAGENAME}}''}} |
||
| ⚫ | |||
| − | {{Infobox_Comic_Book |
||
|title=The Rebel Thief |
|title=The Rebel Thief |
||
| ⚫ | |||
| ⚫ | |||
| ⚫ | |||
| ⚫ | |||
|writer=[[Ryder Windham]] |
|writer=[[Ryder Windham]] |
||
|penciller=[[Gary Erskine]] |
|penciller=[[Gary Erskine]] |
||
| − | |inker= |
+ | |inker=Gary Erskine |
|letterer=[[Annie Parkhouse]] |
|letterer=[[Annie Parkhouse]] |
||
| − | |colorist=[[ |
+ | |colorist=[[Cary Porter]] |
| + | |cover artist= |
||
|editor=[[Bob Cooper]] |
|editor=[[Bob Cooper]] |
||
|publisher=[[Dark Horse Comics]] |
|publisher=[[Dark Horse Comics]] |
||
|publication date=[[June]]-[[October]] [[1997]] |
|publication date=[[June]]-[[October]] [[1997]] |
||
| ⚫ | |||
| ⚫ | |||
| + | |era=[[Rebellion era]] |
||
| ⚫ | |||
| ⚫ | |||
| + | |published in=1-5 |
||
| ⚫ | |||
|preceded by= |
|preceded by= |
||
|followed by=[[X-wing Marks the Spot]]}} |
|followed by=[[X-wing Marks the Spot]]}} |
||
| ⚫ | |||
| ⚫ | |||
| ⚫ | '''''The Rebel Thief''''' is a five part comic written by [[Ryder Windham]] and illustrated by [[Gary Erskine]], and was published in issues ''#1-#5'' of the magazine, ''[[Star Wars Kids (magazine)|Star Wars Kids]]''. It tells the story of how the [[Alliance to Restore the Republic|Rebel Alliance]] was able to finance replacement [[T-65 X-wing starfighter|X-wings]] for the ones they lost at the [[Battle of Yavin]]. |
||
| + | |||
| ⚫ | '''''The Rebel Thief''''' is a five part comic written by [[Ryder Windham]] and illustrated by [[Gary Erskine]], and was published in issues ''#1-#5'' of the magazine, ''[[Star Wars Kids (magazine)|Star Wars Kids]]''. It tells the story of how the [[Alliance to Restore the Republic/Legends|Rebel Alliance]] was able to finance replacement [[T-65 X-wing starfighter|X-wings]] for the ones they lost at the [[Battle of Yavin/Legends|Battle of Yavin]]. |
||
==Plot summary== |
==Plot summary== |
||
| − | [[Han Solo]], while staying on [[Yavin 4]], hears of a temple filled with ancient [[Sith]] treasure, not far from the main Rebel Base. With [[Chewbacca]], he sets out to find the temple, without telling [[Leia Organa Solo|Leia Organa]] and [[Luke Skywalker]]. [[Q-7N]], however, alerts Leia to their plan, and she, with Luke, sets out after them. |
+ | [[Han Solo/Legends|Han Solo]], while staying on [[Yavin 4/Legends|Yavin 4]], hears of a temple filled with ancient [[Sith/Legends|Sith]] treasure, not far from the main Rebel Base. With [[Chewbacca/Legends|Chewbacca]], he sets out to find the temple, without telling [[Leia Organa Solo|Leia Organa]] and [[Luke Skywalker/Legends|Luke Skywalker]]. [[Q-7N]], however, alerts Leia to their plan, and she, with Luke, sets out after them. |
| − | Han reaches the temple, and while trying to take the treasure, is confronted by an ancient Sith [[battle droid]]. Chewbacca destroys the droid, and the two quickly gather the treasure and load it onto the ''[[Millennium Falcon]]''. They take off, just as Leia and Luke arrive in a [[X-34 landspeeder|landspeeder]]. Leia assumes that Han has stolen the treasure for his own personal benefit, and orders his arrest, should he return. |
+ | Han reaches the temple, and while trying to take the treasure, is confronted by an ancient Sith [[Battle droid/Legends|battle droid]]. Chewbacca destroys the droid, and the two quickly gather the treasure and load it onto the ''[[Millennium Falcon/Legends|Millennium Falcon]]''. They take off, just as Leia and Luke arrive in a [[X-34 landspeeder/Legends|landspeeder]]. Leia assumes that Han has stolen the treasure for his own personal benefit, and orders his arrest, should he return. |
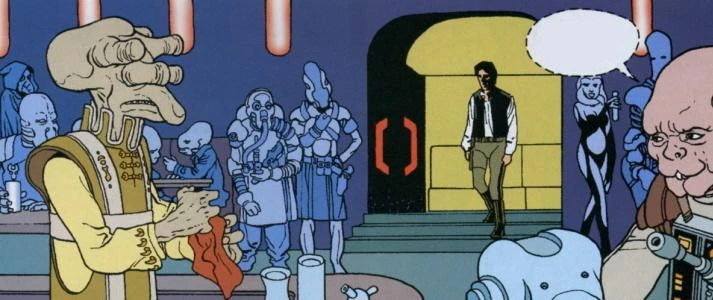
| − | [[File:Zio Snaffkin Cantina web.jpg|250px|thumb|right|[[Han Solo]] enters [[Zio Snaffkin Cantina]].]] |
+ | [[File:Zio Snaffkin Cantina web.jpg|250px|thumb|right|[[Han Solo/Legends|Han Solo]] enters [[Zio Snaffkin Cantina]].]] |
| − | Meanwhile, Han and Chewbacca fly to [[Dennogra]], home of [[Sprool|Sprool the Trader]]. After landing at [[Zio Snaffkin]] Spaceport, Han wanders into a [[Zio Snaffkin Cantina|cantina]], where he is confronted by an [[Aqualish]] [[bounty hunter]]. Han kills the bounty hunter, and declares, "That's it for the entertainment folks! I'm looking for Sprool!" |
+ | Meanwhile, Han and Chewbacca fly to [[Dennogra]], home of [[Sprool|Sprool the Trader]]. After landing at [[Zio Snaffkin]] Spaceport, Han wanders into a [[Zio Snaffkin Cantina|cantina]], where he is confronted by an [[Aqualish/Legends|Aqualish]] [[Bounty hunter/Legends|bounty hunter]]. Han kills the bounty hunter, and declares, "That's it for the entertainment folks! I'm looking for Sprool!" |
| − | Sprool, an [[Ithorian]], quickly identified himself, and was invited onboard the ''Falcon'' to inspect the Sith merchandise. Han offered to sell one of the two crates of treasure, to which Sprool agreed. He then asked Sprool to take the second crate to [[Jabba Desilijic Tiure|Jabba]] the [[Hutt]], to settle the bounty that was on his head. Solo received 500,000 [[Galactic Credit Standard|credits]] from Sprool, and took it back to the Rebel Base on Yavin. Before Leia had him detained, he explained why he had taken the treasure, and presented the [[Prince]]ss with the credits for the new [[T-65 X-wing starfighter|X-wings]] needed to replenish the fleet. Leia, confused, dismissed the guards and allowed Solo to go free. |
+ | Sprool, an [[Ithorian/Legends|Ithorian]], quickly identified himself, and was invited onboard the ''Falcon'' to inspect the Sith merchandise. Han offered to sell one of the two crates of treasure, to which Sprool agreed. He then asked Sprool to take the second crate to [[Jabba Desilijic Tiure/Legends|Jabba]] the [[Hutt/Legends|Hutt]], to settle the bounty that was on his head. Solo received 500,000 [[Galactic Credit Standard|credits]] from Sprool, and took it back to the Rebel Base on Yavin. Before Leia had him detained, he explained why he had taken the treasure, and presented the [[Prince/Legends|Prince]]ss with the credits for the new [[T-65 X-wing starfighter|X-wings]] needed to replenish the fleet. Leia, confused, dismissed the guards and allowed Solo to go free. |
| − | Back on [[Tatooine]], at [[Jabba's Palace]], Sprool presented the Hutt with Solo's second treasure crate. Jabba accepted, but refused to call off the bounty. |
+ | Back on [[Tatooine/Legends|Tatooine]], at [[Jabba's Palace/Legends|Jabba's Palace]], Sprool presented the Hutt with Solo's second treasure crate. Jabba accepted, but refused to call off the bounty. |
==Appearances== |
==Appearances== |
||
{{App |
{{App |
||
|characters= |
|characters= |
||
| − | *[[C-3PO]] |
+ | *[[C-3PO/Legends|C-3PO]] |
| − | *[[Chewbacca]] |
+ | *[[Chewbacca/Legends|Chewbacca]] |
| − | *[[Salacious B. Crumb]] |
+ | *[[Salacious B. Crumb/Legends|Salacious B. Crumb]] |
| ⚫ | |||
| − | *[[Boba Fett]] |
+ | *[[Boba Fett/Legends|Boba Fett]] |
| − | *[[Bib Fortuna]] |
+ | *[[Bib Fortuna/Legends|Bib Fortuna]] |
*[[Leia Organa Solo|Leia Organa]] |
*[[Leia Organa Solo|Leia Organa]] |
||
*[[Q-7N]] {{1st}} |
*[[Q-7N]] {{1st}} |
||
| − | *[[R2-D2]] |
+ | *[[R2-D2/Legends|R2-D2]] |
| − | *[[Luke Skywalker]] |
+ | *[[Luke Skywalker/Legends|Luke Skywalker]] |
| − | *[[Han Solo]] |
+ | *[[Han Solo/Legends|Han Solo]] |
| − | *[[Sprool |
+ | *[[Sprool]] {{1st}} |
| + | *[[Anakin Skywalker/Legends|Darth Vader]] {{Imo}} |
||
| ⚫ | |||
|creatures= |
|creatures= |
||
| ⚫ | |||
|droids= |
|droids= |
||
| − | *[[ |
+ | *[[3PO-series protocol droid]] |
| ⚫ | |||
| − | **[[R-series]] |
||
| − | + | *[[R2-series astromech droid]] |
|
| − | *[[Protocol droid]] |
||
| − | **[[3PO-series protocol droid]] |
||
| ⚫ | |||
|events= |
|events= |
||
| Line 65: | Line 67: | ||
|locations= |
|locations= |
||
*[[Dennogra]] {{1st}} |
*[[Dennogra]] {{1st}} |
||
| − | **[[Zio Snaffkin]] |
+ | **[[Zio Snaffkin]] {{1st}} |
***[[Zio Snaffkin Cantina]] {{1st}} |
***[[Zio Snaffkin Cantina]] {{1st}} |
||
| − | *[[Tatooine]] |
+ | *[[Tatooine/Legends|Tatooine]] |
| − | **[[Jabba's Palace]] |
+ | **[[Jabba's Palace/Legends|Jabba's Palace]] |
| − | *[[Yavin]] |
+ | *[[Yavin Four]] |
| − | **[[ |
+ | **[[Ancient Fortress]] |
| − | + | **[[Great Temple (Yavin 4)|Great Temple]] |
|
| − | + | *[[Yavin Prime]] |
|
|organizations= |
|organizations= |
||
| + | *[[Bounty hunter/Legends|Bounty hunter]] {{Mo}} |
||
| − | *[[Alliance to Restore the Republic|Rebel Alliance]] |
||
| − | + | *[[Galactic Empire/Legends|Galactic Empire]] {{Mo}} |
|
| ⚫ | |||
| + | *[[Princess]] |
||
| + | *[[Rebel Alliance]] |
||
| ⚫ | |||
**[[Rebel Trooper]] |
**[[Rebel Trooper]] |
||
| + | *[[Smuggler/Legends|Smuggler]] |
||
| ⚫ | |||
| − | *[[Galactic Empire]] {{Mo}} |
||
| ⚫ | |||
|species= |
|species= |
||
| + | *[[Gamorrean/Legends|Gamorrean]] |
||
| − | *[[Aqualish]] |
||
| − | *[[ |
+ | *[[Human/Legends|Human]] |
| + | **[[Corellian/Legends|Corellian]] |
||
| − | *[[Gran]] |
||
| − | *[[ |
+ | *[[Hutt/Legends|Hutt]] |
| ⚫ | |||
| − | *[[Hutt]] |
||
| ⚫ | |||
| ⚫ | |||
| ⚫ | |||
| ⚫ | |||
| ⚫ | |||
| ⚫ | |||
| ⚫ | |||
| ⚫ | |||
| ⚫ | |||
|vehicles= |
|vehicles= |
||
| − | *[[ |
+ | *[[Death Star I]] {{Mo}} |
*[[Rebel personnel carrier]] |
*[[Rebel personnel carrier]] |
||
*[[T-65 X-wing starfighter]] |
*[[T-65 X-wing starfighter]] |
||
| − | *[[TIE Advanced x1]] {{ |
+ | *[[TIE Advanced x1/Legends|TIE Advanced x1]] {{Imo}} |
| + | **[[Darth Vader's TIE Advanced x1]] {{Imo}} |
||
| − | *[[X-34 landspeeder]] |
+ | *[[X-34 landspeeder/Legends|X-34 landspeeder]] |
| − | *[[YT-1300 light freighter]] |
+ | *[[YT-1300 light freighter/Legends|YT-1300 light freighter]] |
| − | **''[[Millennium Falcon]]'' |
+ | **''[[Millennium Falcon/Legends|Millennium Falcon]]'' |
|technology= |
|technology= |
||
| ⚫ | |||
| − | *[[Blaster]] |
||
| ⚫ | |||
| − | **[[Blaster pistol]] |
||
| + | *[[Glow rod]] |
||
| ⚫ | |||
| + | *[[Hyperdrive/Legends|Hyperdrive]] {{Mo}} |
||
| ⚫ | |||
| + | *[[Mandalorian armor/Legends|Mandalorian armor]] |
||
| − | *[[Glowrod]] |
||
| ⚫ | |||
|miscellanea= |
|miscellanea= |
||
| − | *[[ |
+ | *[[Credit]] {{Mo}} |
| − | *[[Nerf herder]] {{Mo}} |
+ | *[[Nerf herder/Legends|Nerf herder]] {{Mo}} |
| + | *[[Shyriiwook/Legends|Shyriiwook]] |
||
| − | *[[Spice]] {{Mo}} |
+ | *[[Spice/Legends|Spice]] {{Mo}} |
}} |
}} |
||
| Line 122: | Line 126: | ||
==Collections== |
==Collections== |
||
| + | {{Imagecat|Images from The Rebel Thief}} |
||
| + | |||
*''[[Omnibus: Wild Space Volume 1]]'' |
*''[[Omnibus: Wild Space Volume 1]]'' |
||
{{Star Wars Kids comics}} |
{{Star Wars Kids comics}} |
||
| − | [[Category: |
+ | [[Category:Star Wars Kids comic strips]] |
Revision as of 23:45, 10 December 2015
Warning: This infobox has missing parameters: reprinted in, illustrator, release date and unrecognized parameters: issue number, era, publication date
- "Hmmm. I accept Solo's most generous gift! As for calling off the bounty, tell Solo…'Fat chance!'"
- ―Jabba Desilijic Tiure
The Rebel Thief is a five part comic written by Ryder Windham and illustrated by Gary Erskine, and was published in issues #1-#5 of the magazine, Star Wars Kids. It tells the story of how the Rebel Alliance was able to finance replacement X-wings for the ones they lost at the Battle of Yavin.
Plot summary
Han Solo, while staying on Yavin 4, hears of a temple filled with ancient Sith treasure, not far from the main Rebel Base. With Chewbacca, he sets out to find the temple, without telling Leia Organa and Luke Skywalker. Q-7N, however, alerts Leia to their plan, and she, with Luke, sets out after them.
Han reaches the temple, and while trying to take the treasure, is confronted by an ancient Sith battle droid. Chewbacca destroys the droid, and the two quickly gather the treasure and load it onto the Millennium Falcon. They take off, just as Leia and Luke arrive in a landspeeder. Leia assumes that Han has stolen the treasure for his own personal benefit, and orders his arrest, should he return.

Han Solo enters Zio Snaffkin Cantina.
Meanwhile, Han and Chewbacca fly to Dennogra, home of Sprool the Trader. After landing at Zio Snaffkin Spaceport, Han wanders into a cantina, where he is confronted by an Aqualish bounty hunter. Han kills the bounty hunter, and declares, "That's it for the entertainment folks! I'm looking for Sprool!"
Sprool, an Ithorian, quickly identified himself, and was invited onboard the Falcon to inspect the Sith merchandise. Han offered to sell one of the two crates of treasure, to which Sprool agreed. He then asked Sprool to take the second crate to Jabba the Hutt, to settle the bounty that was on his head. Solo received 500,000 credits from Sprool, and took it back to the Rebel Base on Yavin. Before Leia had him detained, he explained why he had taken the treasure, and presented the Princess with the credits for the new X-wings needed to replenish the fleet. Leia, confused, dismissed the guards and allowed Solo to go free.
Back on Tatooine, at Jabba's Palace, Sprool presented the Hutt with Solo's second treasure crate. Jabba accepted, but refused to call off the bounty.
Appearances
| Characters | Organisms | Droid models | Events | Locations |
| Organizations and titles | Sentient species | Vehicles and vessels | Weapons and technology | Miscellanea |
Characters
|
Organisms
|
Droid models
Locations
|
Organizations and titles
|
Sentient species
Vehicles and vessels
|
Weapons and technology
|
Miscellanea
|
Continuity errors
In this story Han claims he has returned his award money back to the Rebels. This, however, contradicts with the early Marvel issues, where it was stolen by Crimson Jack.
Collections
Template:Star Wars Kids comics